Here you can find the list of origami diagrams in this website. Not all of my published models have diagrams available yet, but you can find instructions for all of them in my YouTube Channel.
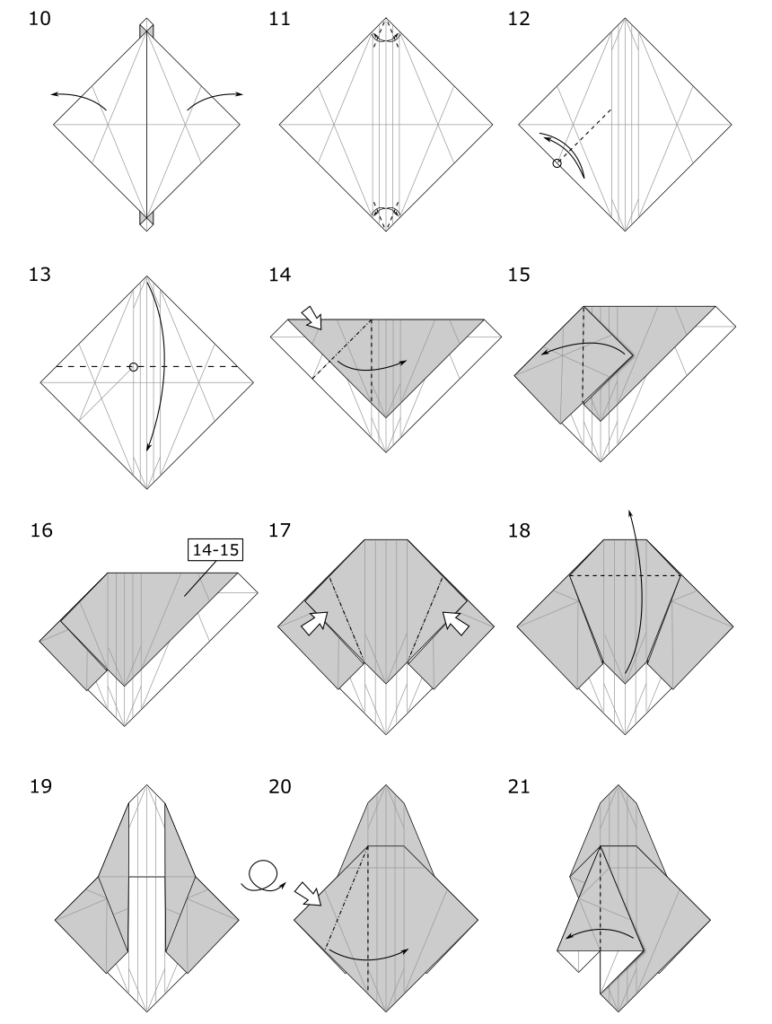
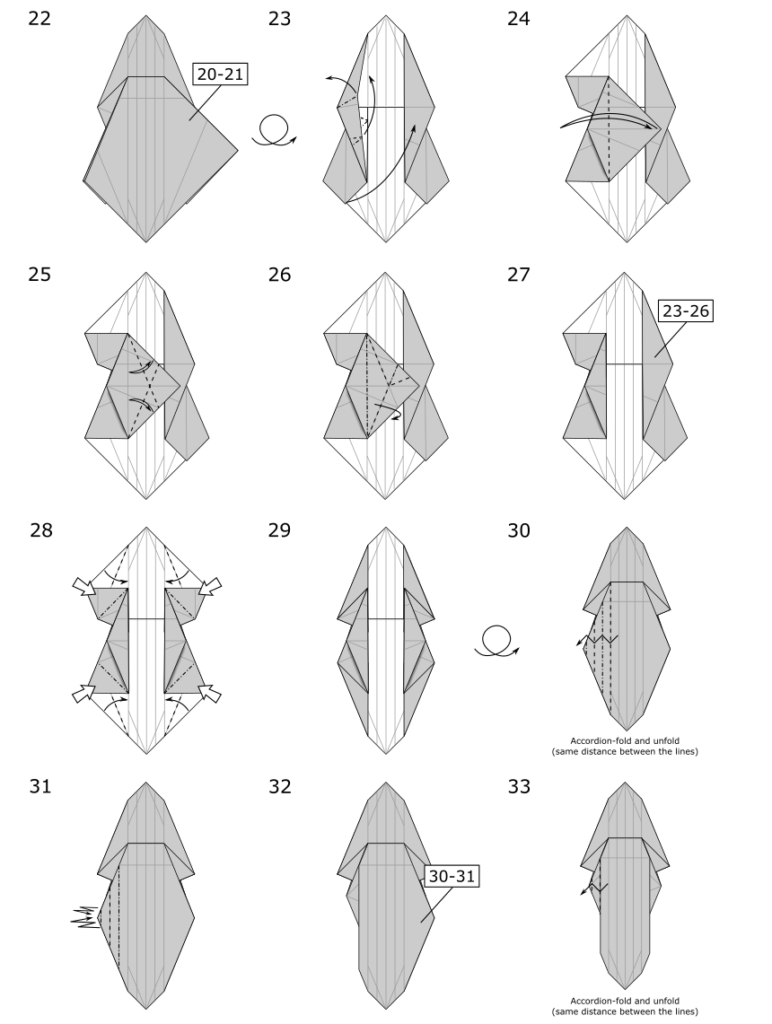
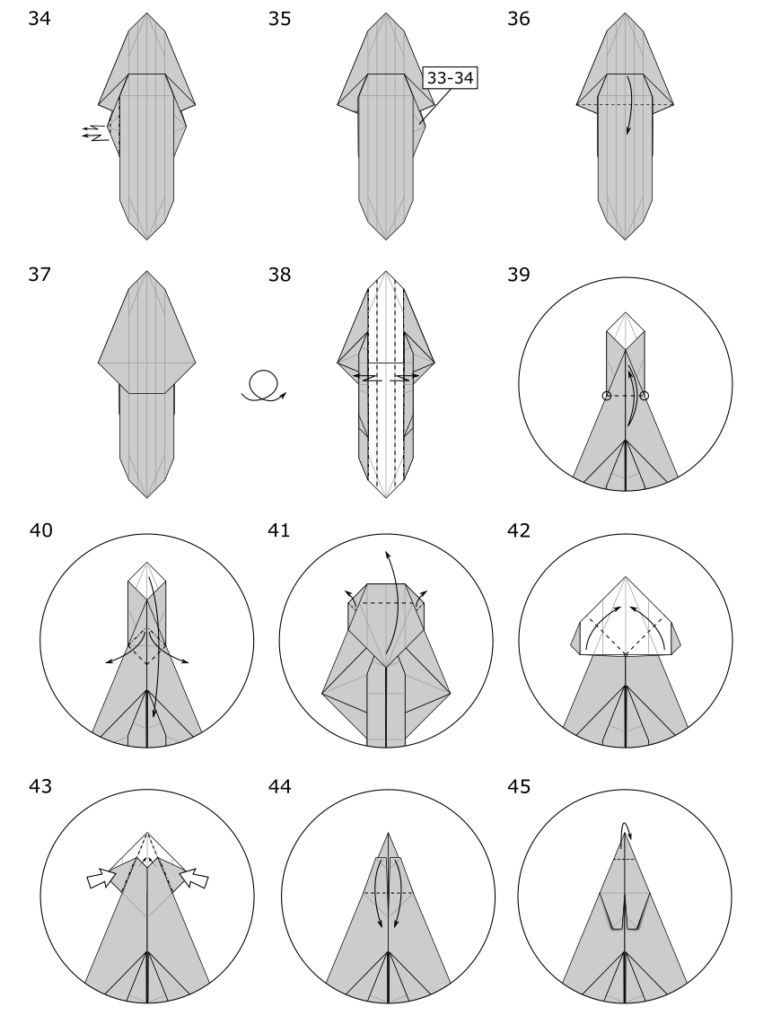
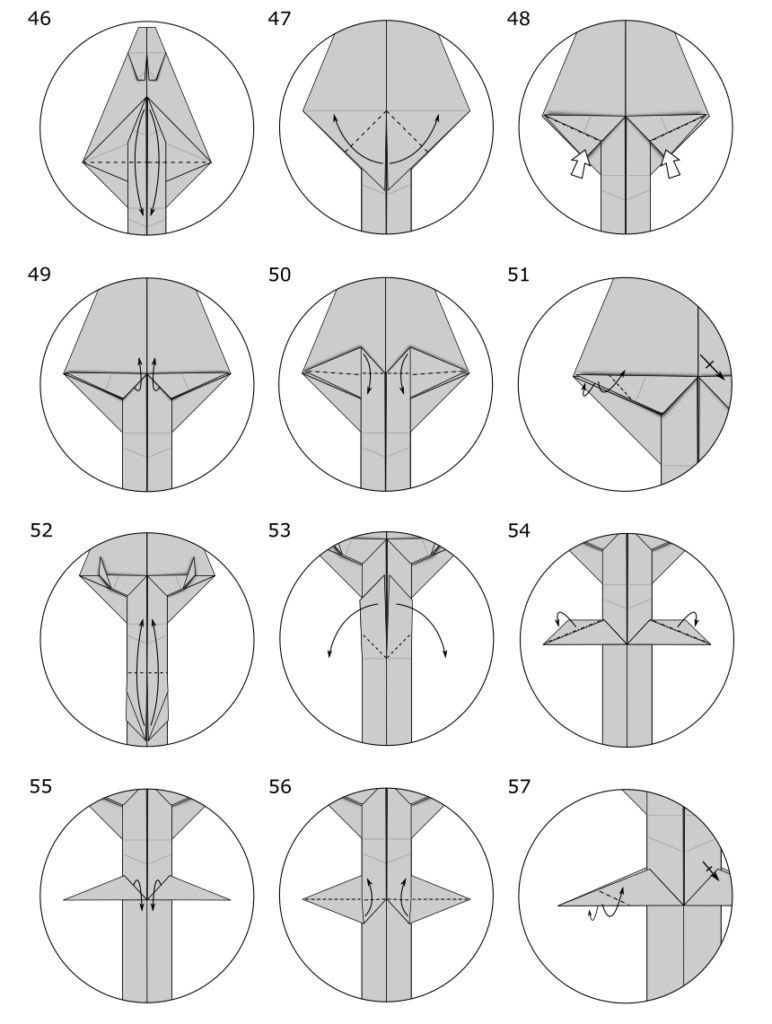
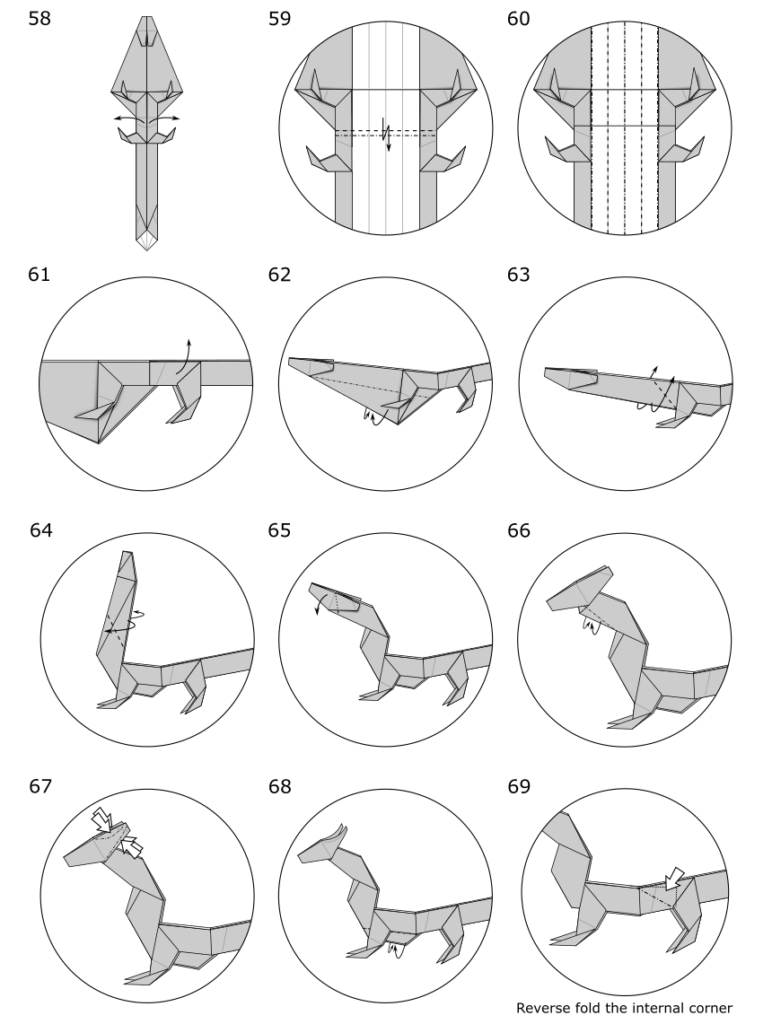
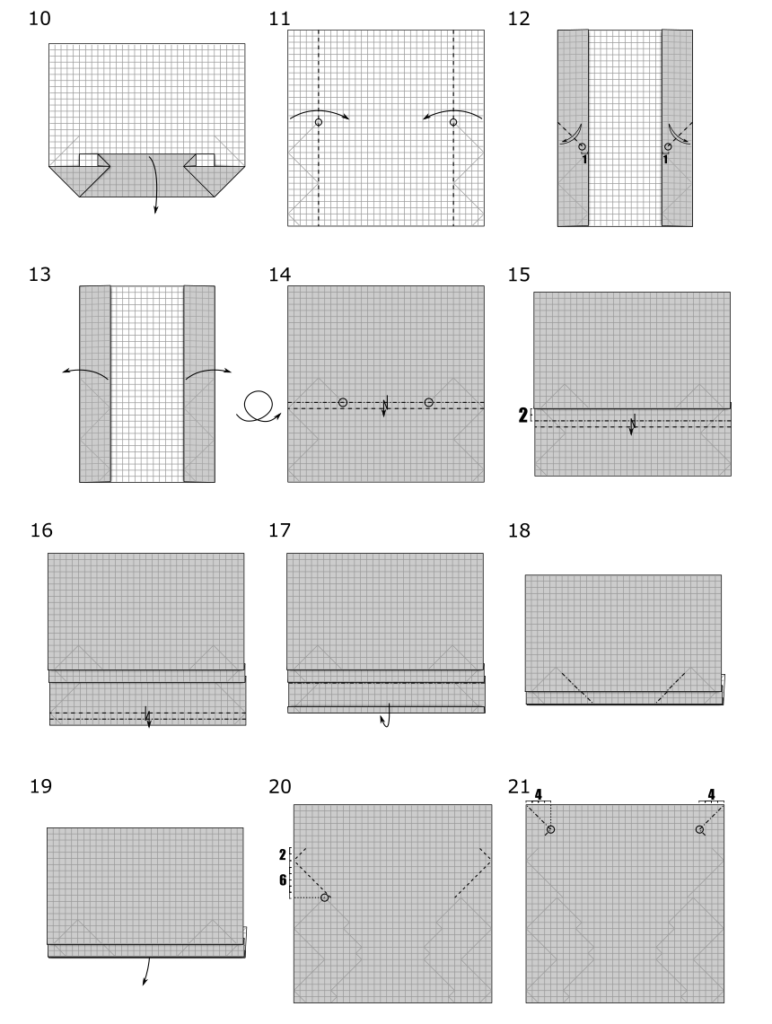
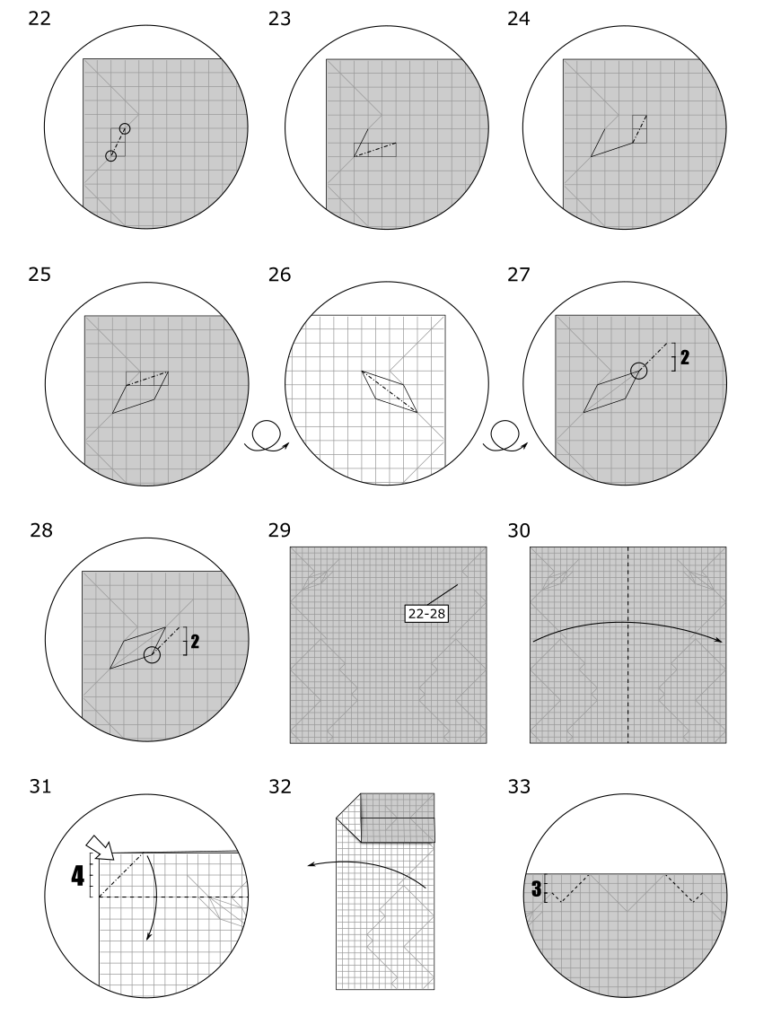
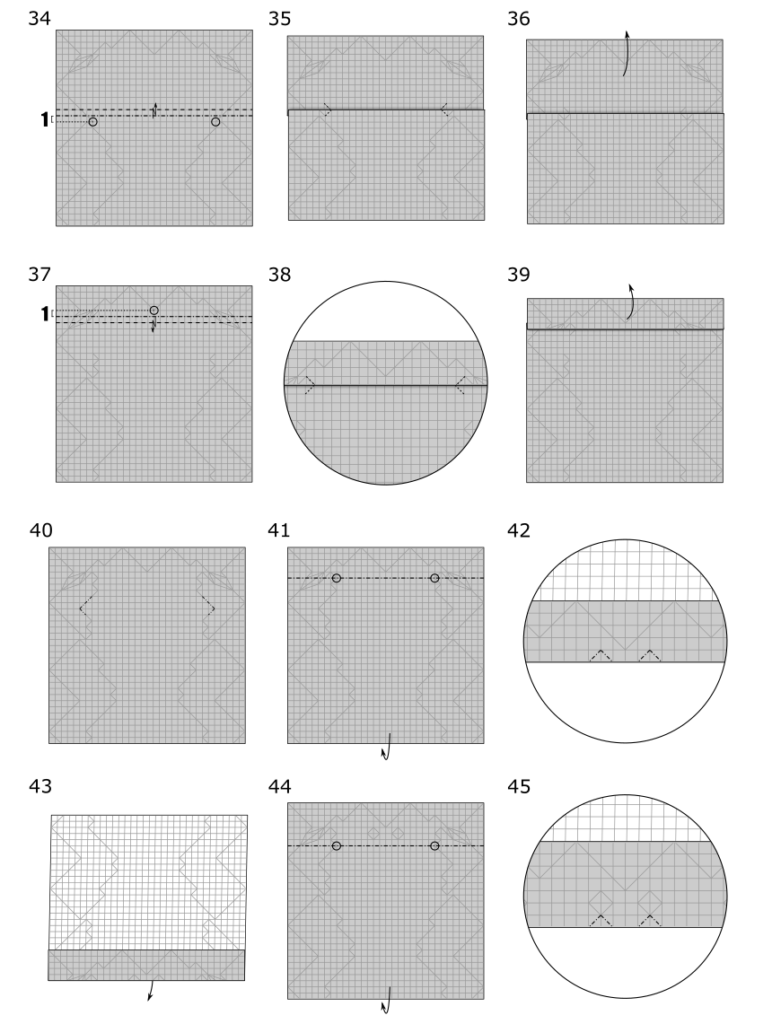
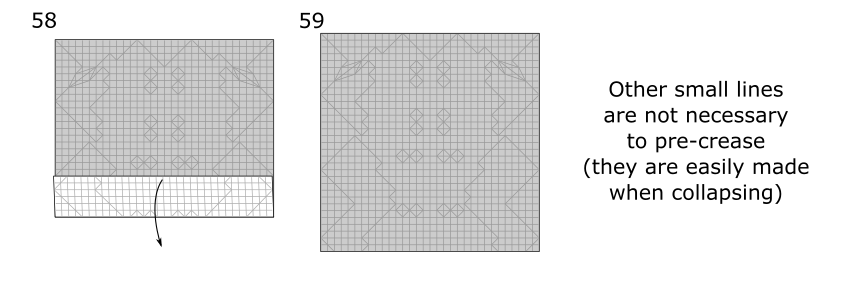
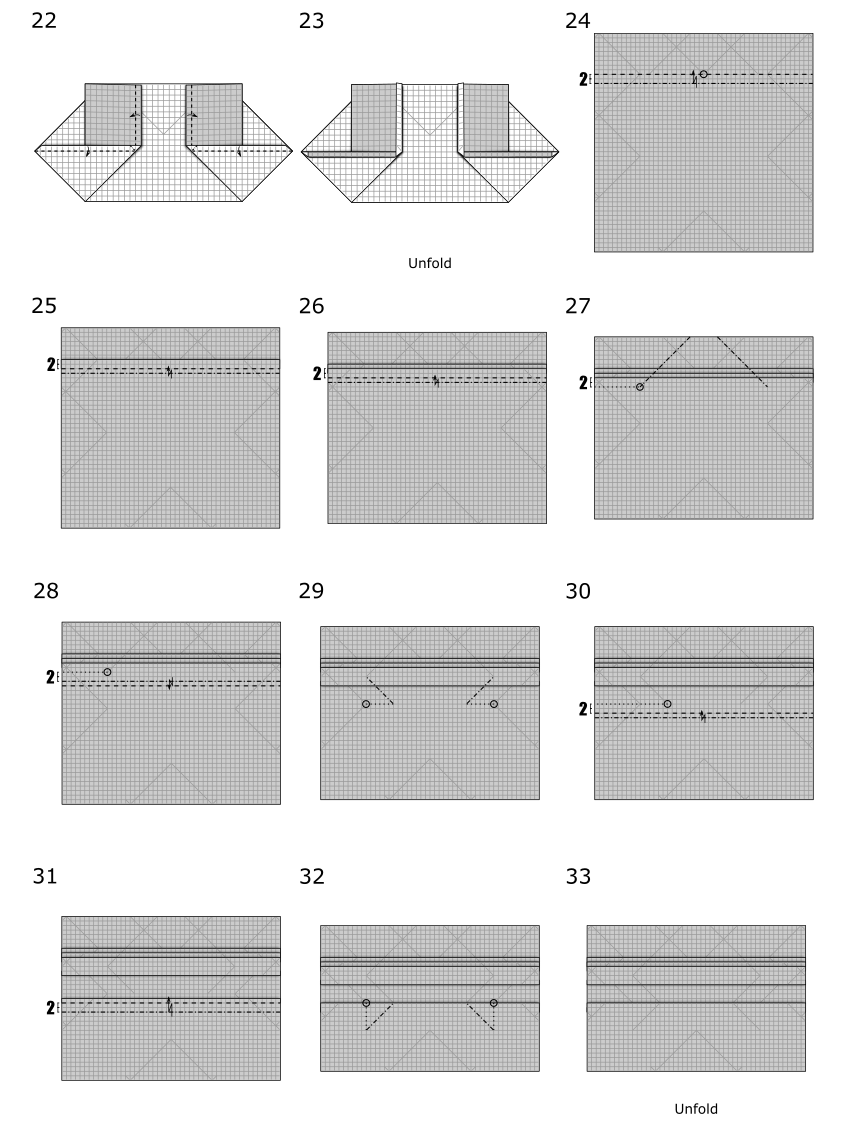
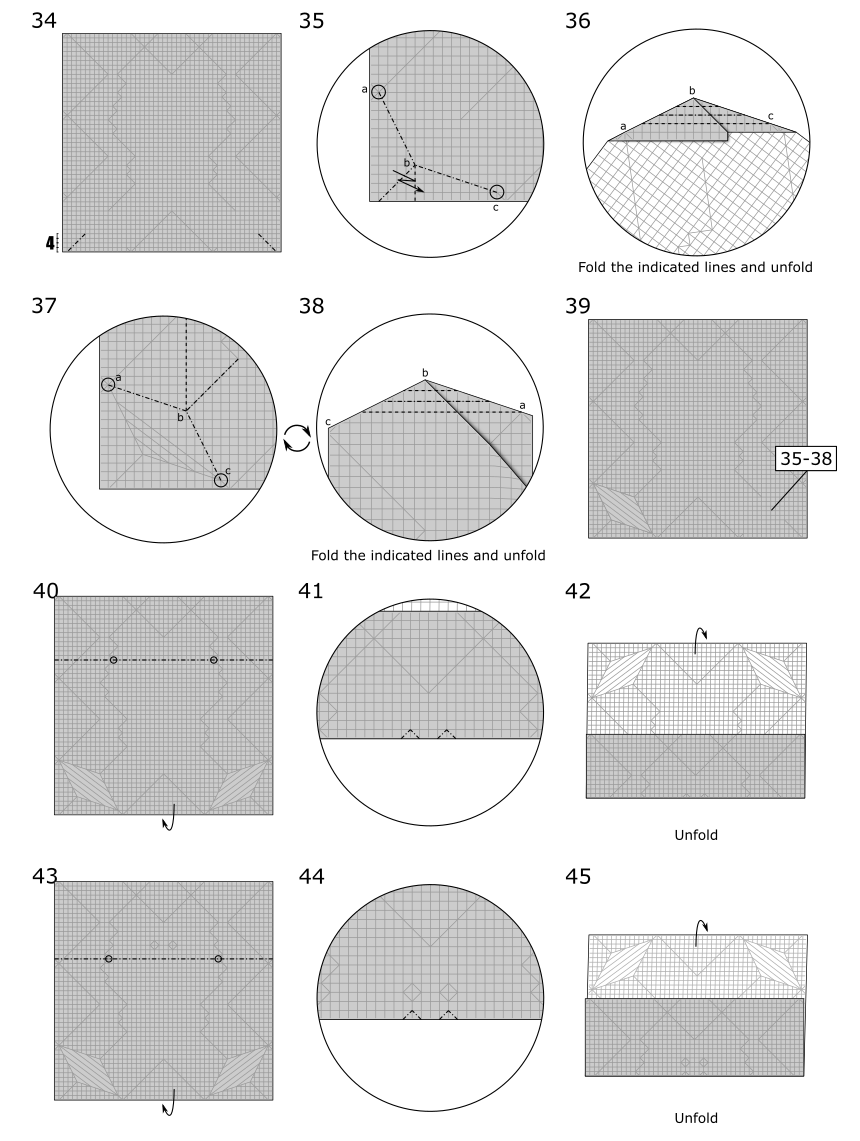
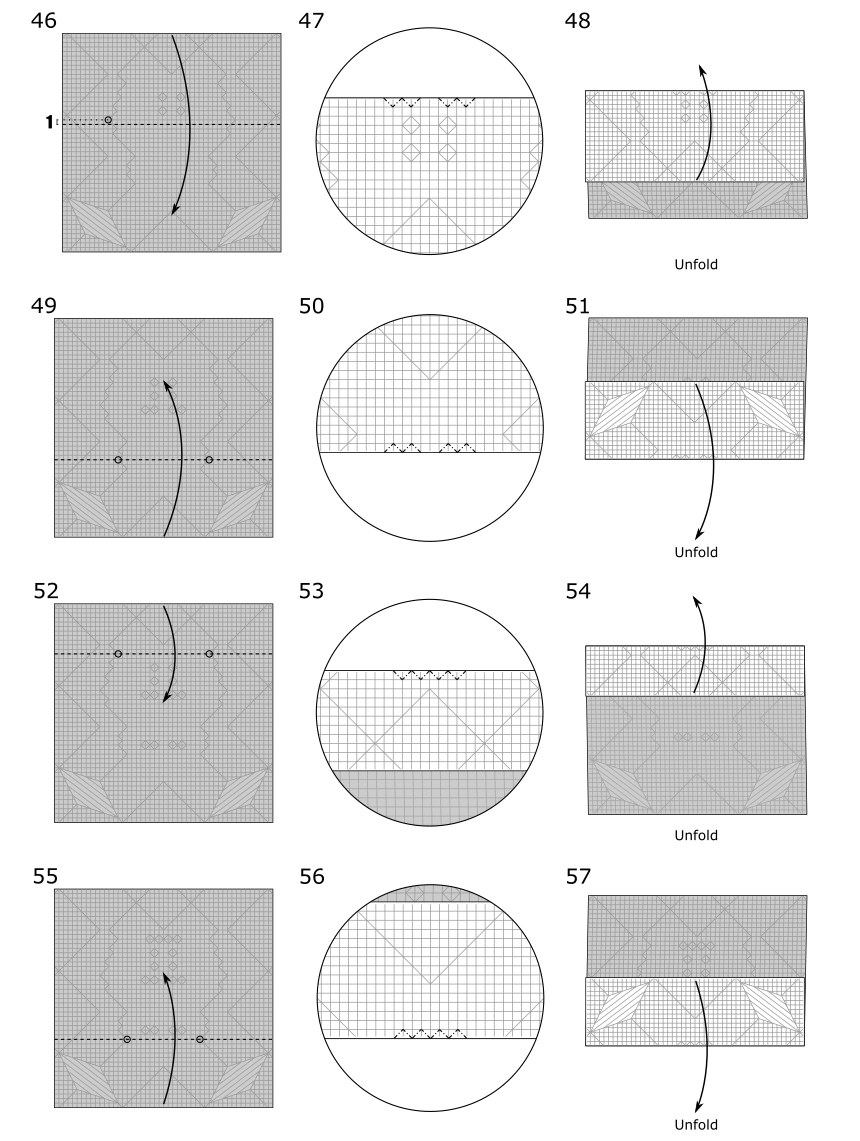
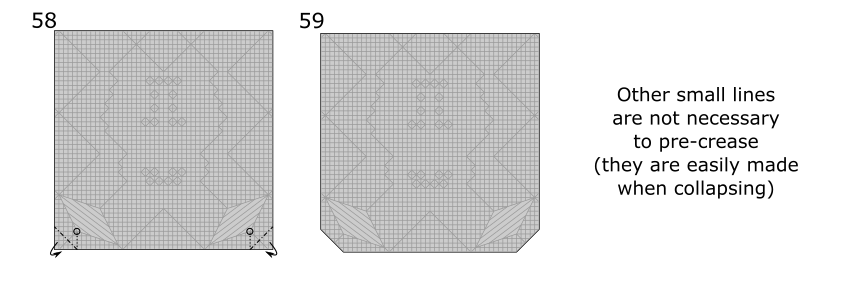
Origami Eastern Dragon designed by Jo Nakashima (12/2023) Difficulty level: intermediate
Learn how to make an origami Eastern Dragon for 2024, the year of the dragon according to the Chinese zodiac. I’ve already created a few dragons before, but all of them were western dragons with wings and larger bodies. The eastern dragon has a long snake-like body with four legs and they can fly without wings.
The head is the same as the origami Dragon v3, but the base is similar to the Chameleon.
Origami Eastern Dragon Diagrams
Support my work!
If you like my work, please consider visiting and subscribing to my YouTube channel! You’ll find all my work, including models that are not in this website and also models from other origami artists. The easiest way to support my work is simply watching my videos, clicking the like button, leaving comments and subscribing to my channel!
You can also contribute with small donations on Patreon or YouTube Channel Membership. It’s basically like paying me a tip as a thanks for my work and get some rewards in return, like early access to my tutorials and your name in the video (the “thank you” list). They work with recurring payments, but you can cancel anytime so one-time donations are also possible.
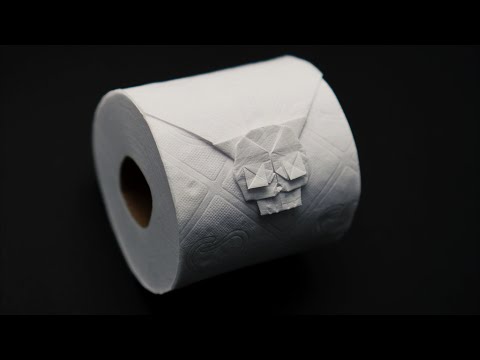
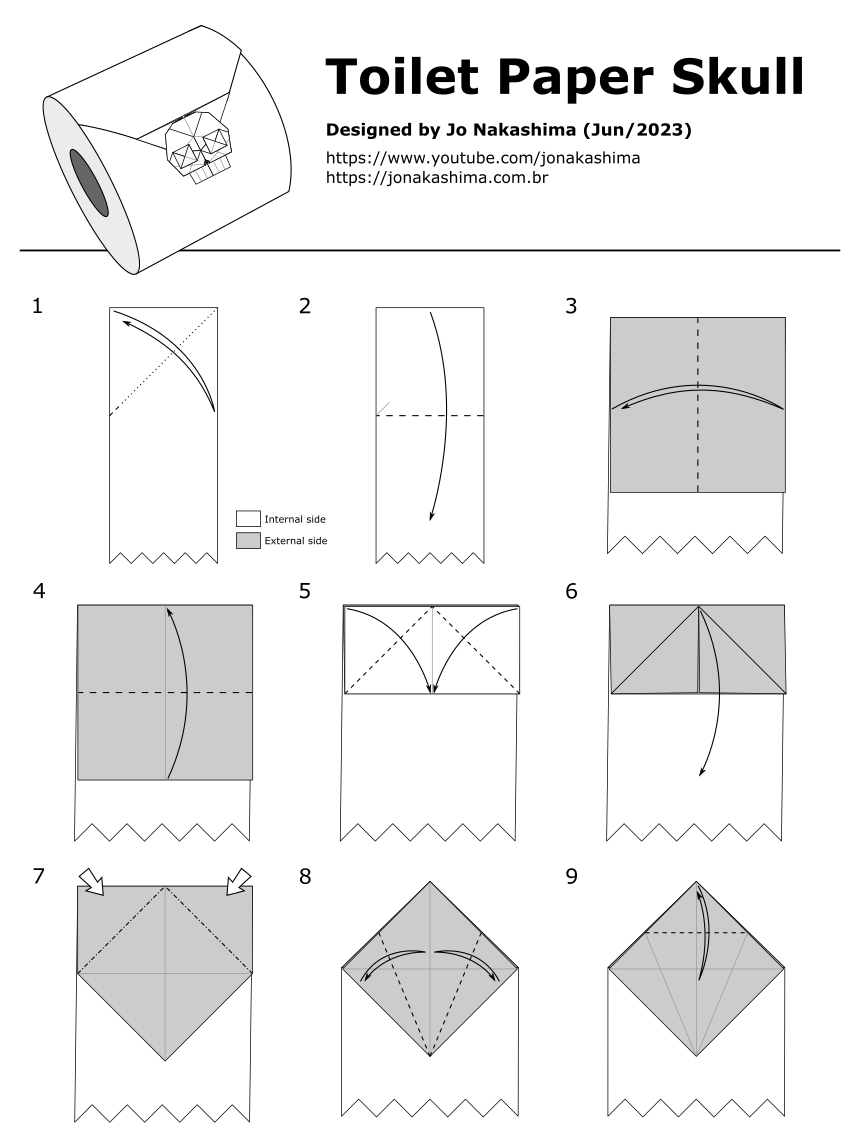
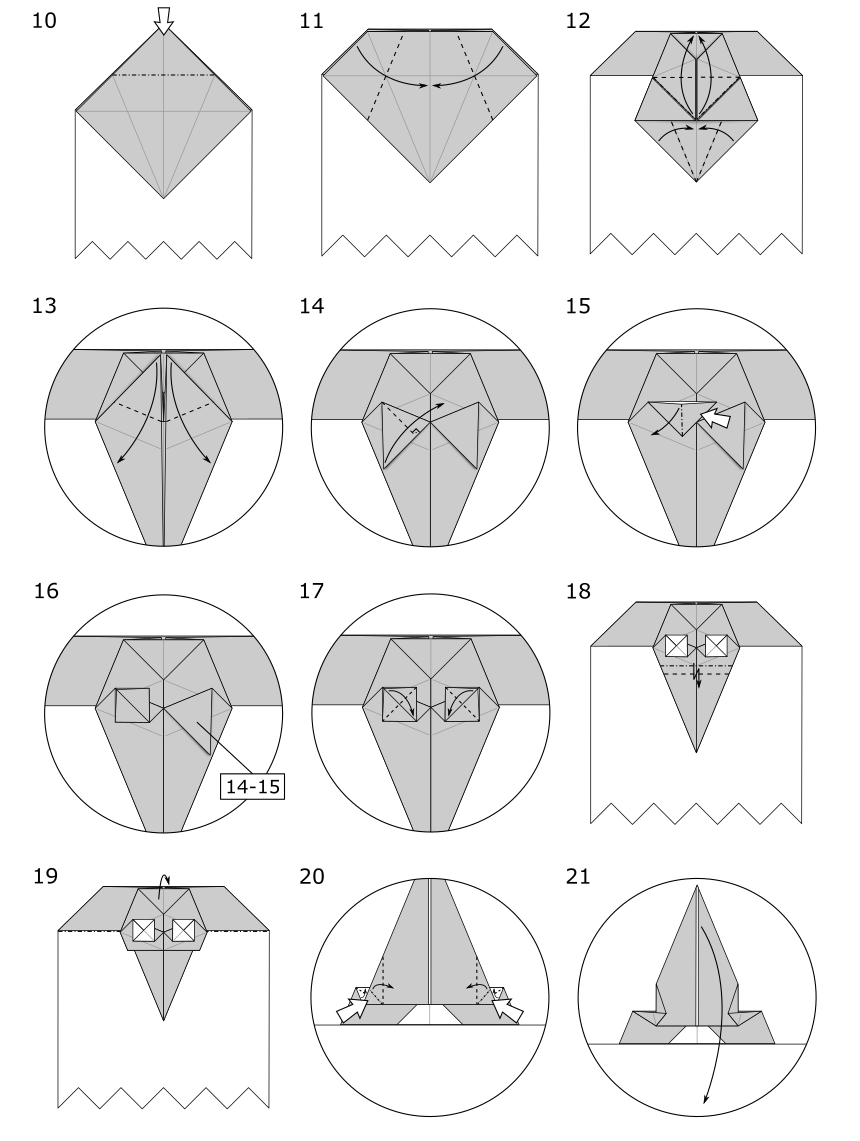
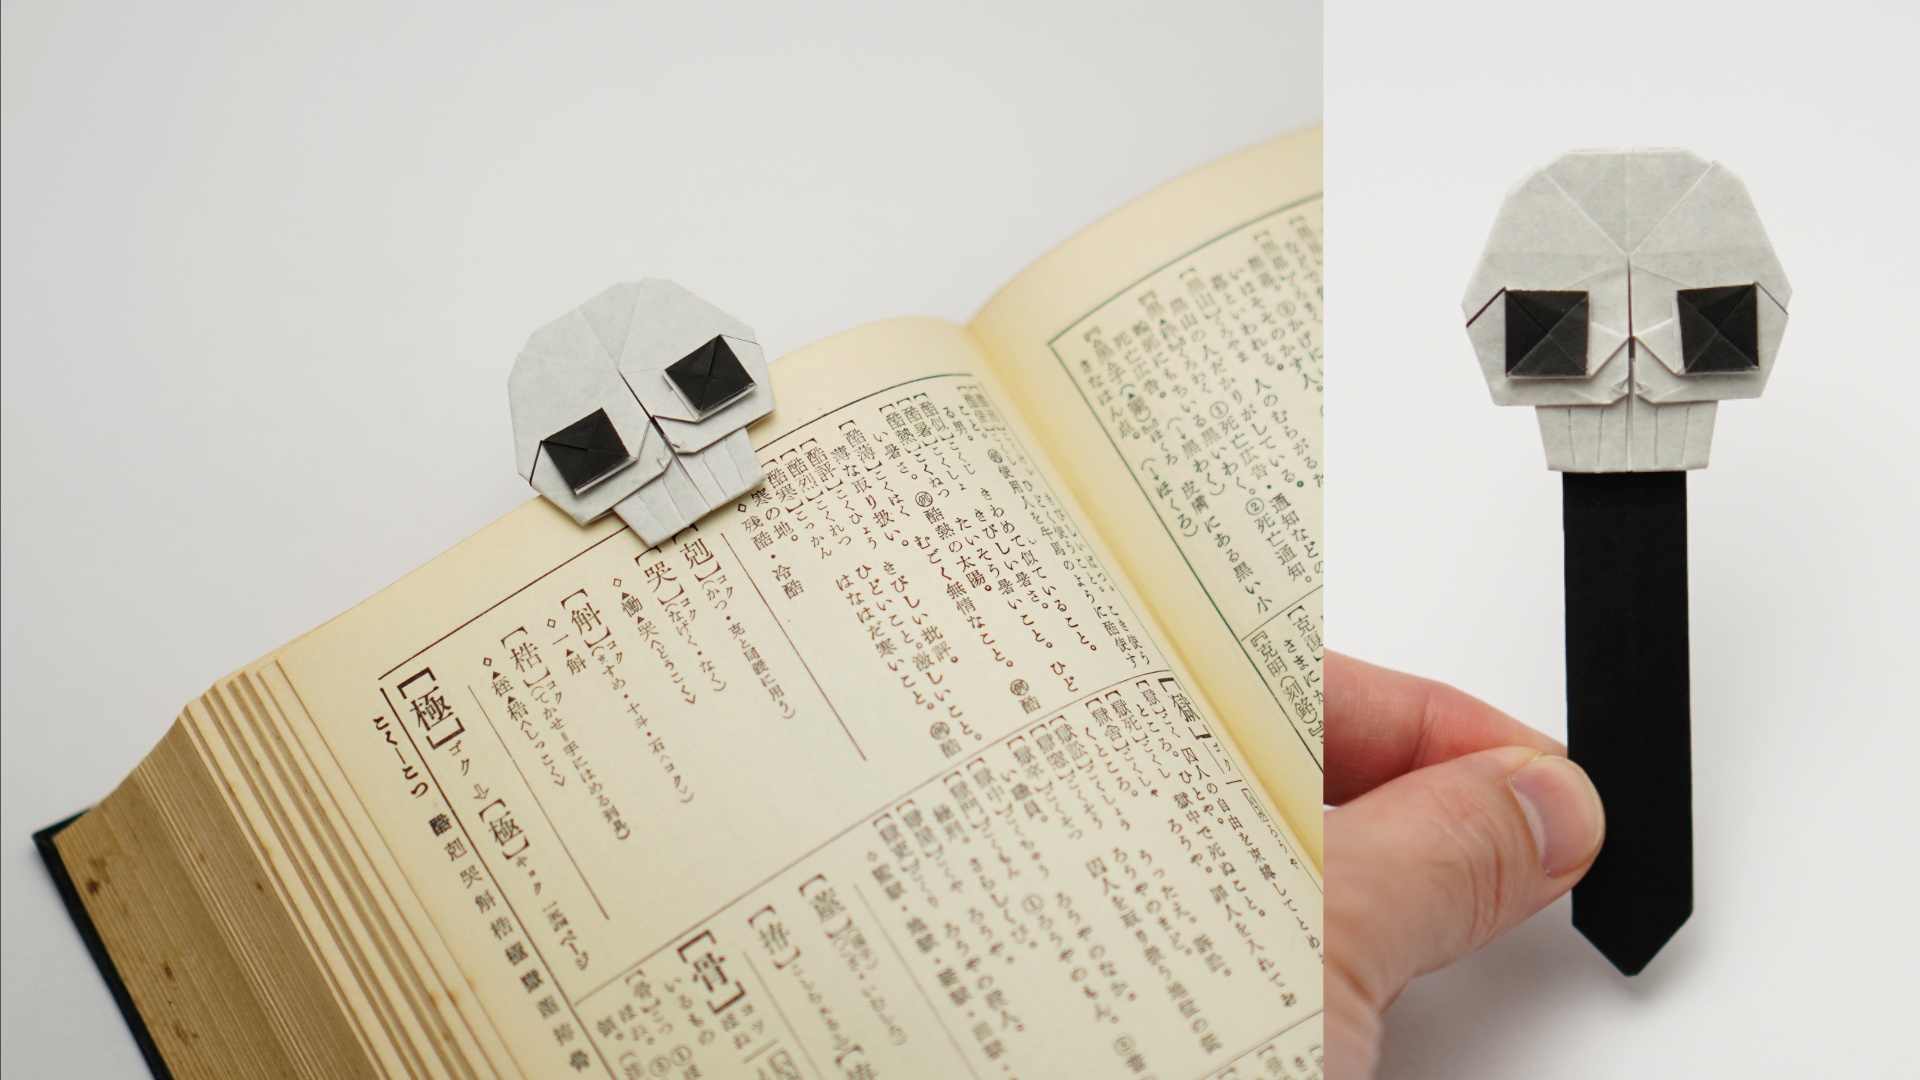
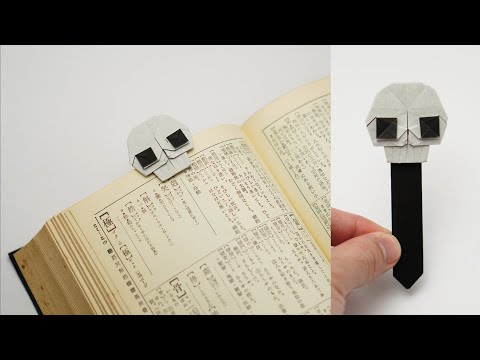
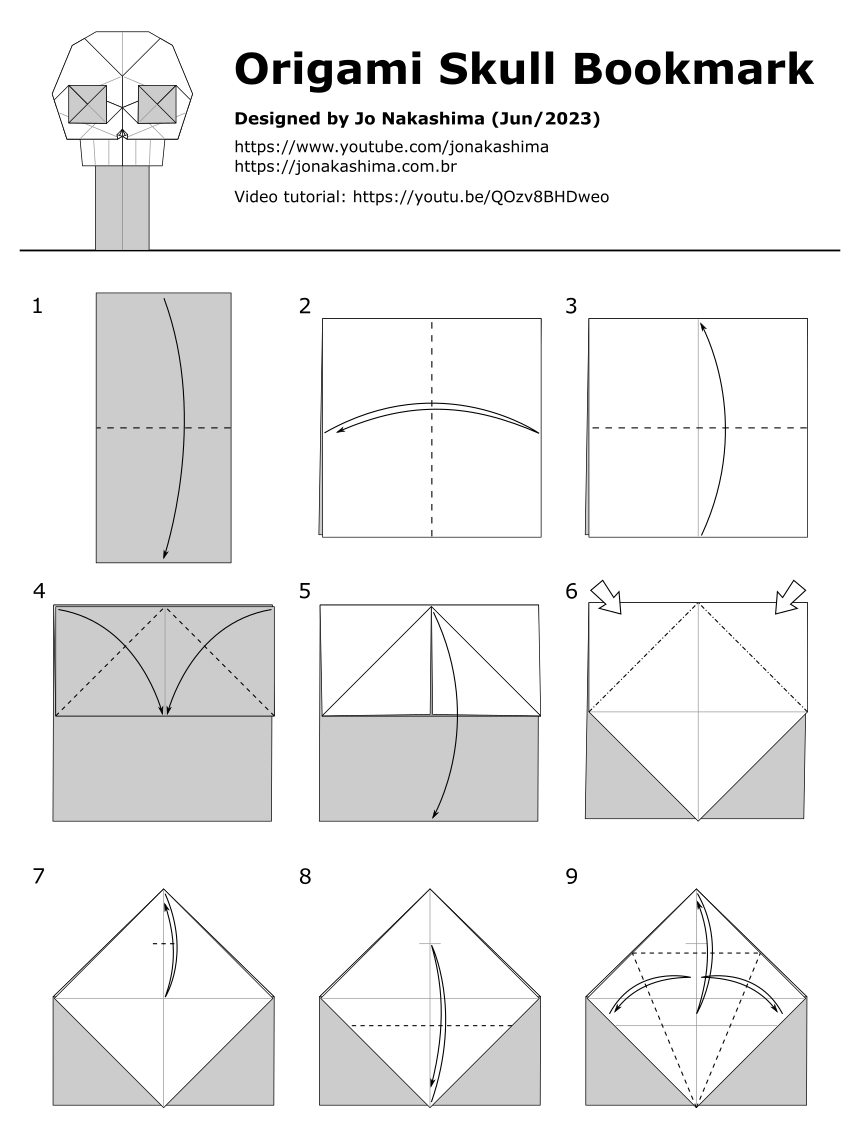
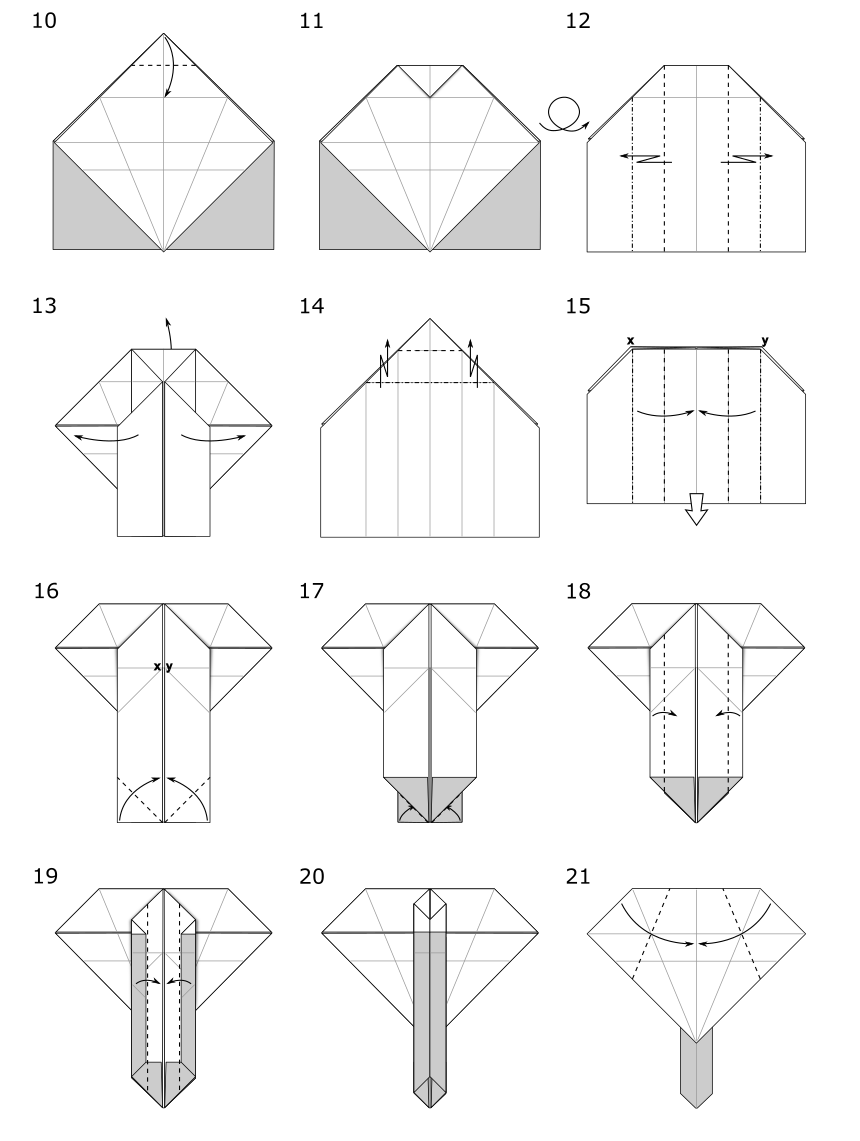
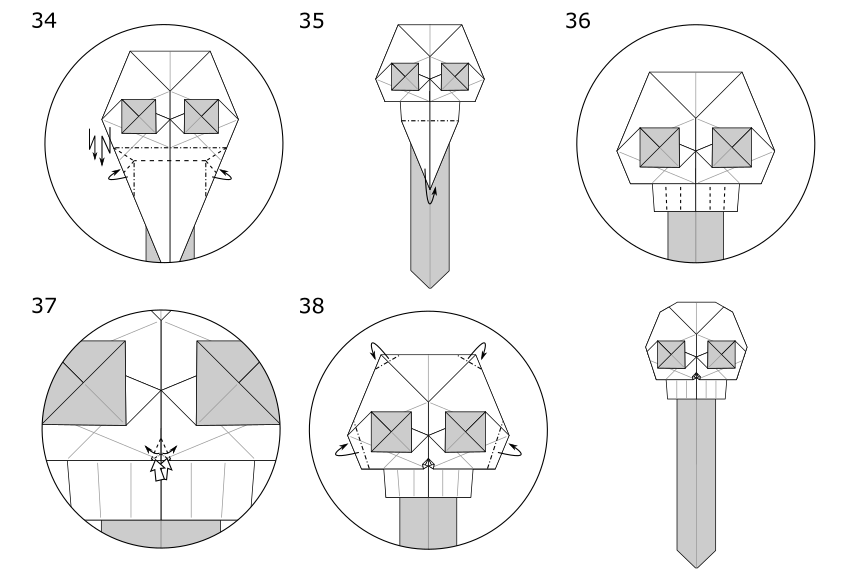
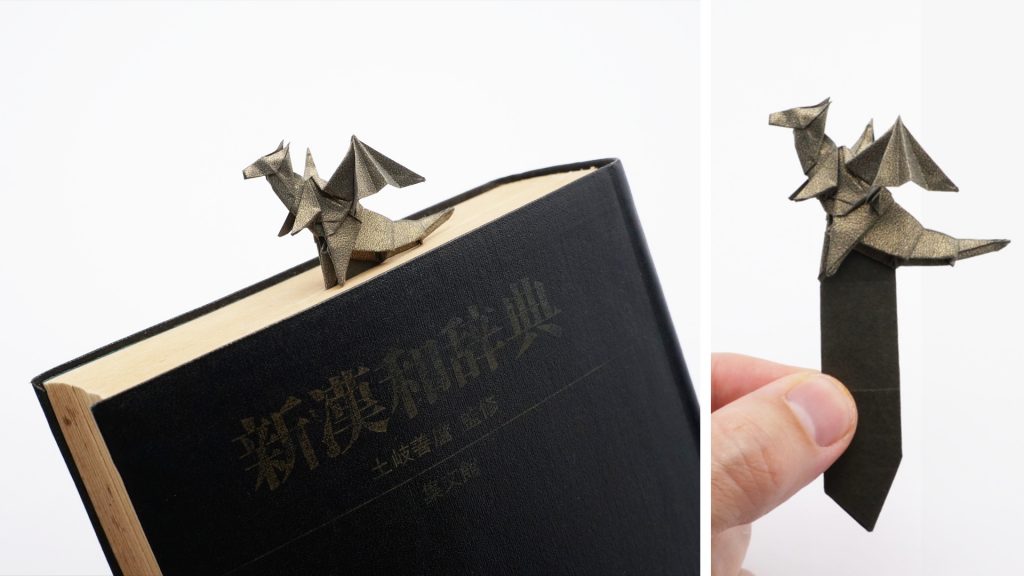
Toilet Paper Skull designed by Jo Nakashima (06/2023) Difficulty level: low intermediate
Learn how to make an origami skull on toilet paper. This model is the same as my origami Skull Bookmark, but without the stick. The steps aren’t too complicated, but folding it using toilet paper can be a bit tricky.
Origami Toilet Paper Skull diagrams
Optionally you can skip the step 23 (a crimp fold) to make it easier, but won’t be possible to make the nose later (step 26).
If you like my work, please consider visiting and subscribing to my YouTube channel! You’ll find all my work, including models that are not in this website and also models from other origami artists. The easiest way to support my work is simply watching my videos, clicking the like button, leaving comments and subscribing to my channel!
You can also contribute with small donations on Patreon or YouTube Channel Membership. It’s basically like paying me a tip as a thanks for my work and get some rewards in return, like early access to my tutorials and your name in the video (the “thank you” list). They work with recurring payments, but you can cancel anytime so one-time donations are also possible.
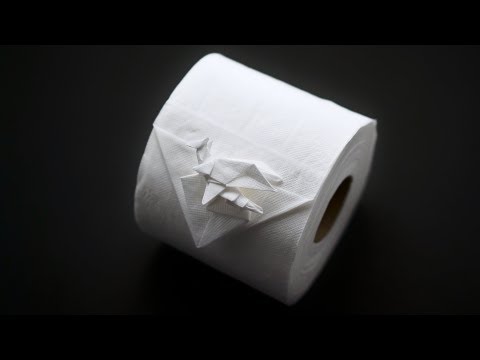
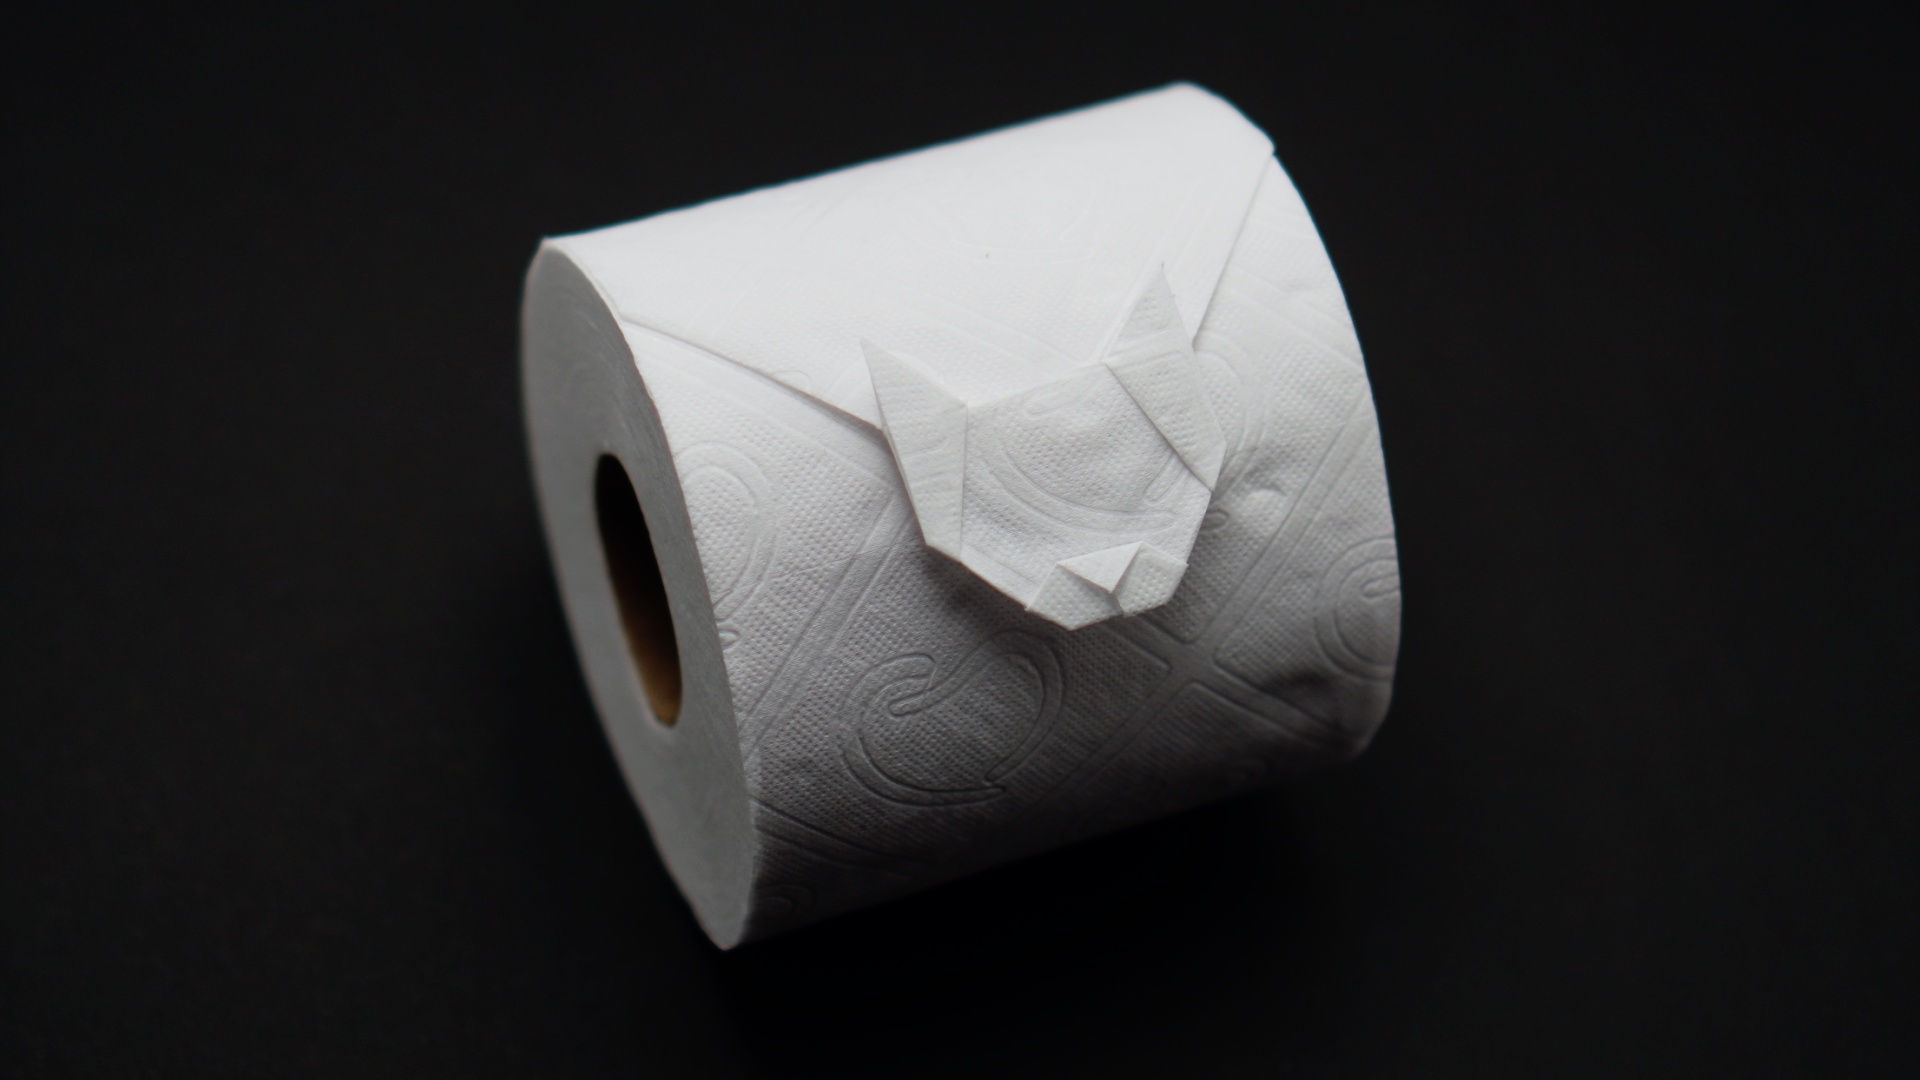
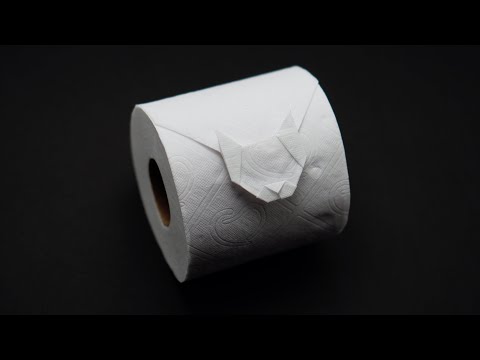
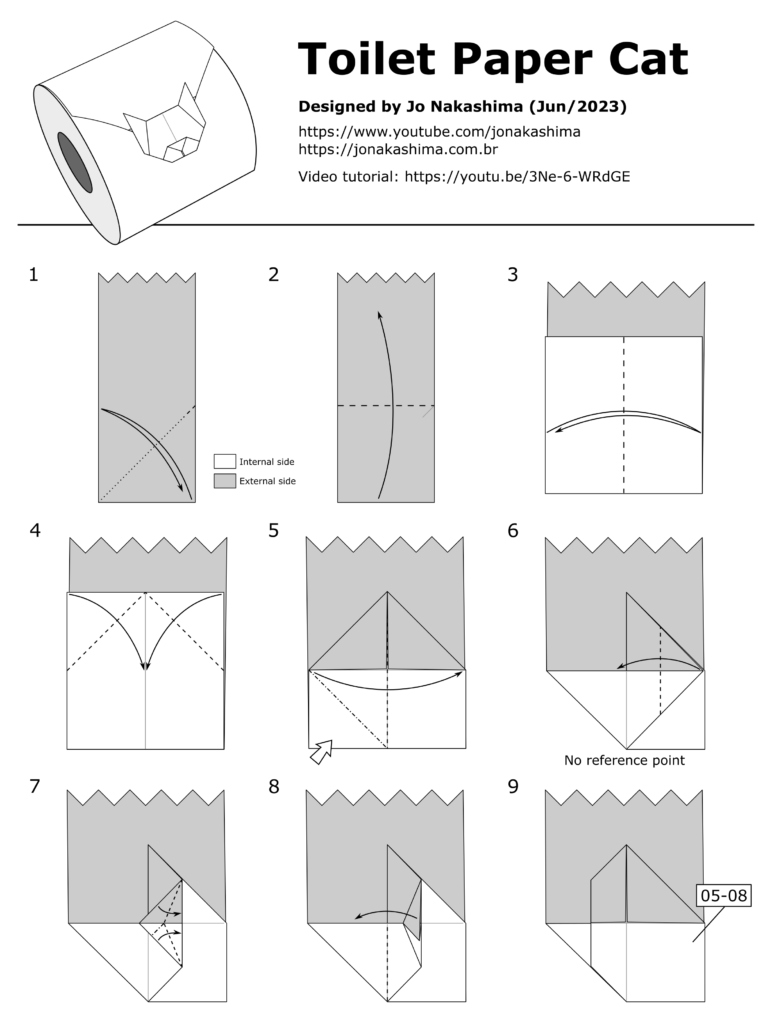
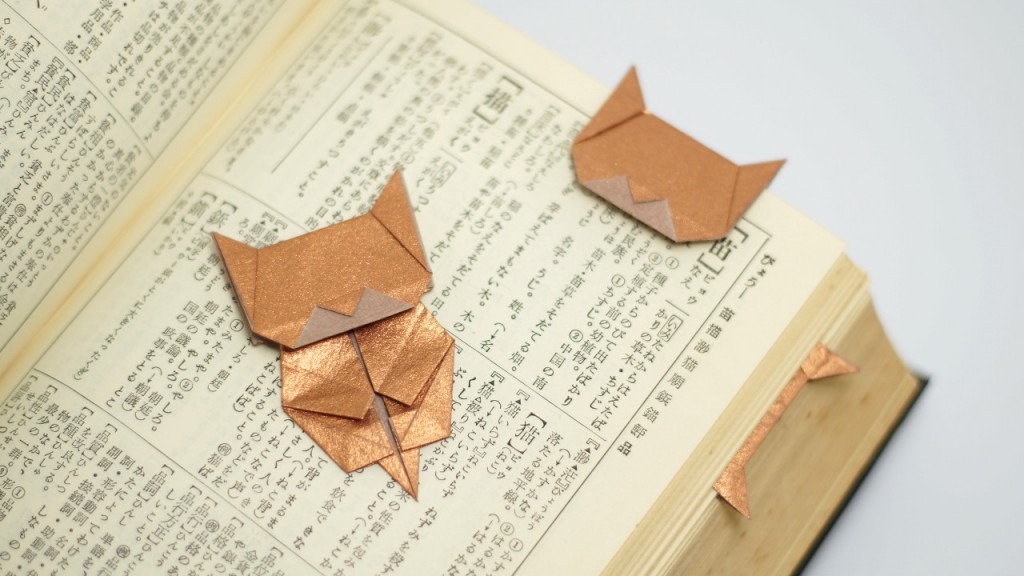
Toilet Paper Cat Designed by Jo Nakashima (06/2023) Difficulty level: simple
Learn how to make an easy origami cat face on toilet paper. Based on one of my first designs, the origami Neko created in 2010. If you don’t have a real cat to accompany you while pooping, now you can make at least a paper version!
Toilet Paper Cat Diagrams
More Toilet Paper Origami
See also more origami models that you can fold on toilet paper in this playlist!
Support my work!
If you like my work, please consider visiting and subscribing to my YouTube channel! You’ll find all my work, including models that are not in this website and also models from other origami artists. The easiest way to support my work is simply watching my videos, clicking the like button, leaving comments and subscribing to my channel!
You can also contribute with small donations on Patreon or YouTube Channel Membership. It’s basically like paying me a tip as a thanks for my work and get some rewards in return, like early access to my tutorials and your name in the video (the “thank you” list). They work with recurring payments, but you can cancel anytime so one-time donations are also possible.
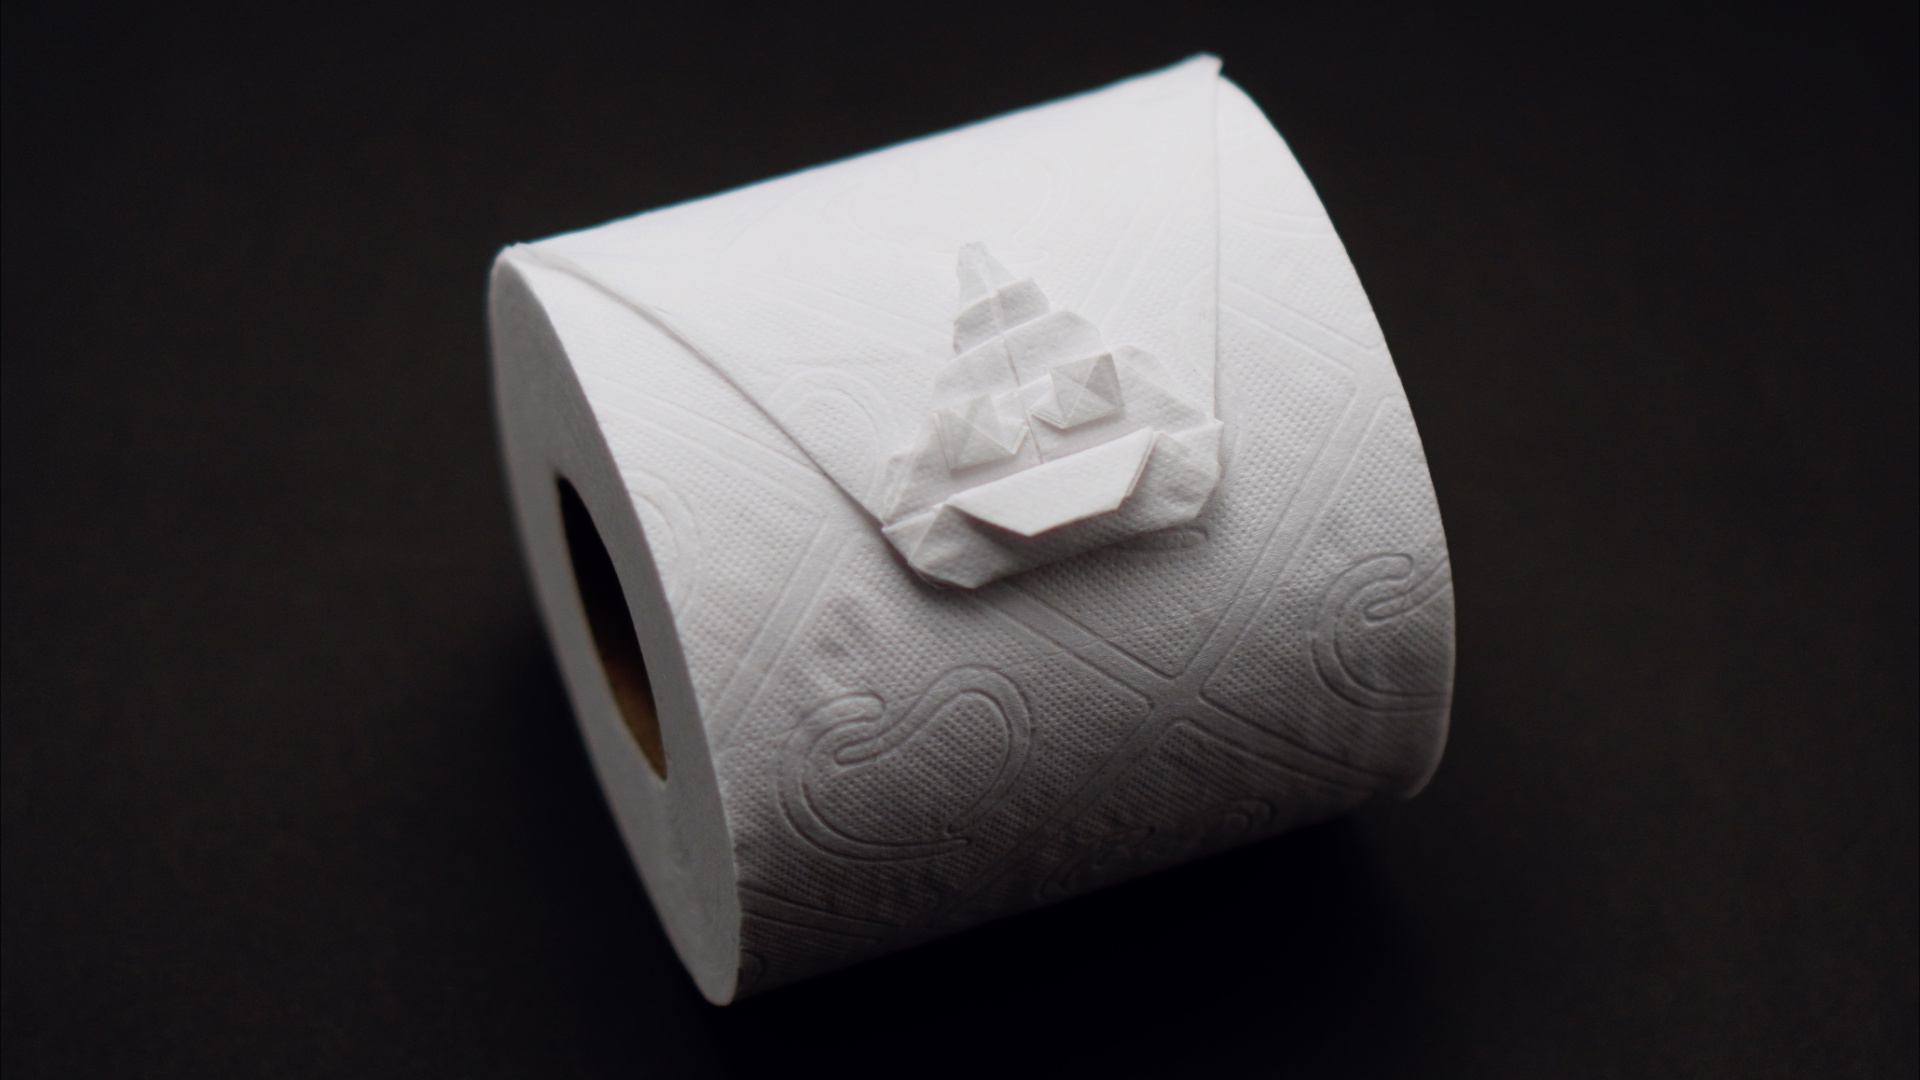
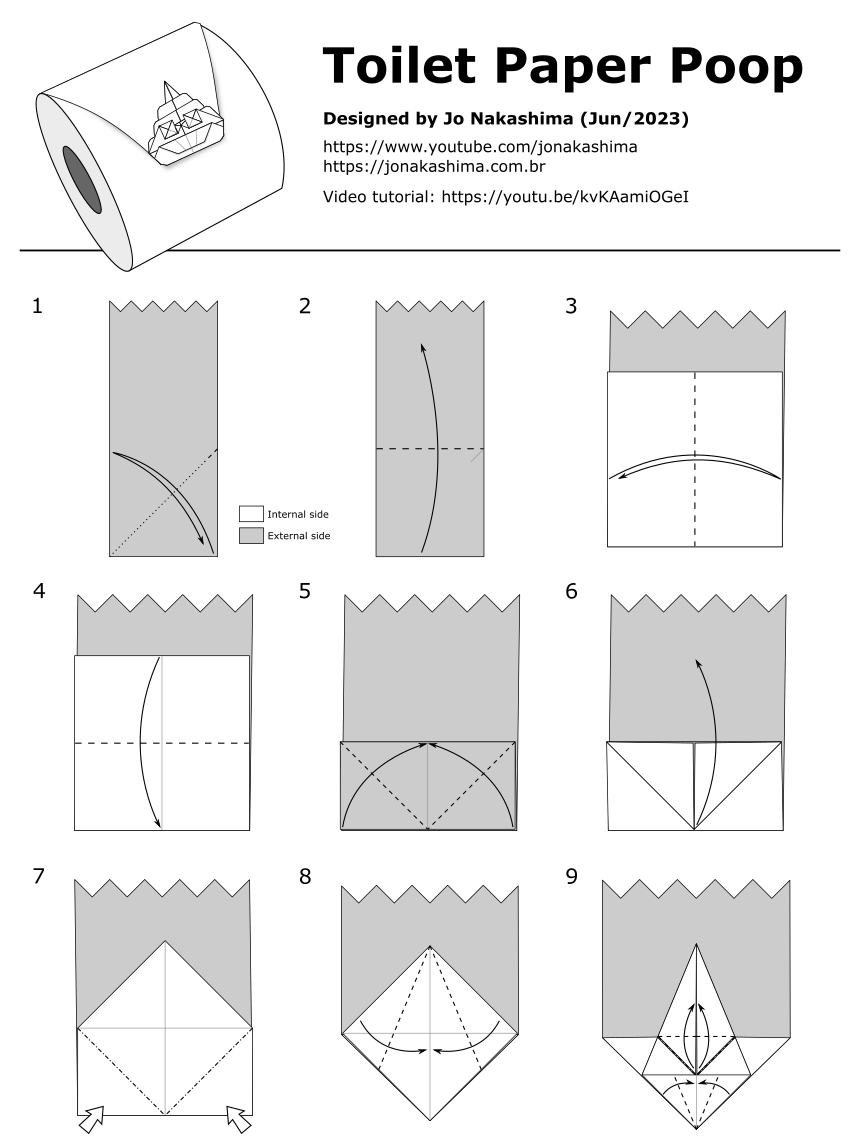
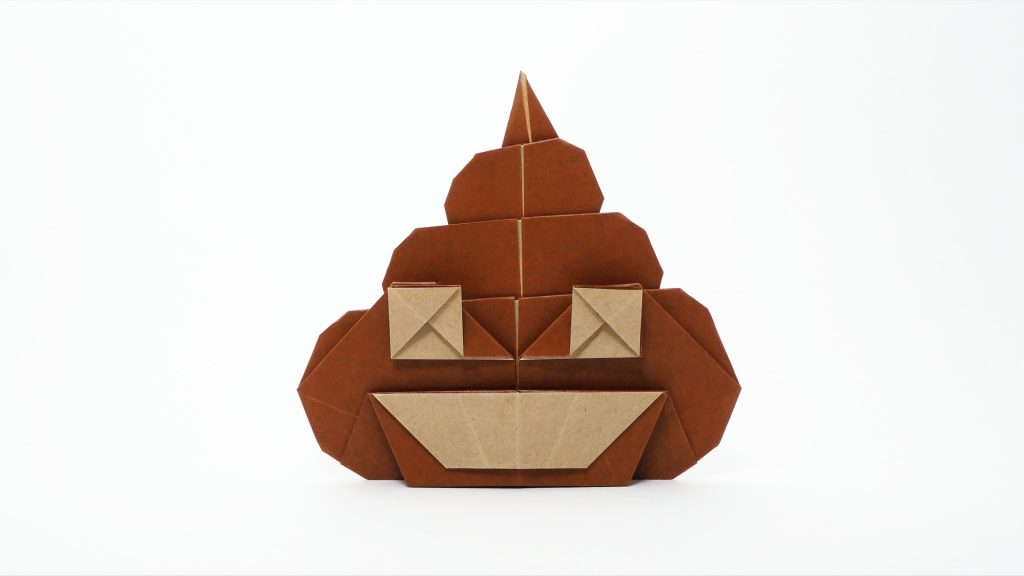
How to make the Origami Toilet Paper Poop Designed by Jo Nakashima (06/2023)
This is a modification of my origami Poop Emoji designed in 10/2017. The original version, made from a square sheet of paper, has color changes on eyes and also mouth. On the toilet paper version the color change was only possible on the eyes after a small modification on the way I made the squash folds (but it doesn’t really matter since toilet papers always have the same color on both sides).
Toilet Paper Poop Diagrams
More Toilet Paper Origami
See also more origami models that you can fold on toilet paper in this playlist!
Support my work!
If you like my work, please consider visiting and subscribing to my YouTube channel! You’ll find all my work, including models that are not in this website and also models from other origami artists. The easiest way to support my work is simply watching my videos, clicking the like button, leaving comments and subscribing to my channel!
You can also contribute with small donations on Patreon or YouTube Channel Membership. It’s basically like paying me a tip as a thanks for my work and get some rewards in return, like early access to my tutorials and your name in the video (the “thank you” list). They work with recurring payments, but you can cancel anytime so one-time donations are also possible.
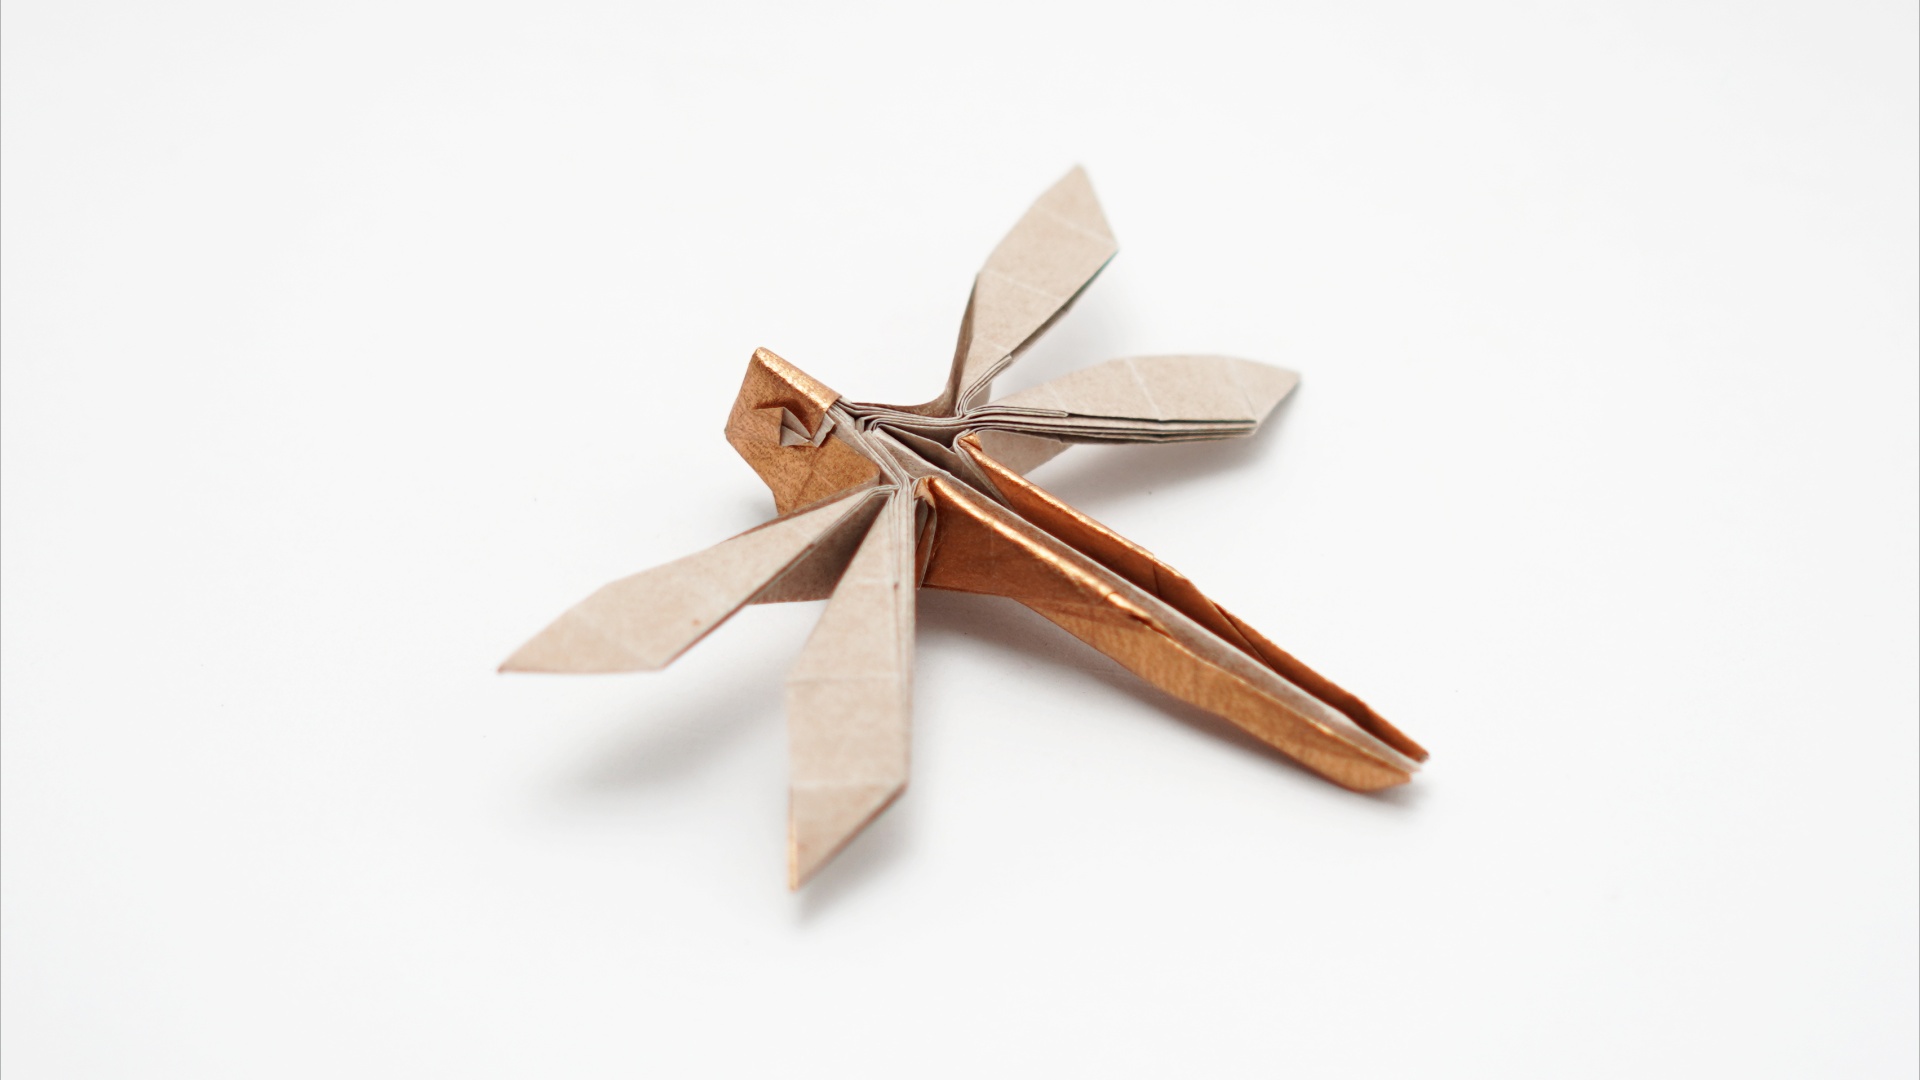
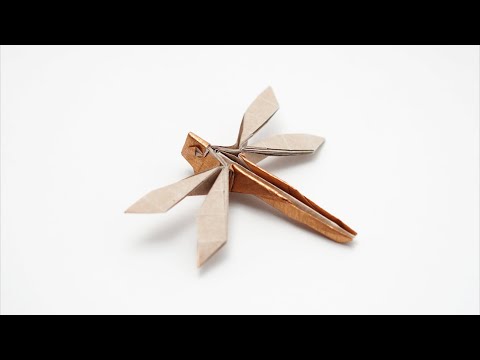
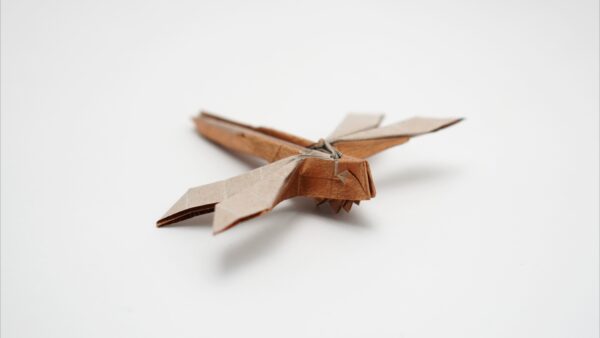
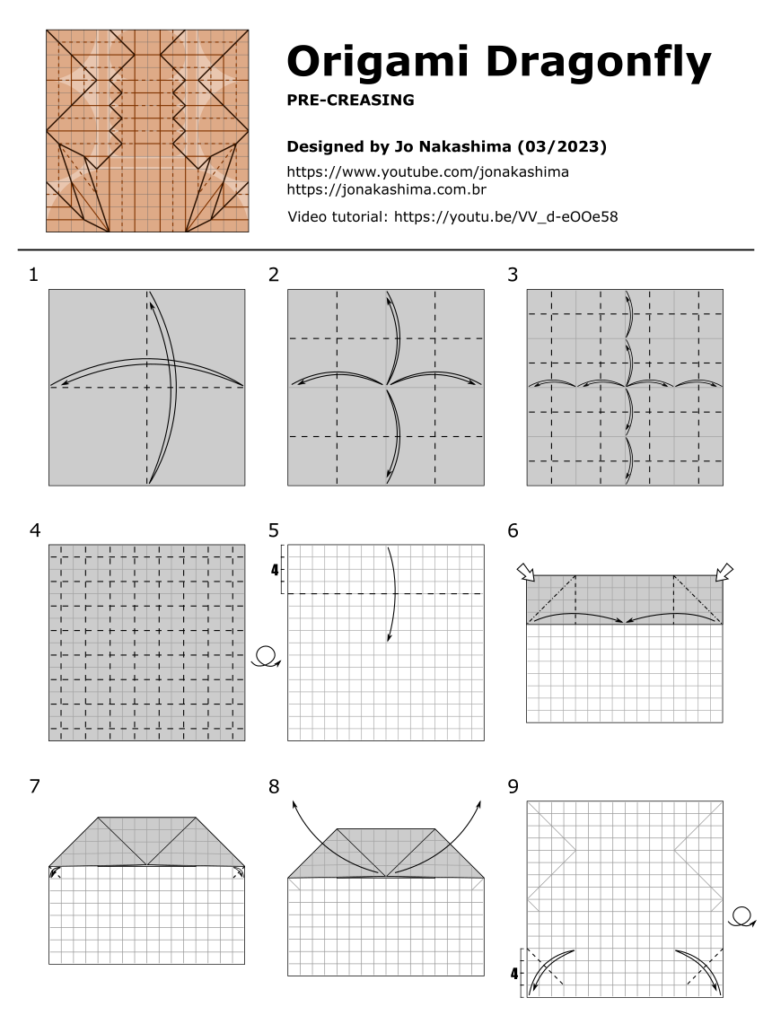
Origami Dragonfly designed by Jo Nakashima (03/2023) Difficulty level: intermediate
A dragonfly is a difficult subject to fold but I managed to make it quite simple from a small 16×16 grid. I recommend 20cm x 20cm for this model, but 15cm x 15m is also fine. I’m using copper Tissue-foil in this video, but special paper is not required so you can use standard origami paper.
The legs are made from three middle flaps, but I used only the corners of each flap so it has all six legs. The head has color changed eyes and a lock to prevent it from keep opening due to the internal layers.
Origami Dragonfly Crease Pattern
Origami Dragonfly diagrams (pre-creasing only)
Support my work!
If you like my work, please consider visiting and subscribing to my YouTube channel! You’ll find all my work, including models that are not in this website and also models from other origami artists. The easiest way to support my work is simply watching my videos, clicking the like button, leaving comments and subscribing to my channel!
You can also contribute with small donations on Patreon or YouTube Channel Membership. It’s basically like paying me a tip as a thanks for my work and get some rewards in return, like early access to my tutorials and your name in the video (the “thank you” list). They work with recurring payments, but you can cancel anytime so one-time donations are also possible.
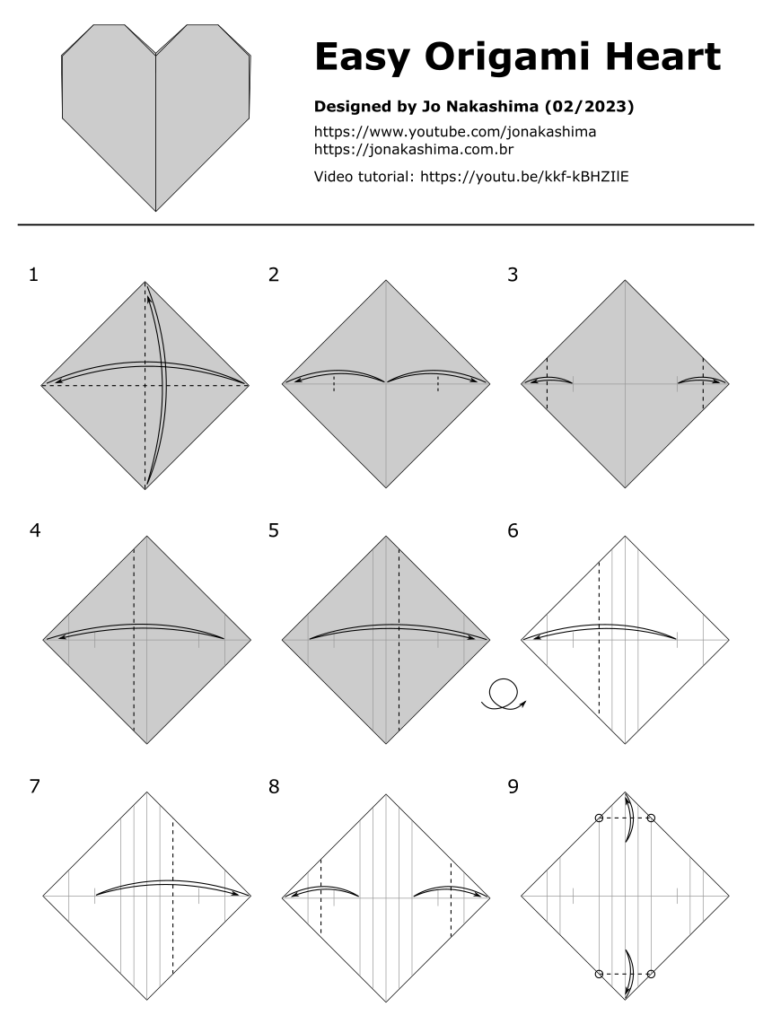
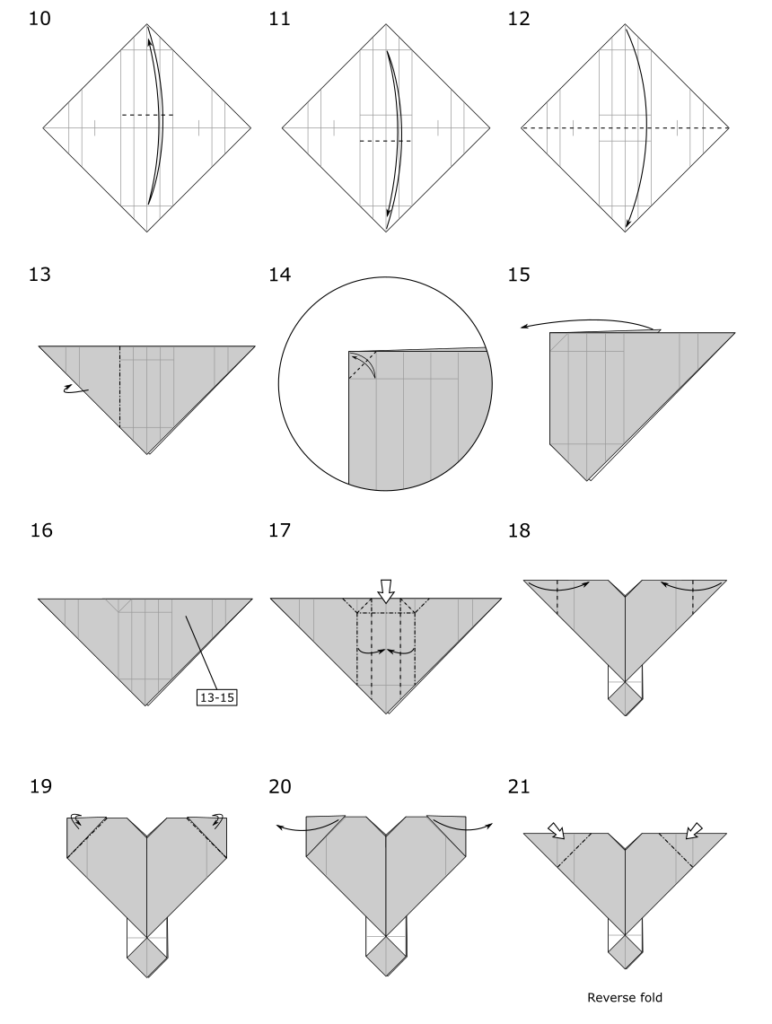
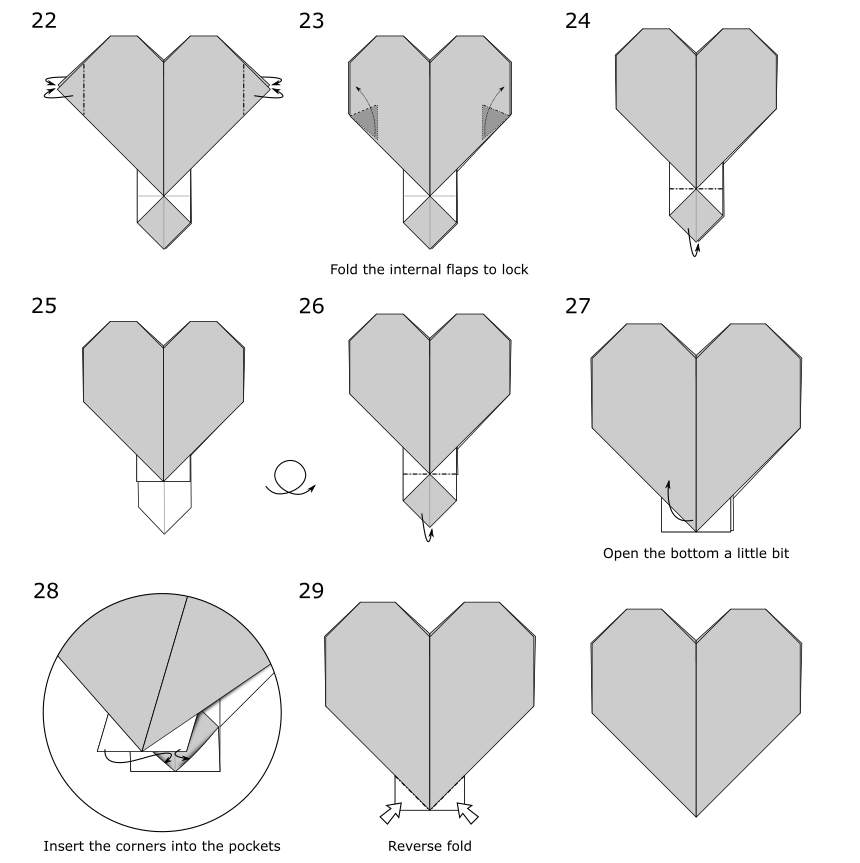
Easy Origami Heart Designed by Jo Nakashima (02/2023) Level: easy
I made this heart for Valentine’s day with the following goals:
double sided
no loose flaps
no unwanted creases
no unwanted layers
easiest as possible
I made another heart in 2018 with these characteristics, but this new one is easier. You can see the comparison between them further in this article.
Diagrams
The only part I think might look tricky for beginners is the collapsing at step 17. You can always watch the video on YouTube, it is not that hard and all you need to do is use the creases you already made. All the other creases are simple valley/mountain and a couple of reverse folds.
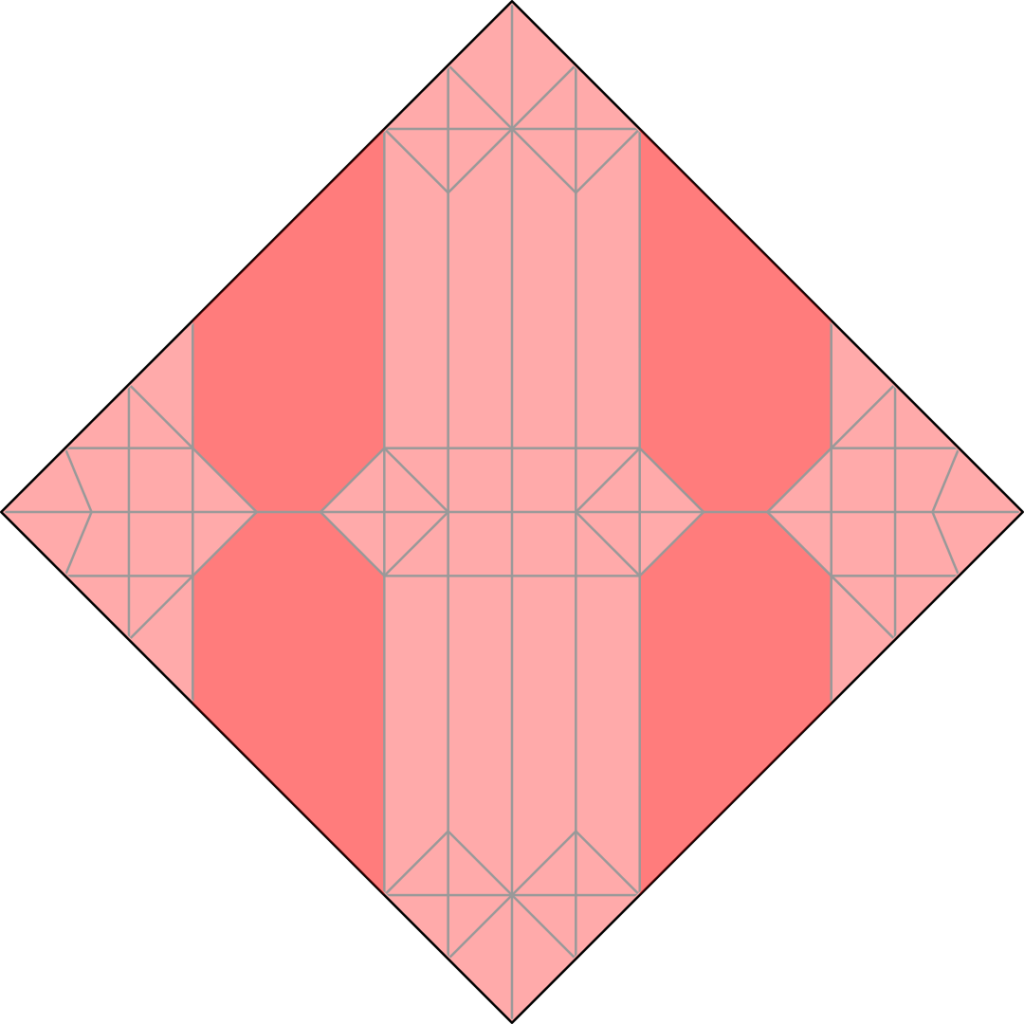
Crease Pattern
Heart Stand
Optionally you can stop at step 27 of the diagrams and use the bottom to make it stand
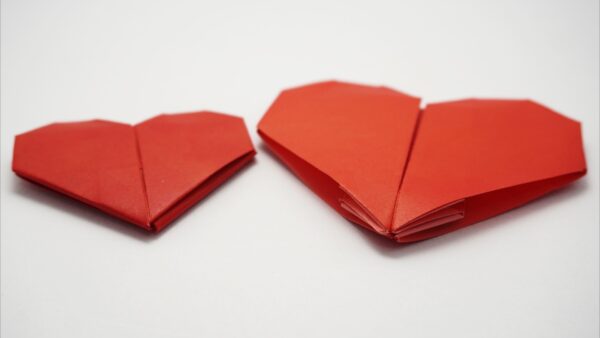
Hearts comparison – 2018 version vs 2023 version
2018 version – Nakashima Heart
It’s really difficult to show how good my origami hearts are with only the picture in the thumbnail of the video. They look the same! And they look like the traditional origami heart, a very simple heart but not double sided. For this reason I think these tutorials don’t get as much views as they deserve.
2018 version – which I named “Nakashima Heart” trying to differentiate from other origami hearts – is definitely my favorite. The locks are great, there are no unwanted creases/flaps/layers, the distribution of paper is good making it feel sturdy and the white side is 100% hidden.
I made the 2023 version as an easier alternative. It has fewer folds, so it is less time consuming and the paper usage is more efficient (meaning you can make larger hearts from the same size of paper, or use smaller sizes). There are only 3 locks at corners and the bottom edges are open (the model will stay locked but you can see the white side there). It also don’t feel sturdy like the previous version because some parts will have thinner layers.
2018 version (left) and 2023 version (right) – both made from 15cm x 15cm squareFrom the bottom you can see the 2018 version has better locks
Support my work!
If you like my work, please consider visiting and subscribing to my YouTube channel! You’ll find all my work, including models that are not in this website and also models from other origami artists. The easiest way to support my work is simply watching my videos, clicking the like button, leaving comments and subscribing to my channel!
You can also contribute with small donations on Patreon or YouTube Channel Membership. It’s basically like paying me a tip as a thanks for my work and get some rewards in return, like early access to my tutorials and your name in the video (the “thank you” list). They work with recurring payments, but you can cancel anytime so one-time donations are also possible.
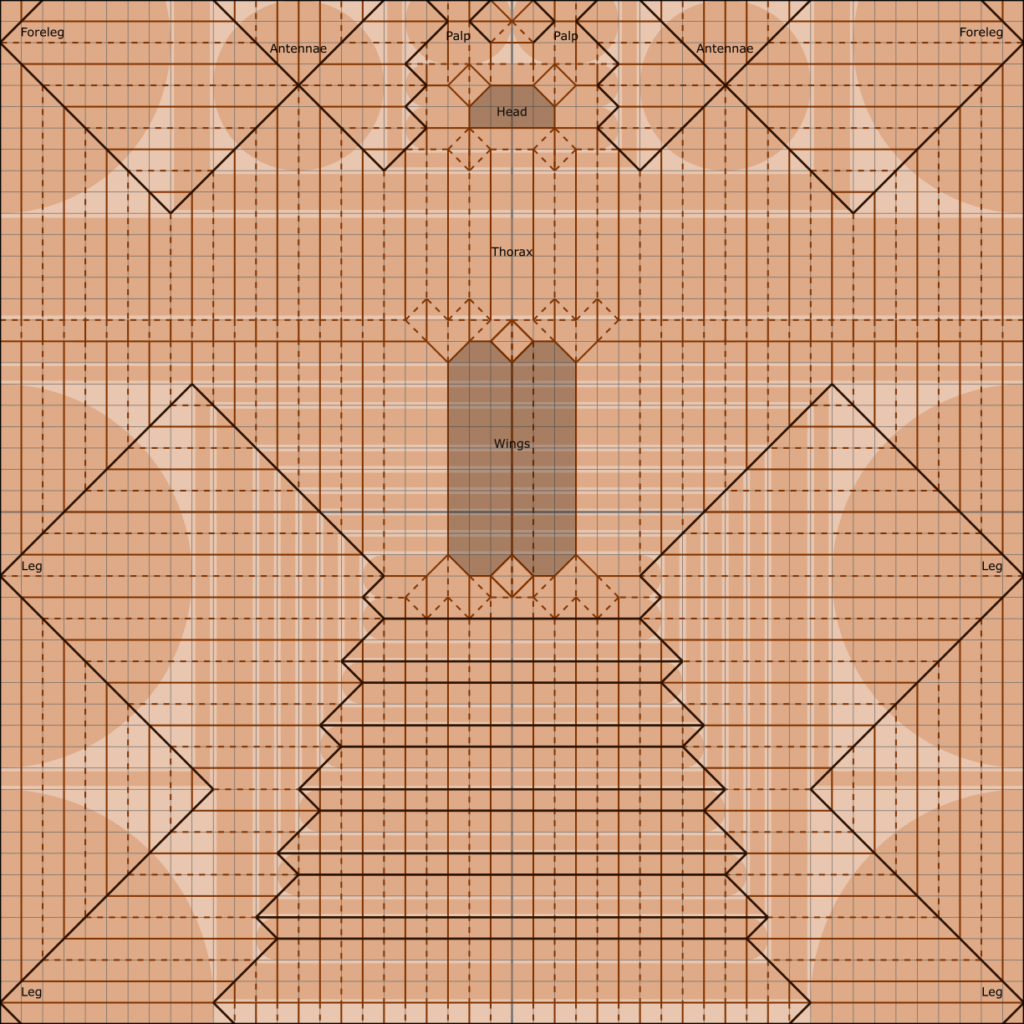
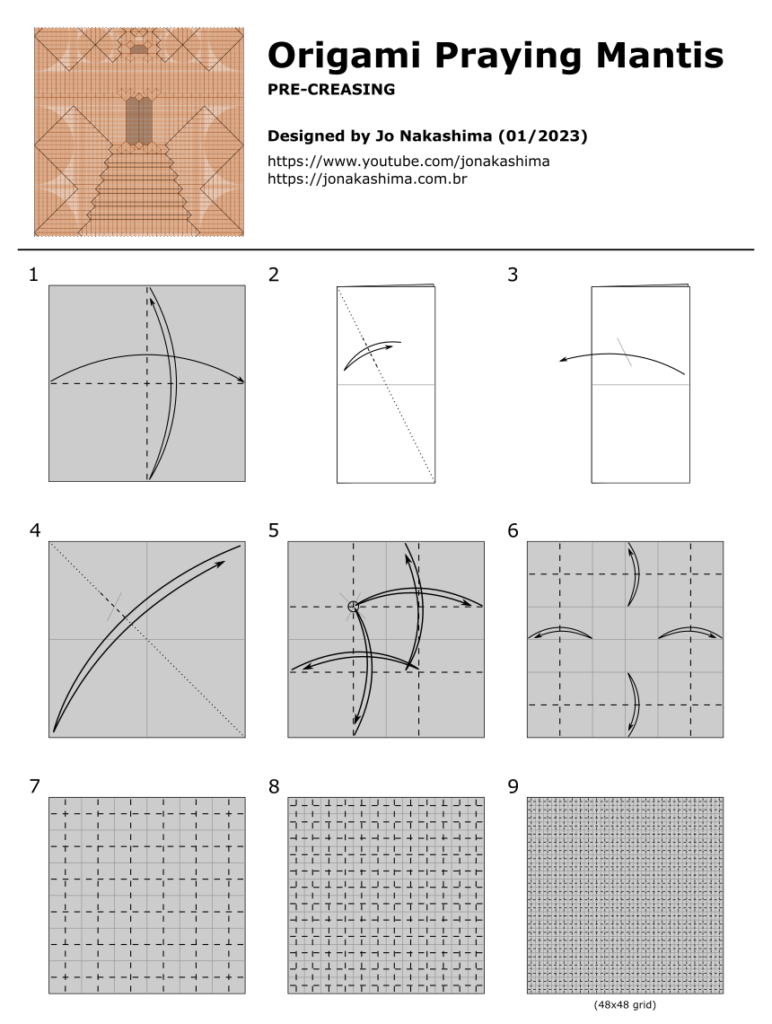
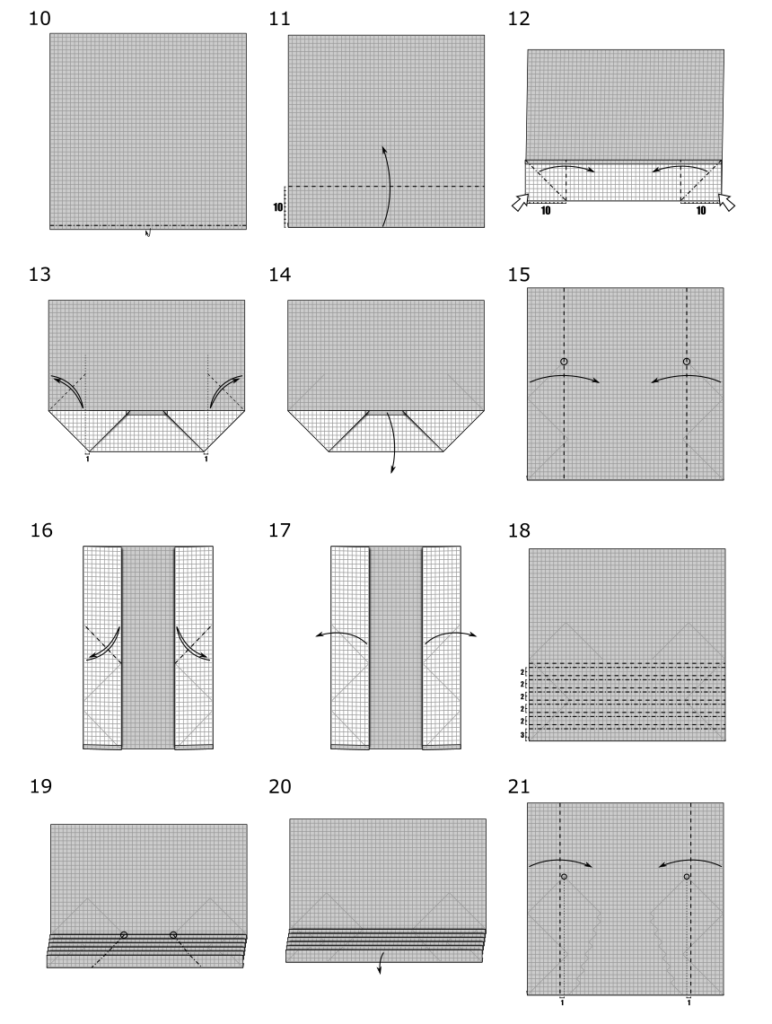
How to make an origami Praying Mantis Designed by Jo Nakashima (01/2023) Level: complex
In this video you’ll learn how to fold an origami praying mantis from a single uncut square sheet of paper. It is a box pleat model from a 48×48 grid. It is easier to fold than my origami ant and spider.
Crease Pattern
Paper
I recommend 30cm x 30cm of high quality thin paper that holds well the shape. Some suggestions:
Kraft Alios – It’s the one I used in the picture. It’s super thin and light, but wet-shaping is required. Buy it here.
Foil paper – Holds the shape very well, works great for complex models. Buy it here.
Sandwich paper – With its foil base, you can shape it and it will hold in place without any effort. Buy it here.
Home made tissue-foil – Made by gluing tissue paper and aluminum foil. Works great like the previous one and you can customize it with the color you want.
Tissue-foil from origami-shop – It’s the paper I used in the tutorial. I think it’s a bit thick unless you use a larger sheet (you can see how it looks in the end of the tutorial). Buy it here.
Origami Praying Mantis pre-creasing diagrams
Support my work!
If you like my work, please consider visiting and subscribing to my YouTube channel! You’ll find all my work, including models that are not in this website and also models from other origami artists. The easiest way to support my work is simply watching my videos, clicking the like button, leaving comments and subscribing to my channel!
You can also contribute with small donations on Patreon or YouTube Channel Membership. It’s basically like paying me a tip as a thanks for my work and get some rewards in return, like early access to my tutorials and your name in the video (the “thank you” list). They work with recurring payments, but you can cancel anytime so one-time donations are also possible.
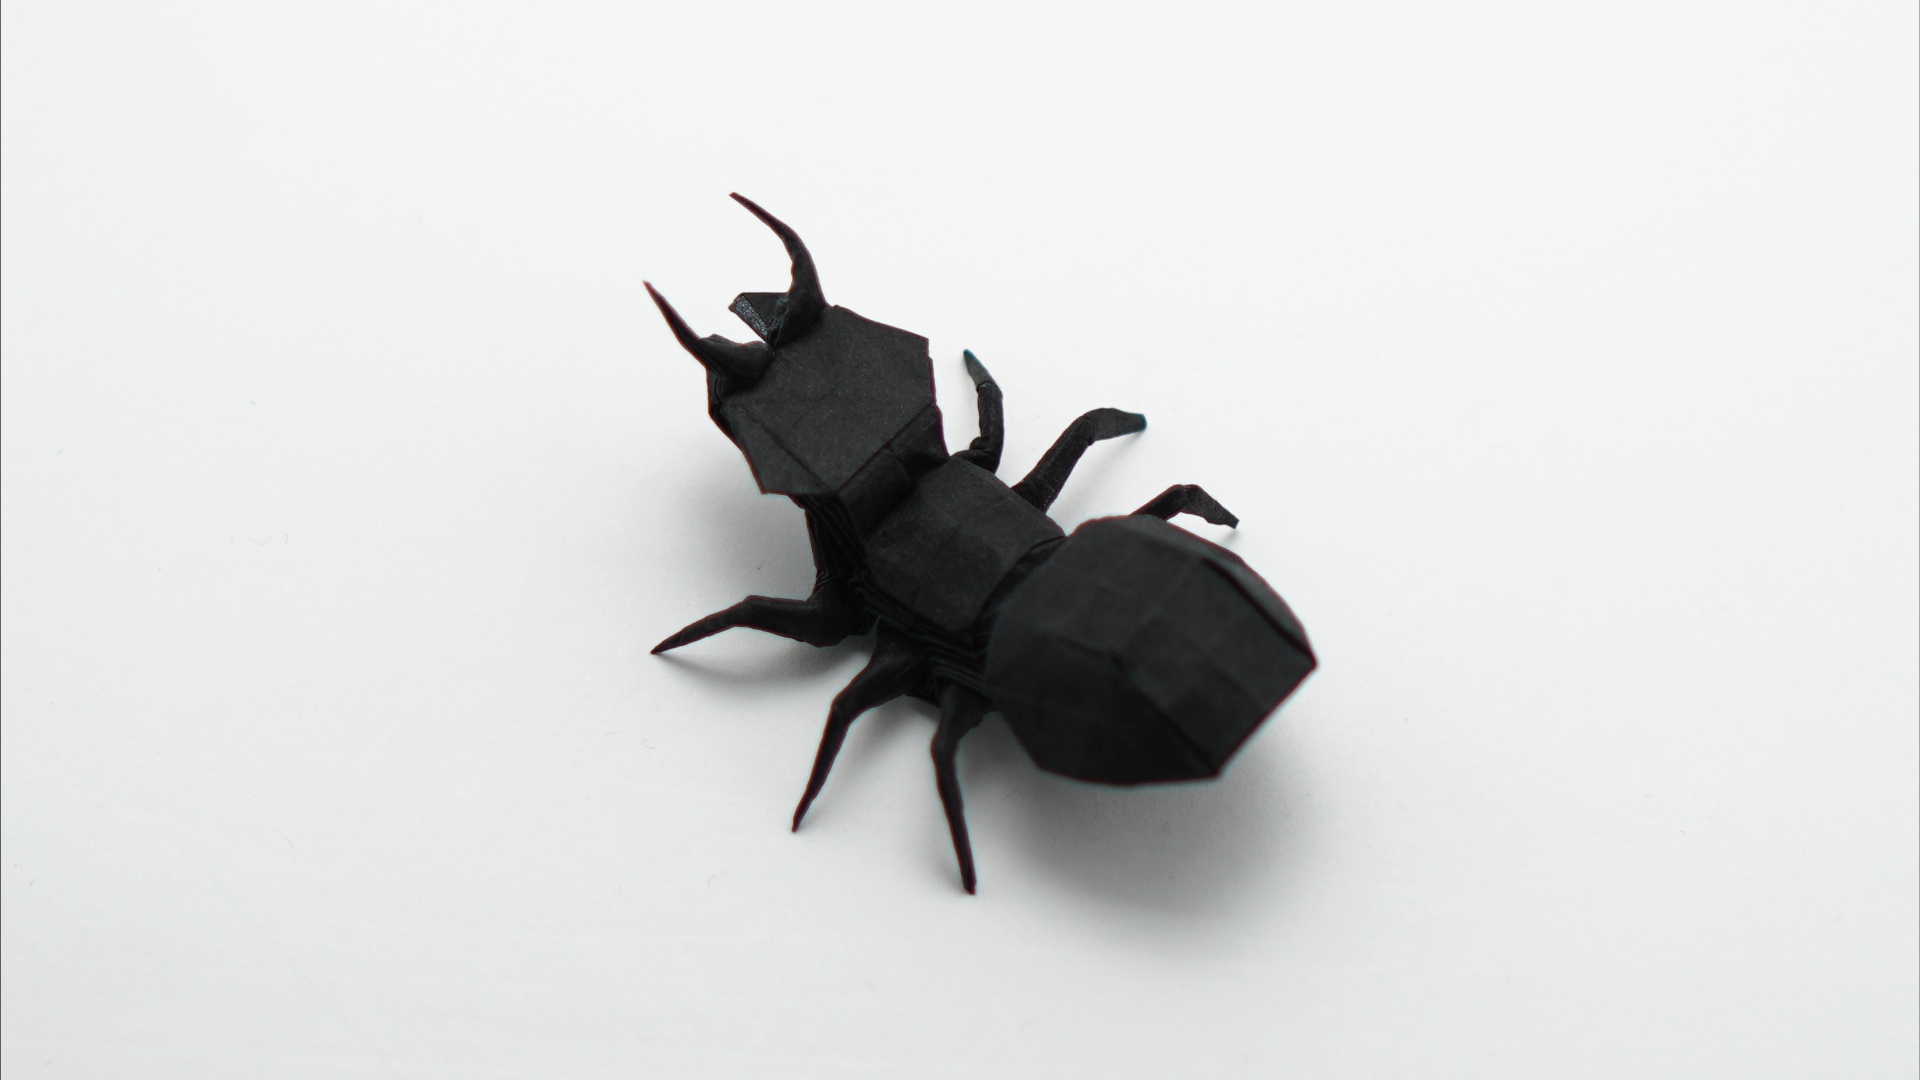
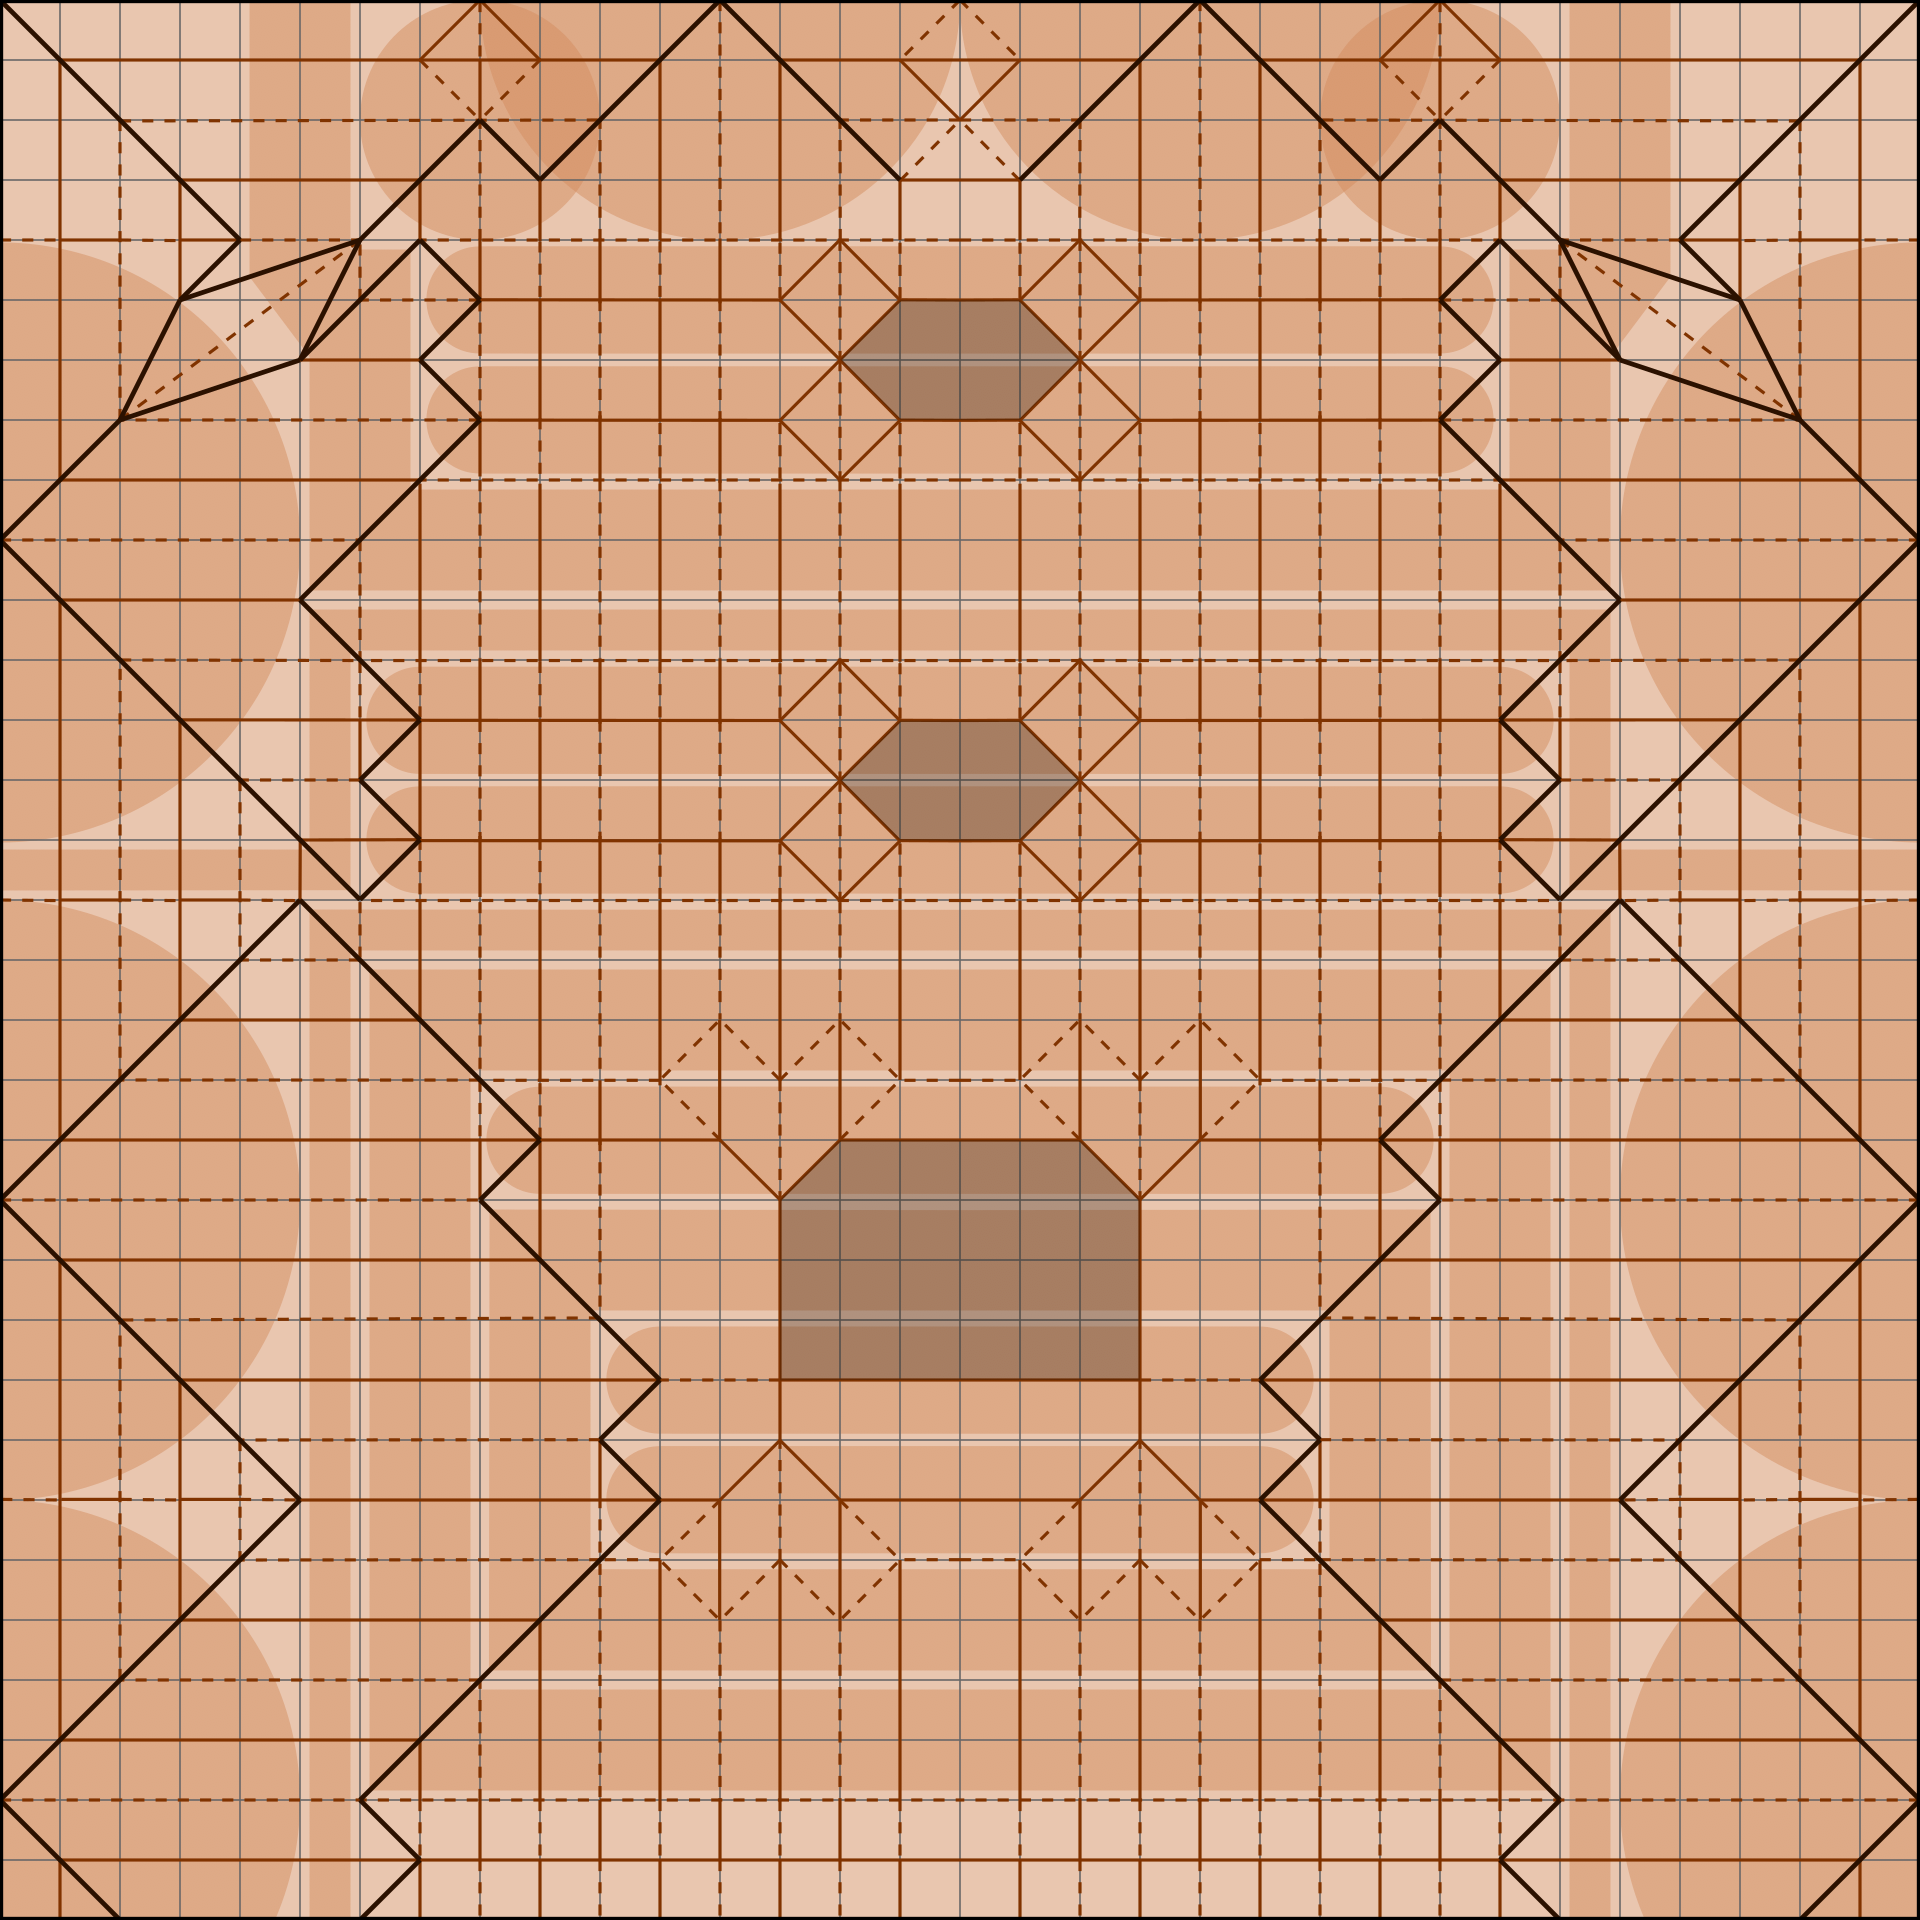
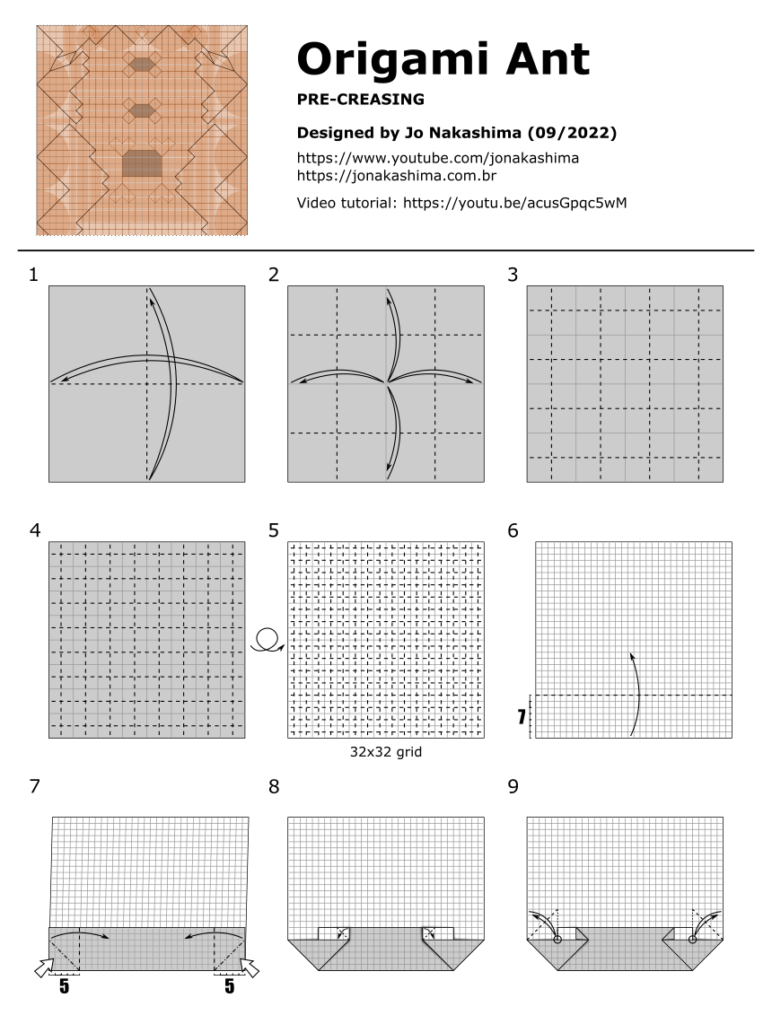
How to make an origami Ant Designed by Jo Nakashima (09/2022) Difficulty level: complex
In this video you’ll learn how to make an origami ant from a single square sheet of paper. It is a box pleated model based on a 32×32 grid.
This origami ant isn’t too difficult to fold, there are no tricky steps. For best results use thin paper with at least 20cm x 20cm (or 15cm x 15cm if your paper is really good and you are experienced). Printer paper works for learning and you can print the crease pattern to make it easily.
You can wet-shape the legs in the end for better results if your paper allows it.
Crease Pattern
Origami Ant pre-creasing diagrams
Support my work!
If you like my work, please consider visiting and subscribing to my YouTube channel! You’ll find all my work, including models that are not in this website and also models from other origami artists. The easiest way to support my work is simply watching my videos, clicking the like button, leaving comments and subscribing to my channel!
You can also contribute with small donations on Patreon or YouTube Channel Membership. It’s basically like paying me a tip as a thanks for my work and get some rewards in return, like early access to my tutorials and your name in the video (the “thank you” list). They work with recurring payments, but you can cancel anytime so one-time donations are also possible.
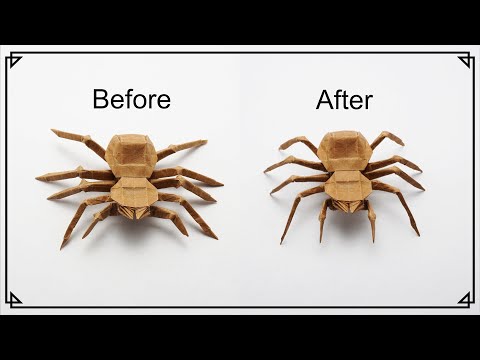
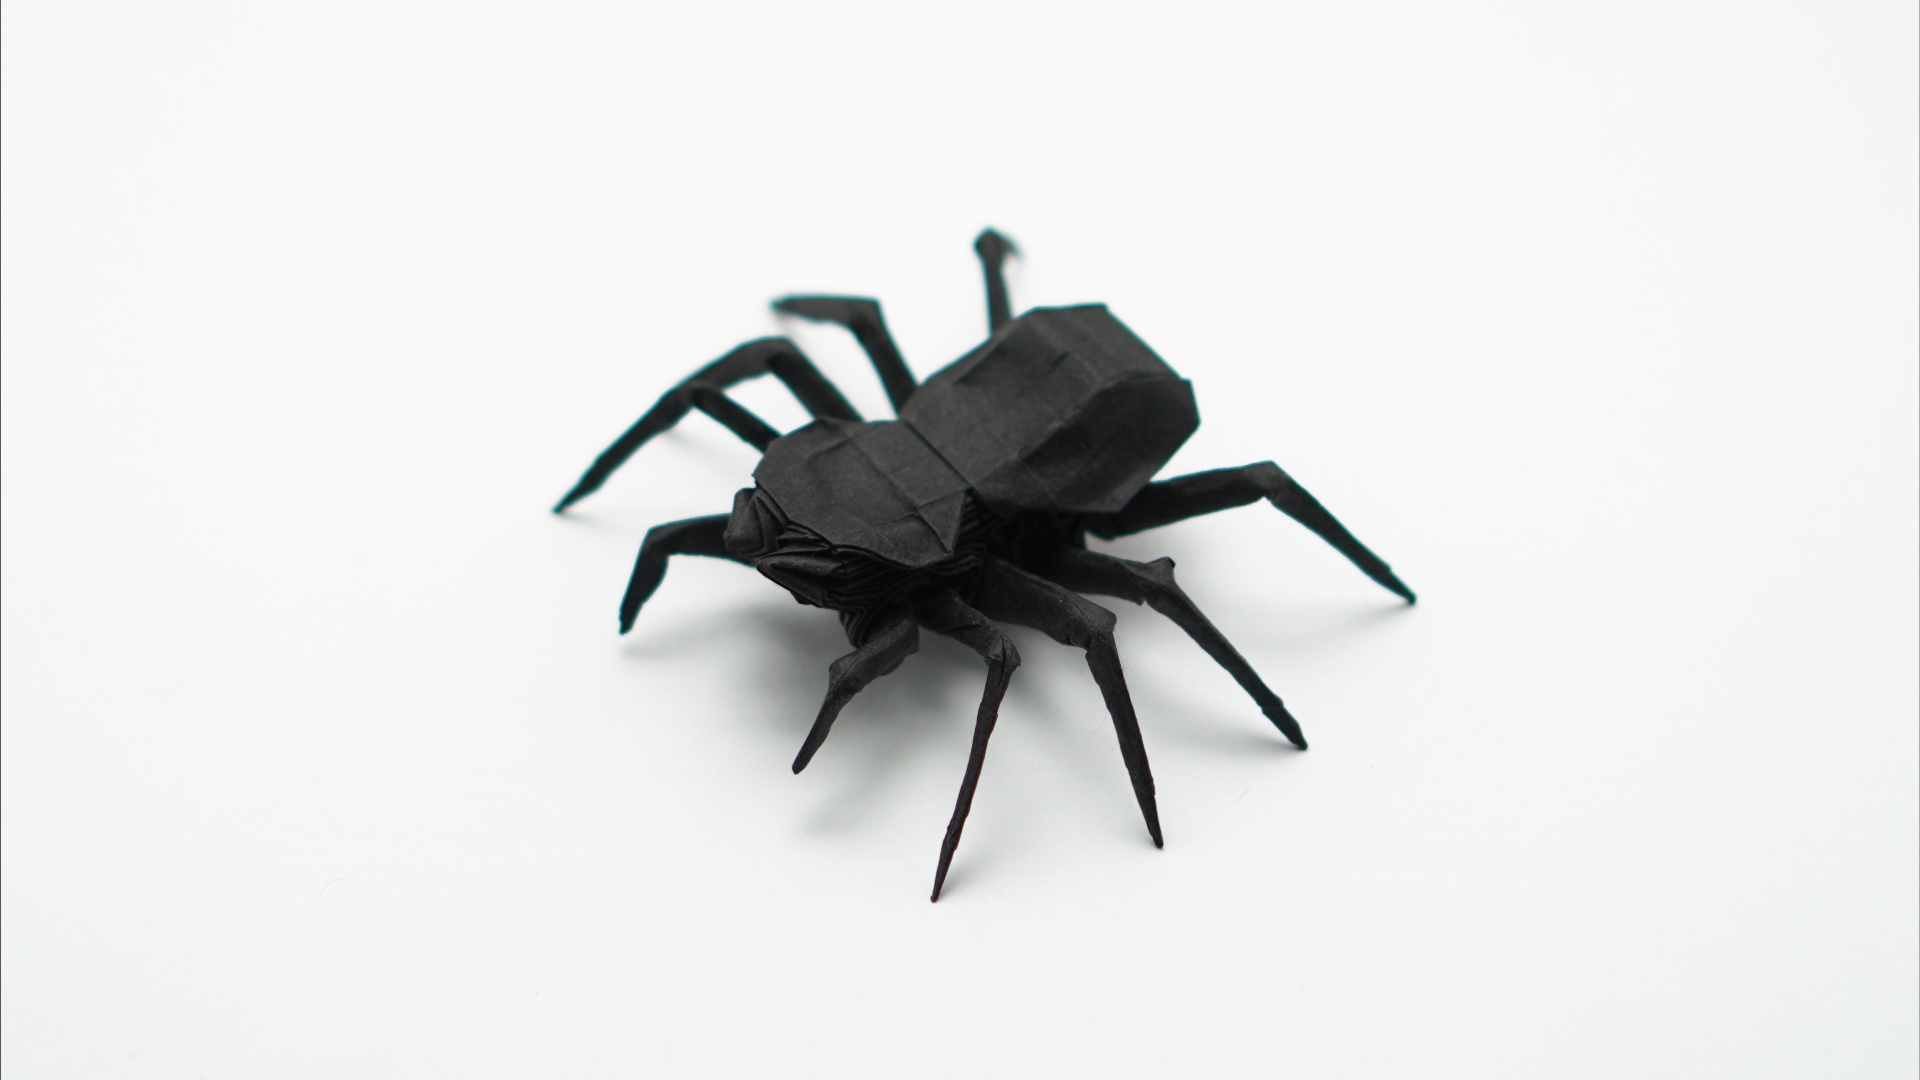
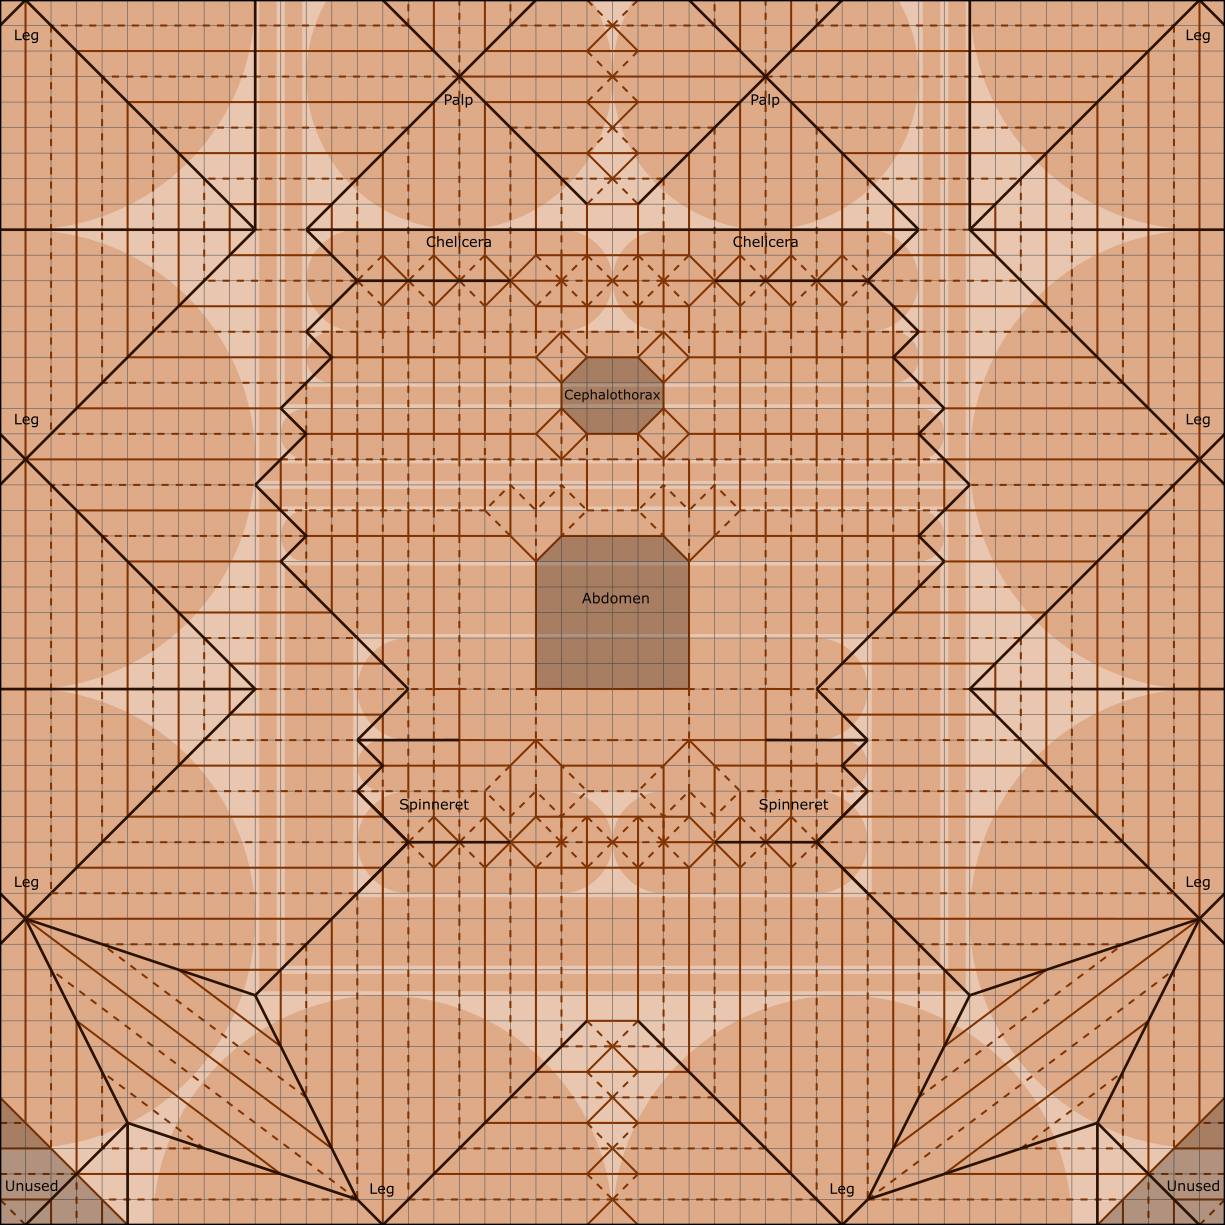
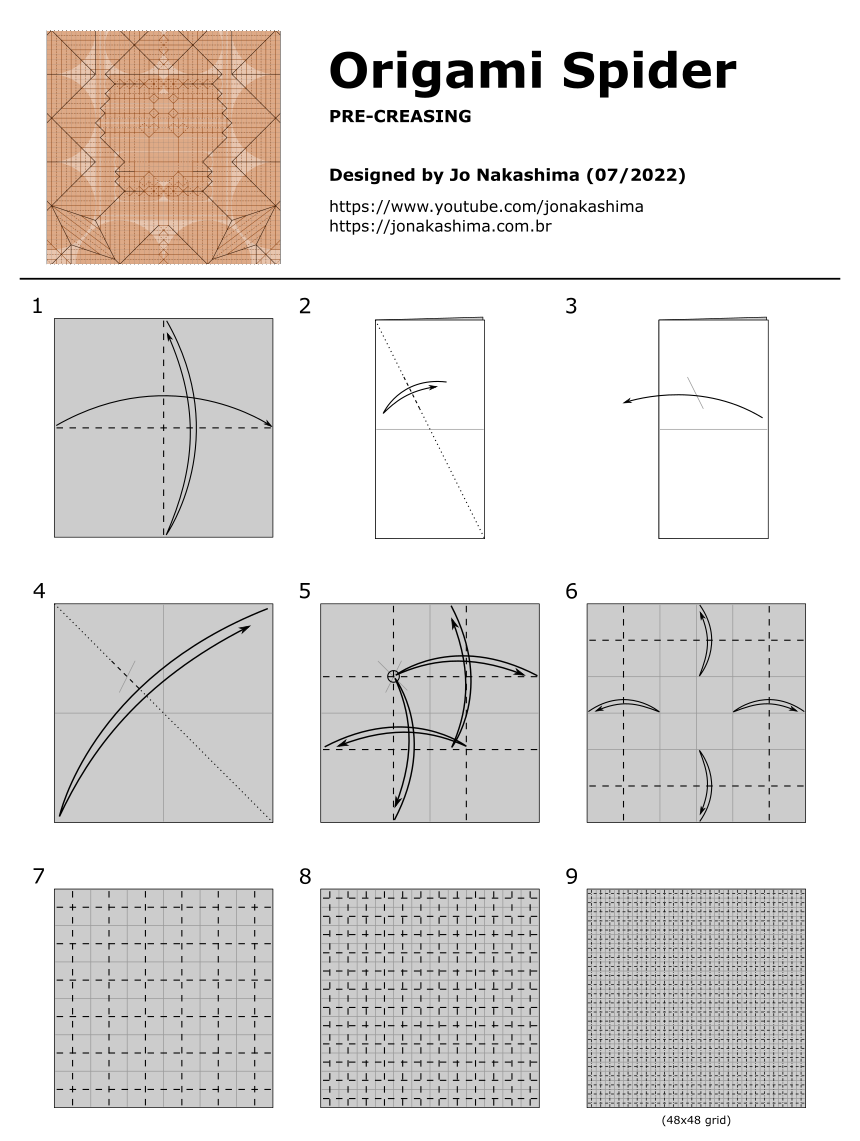
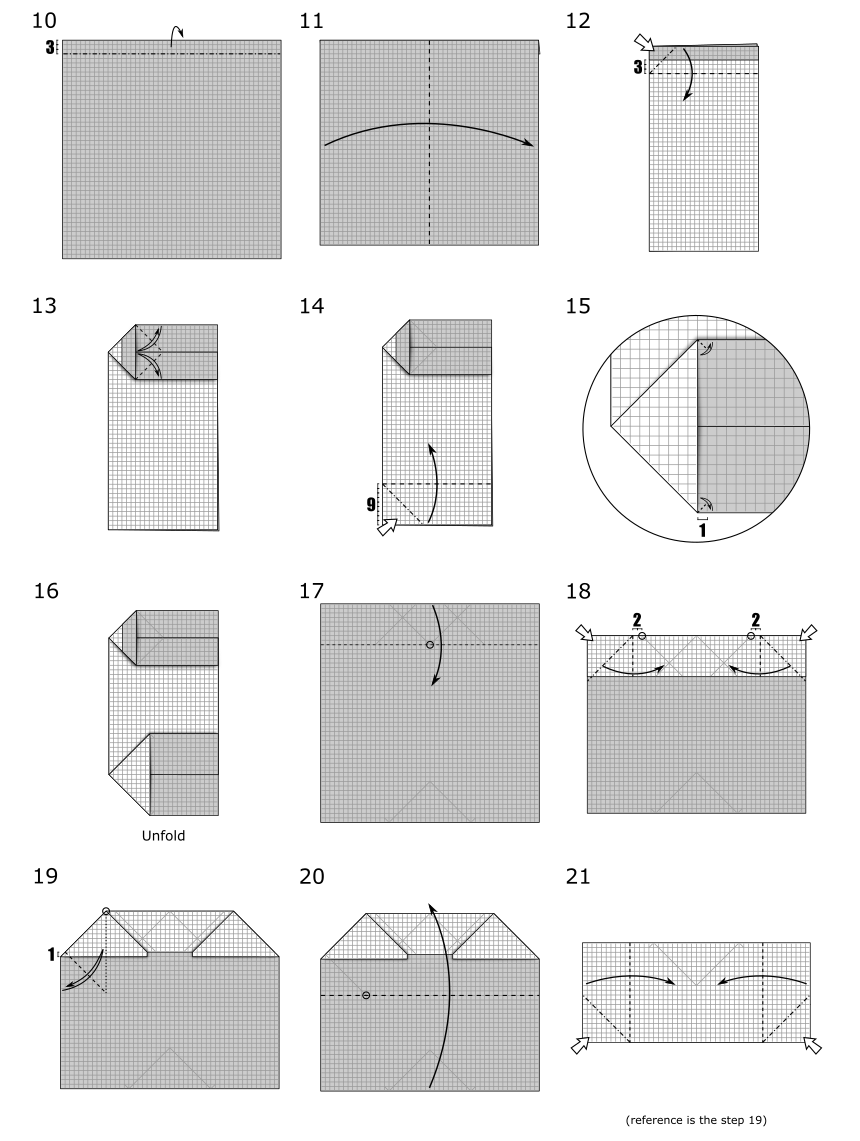
I recommend using some high quality thin paper of 30cm x 30cm (minimum of 24cm x 24cm if your paper is excellent) for this origami spider.
It takes me more than 3 hours to fold this model completely, so be patient and try to fold it precisely. I’m using partial crease patterns to demonstrate some steps and make the instructions clearer and easily, but you’ll probably struggle a bit more to handle the complete sheet of paper.
The hardest steps are the chelicerae and spinnerets. The procedure is the same for both, but spinnerets are a bit harder to make (optionally you can skip them and just hide the flap in the end). It may be easier to learn these steps if you print and fold the partial crease pattern (links below).
If you like my work, please consider visiting and subscribing to my YouTube channel! You’ll find all my work, including models that are not in this website and also models from other origami artists. The easiest way to support my work is simply watching my videos, clicking the like button, leaving comments and subscribing to my channel!
You can also contribute with small donations on Patreon or YouTube Channel Membership. It’s basically like paying me a tip as a thanks for my work and get some rewards in return, like early access to my tutorials and your name in the video (the “thank you” list). They work with recurring payments, but you can cancel anytime so one-time donations are also possible.
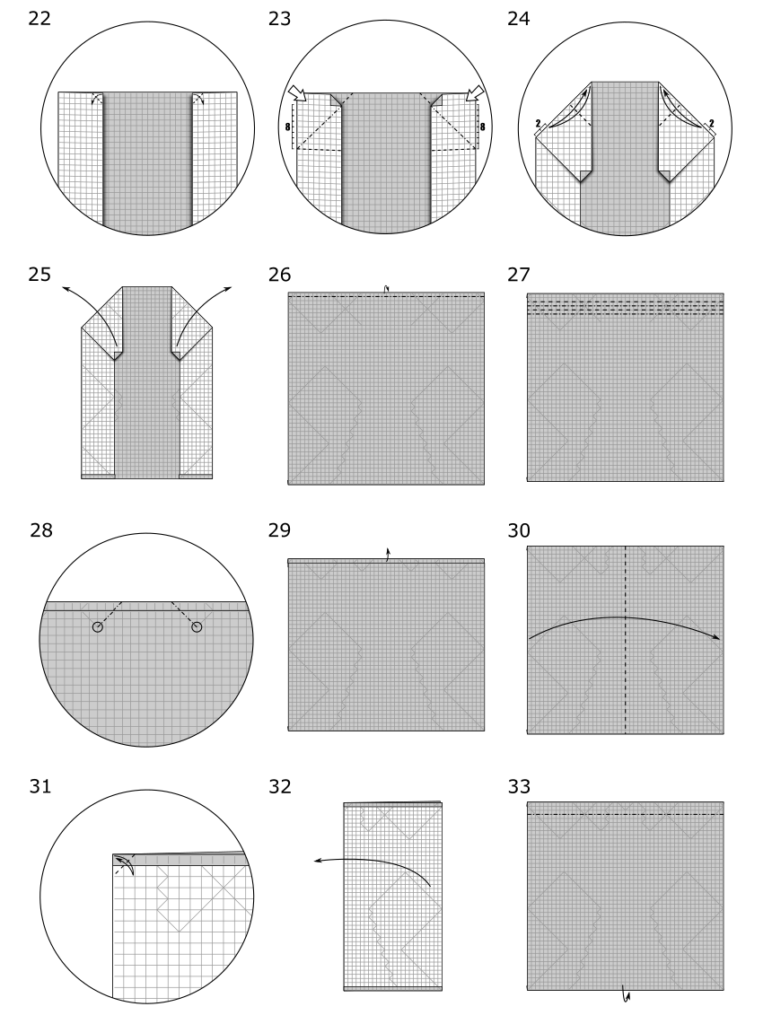
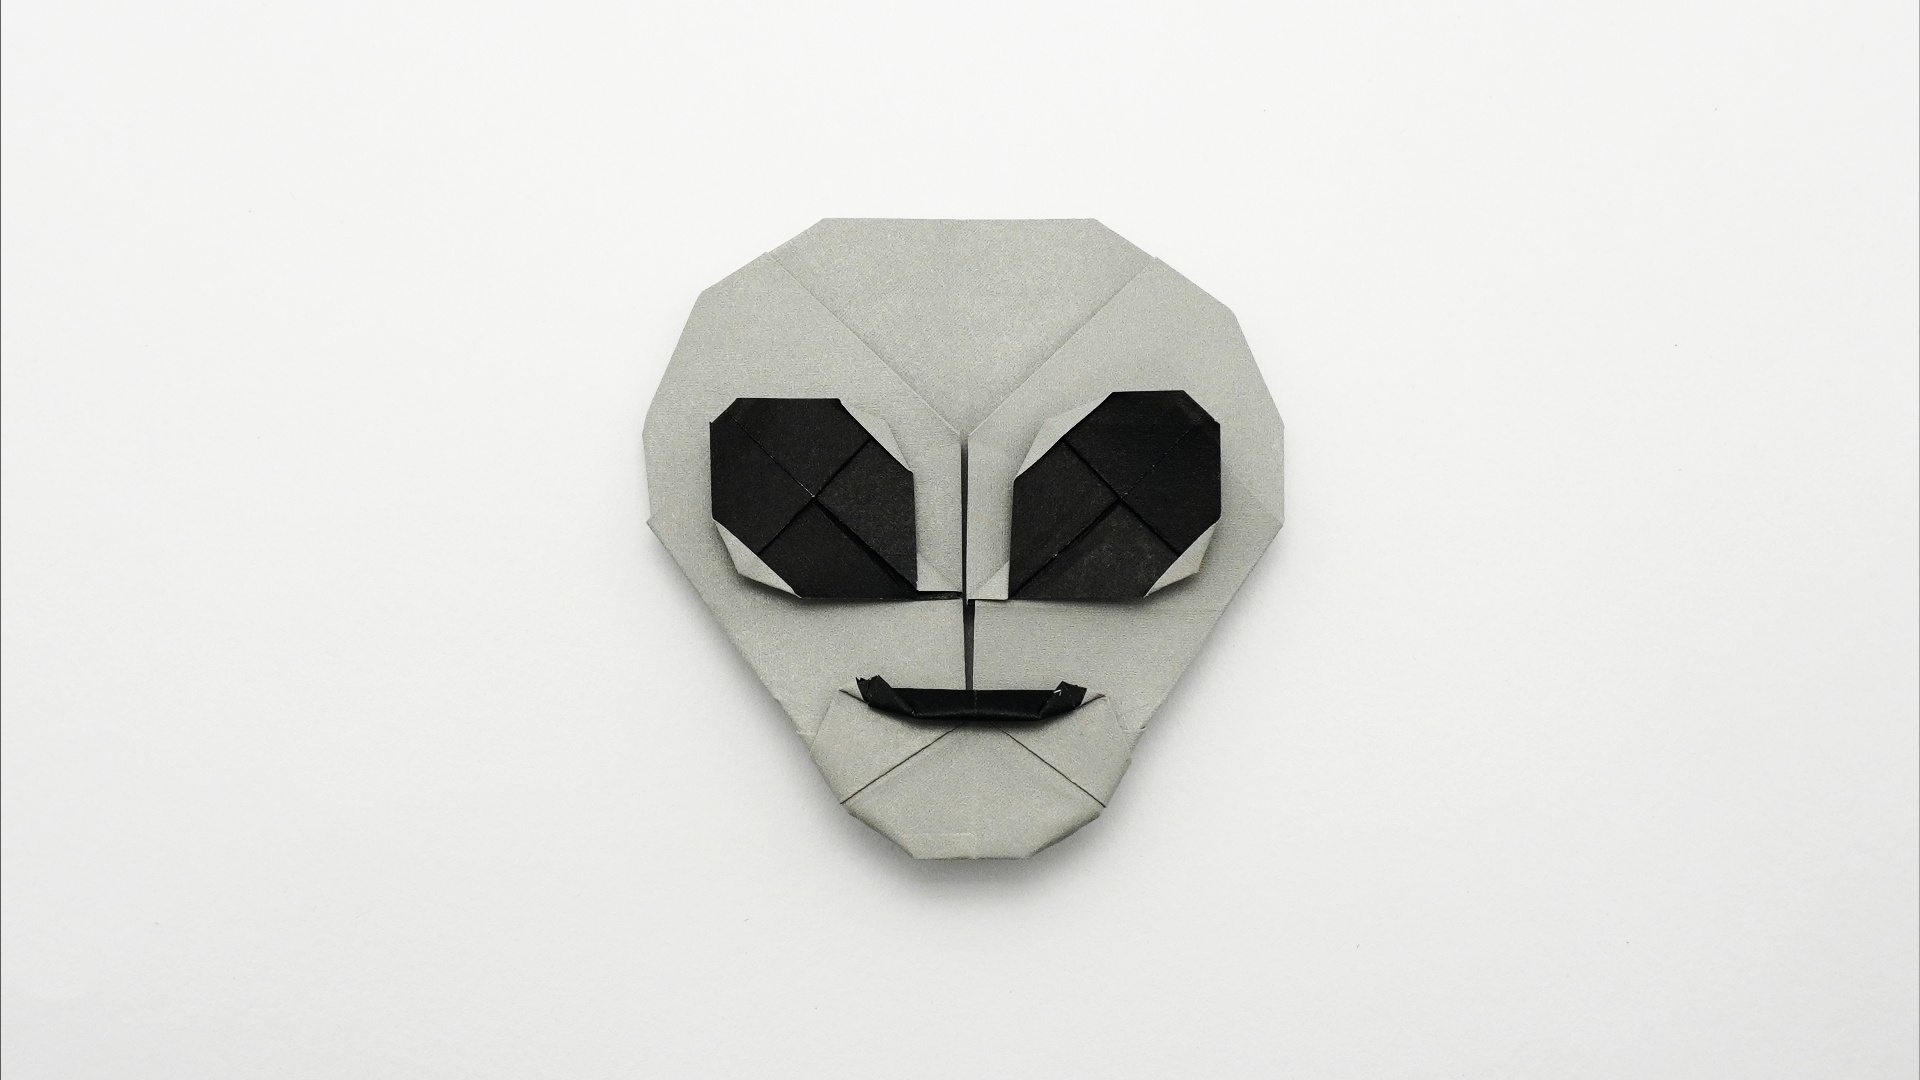
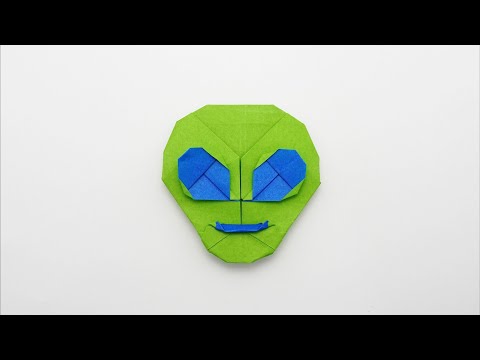
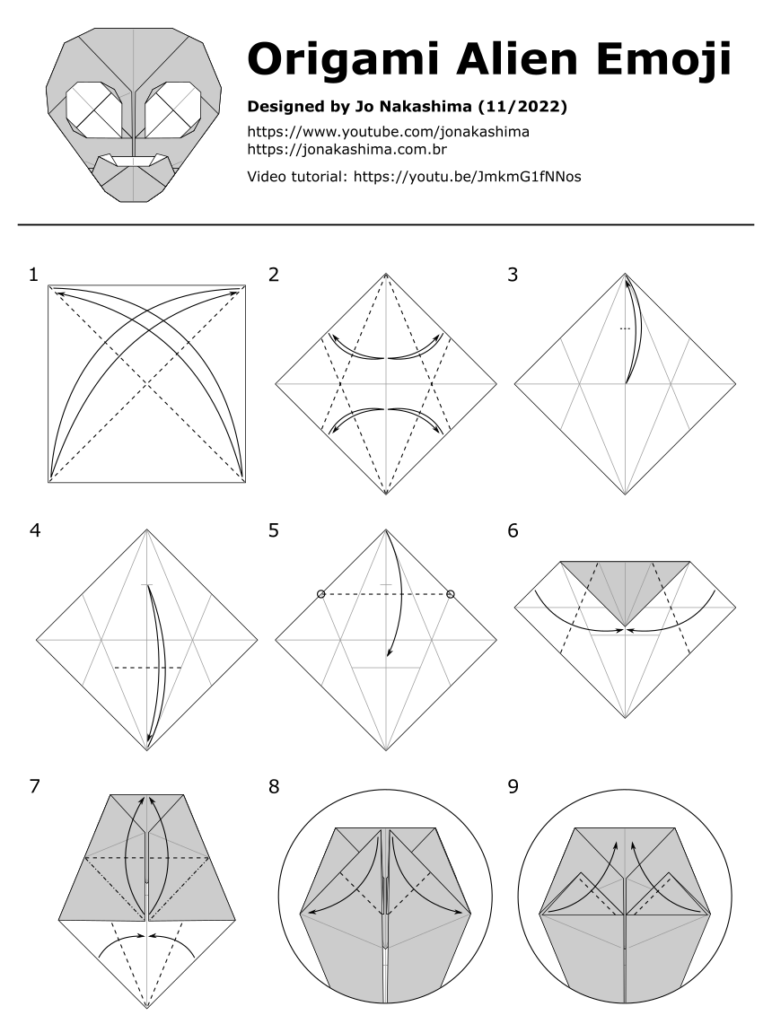
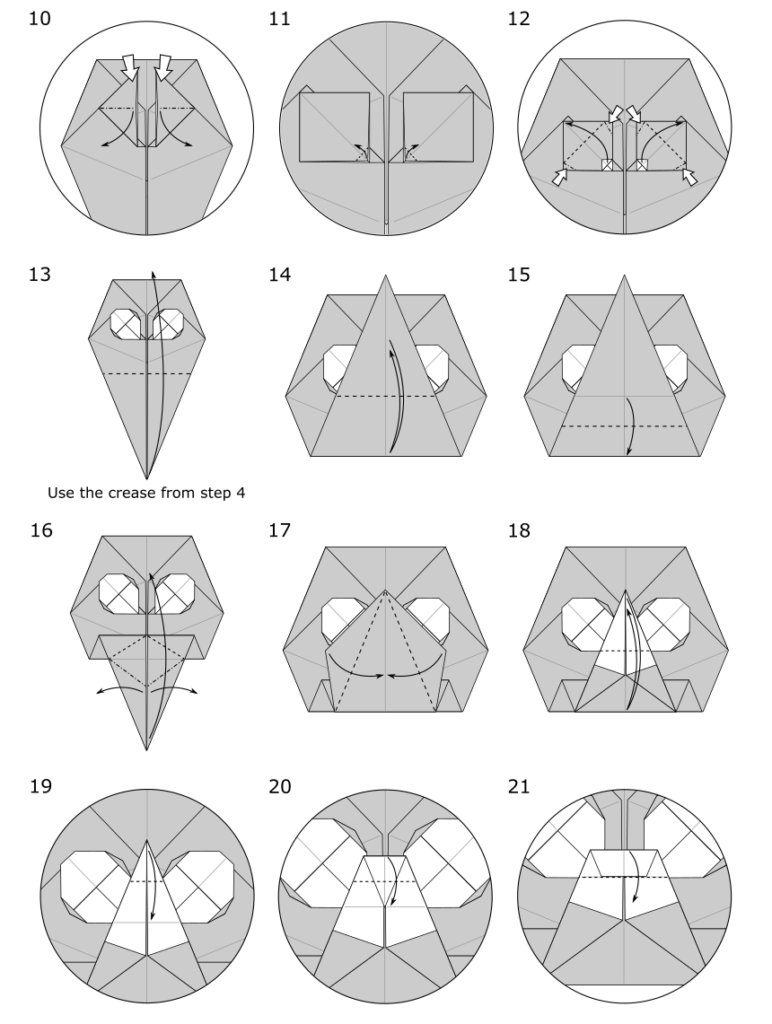
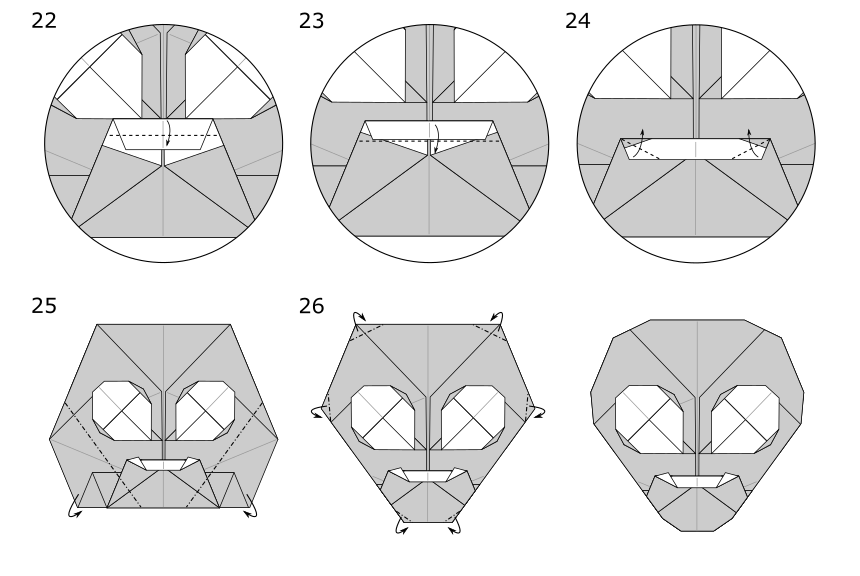
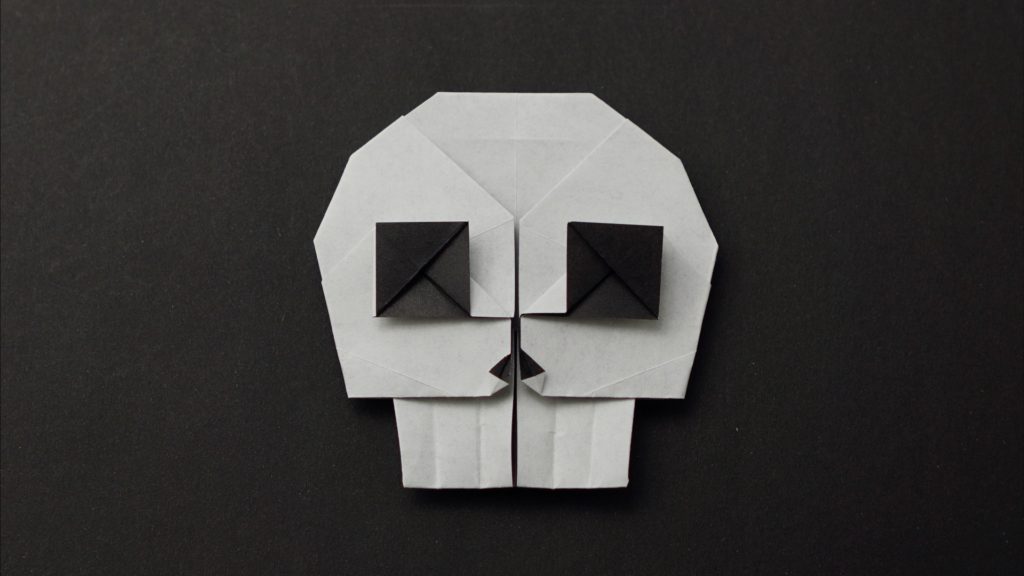
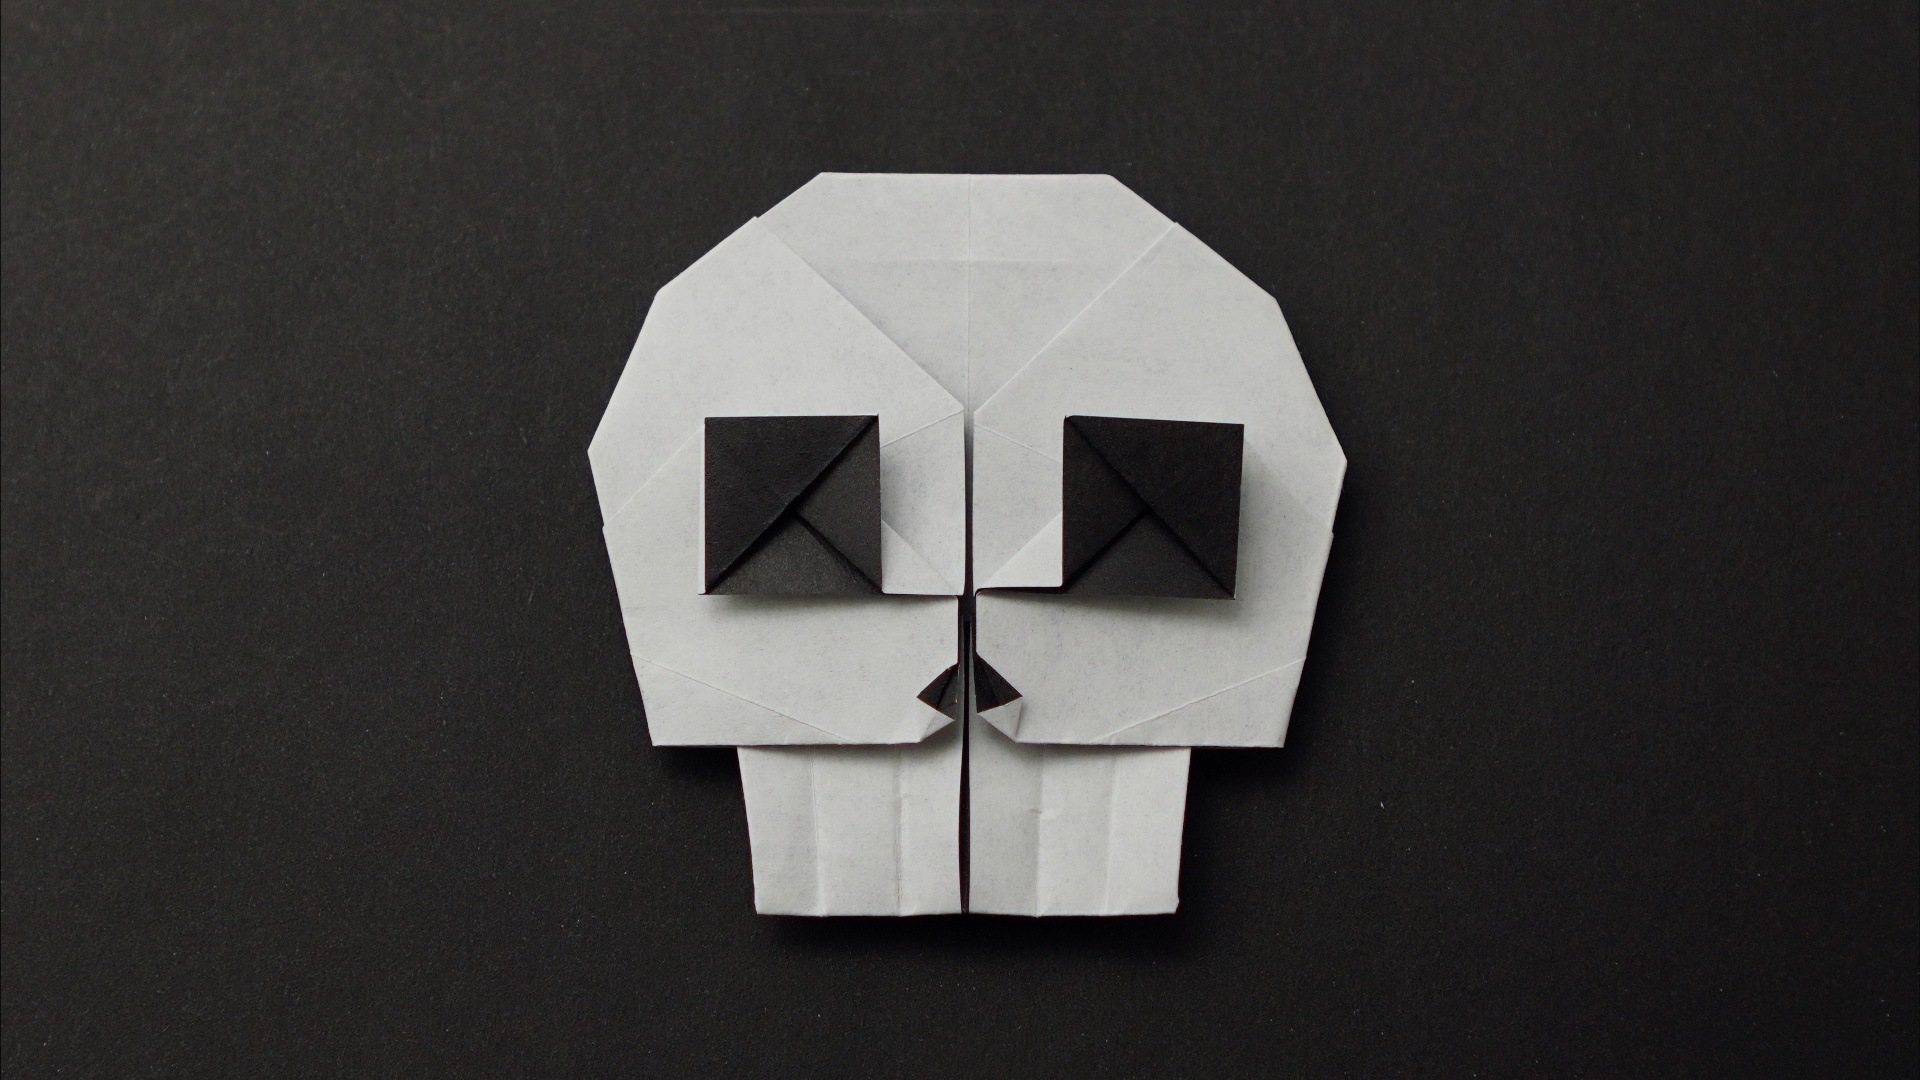
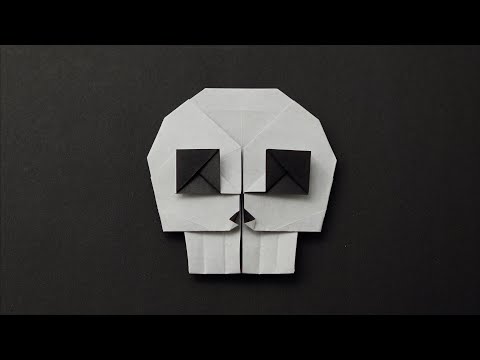
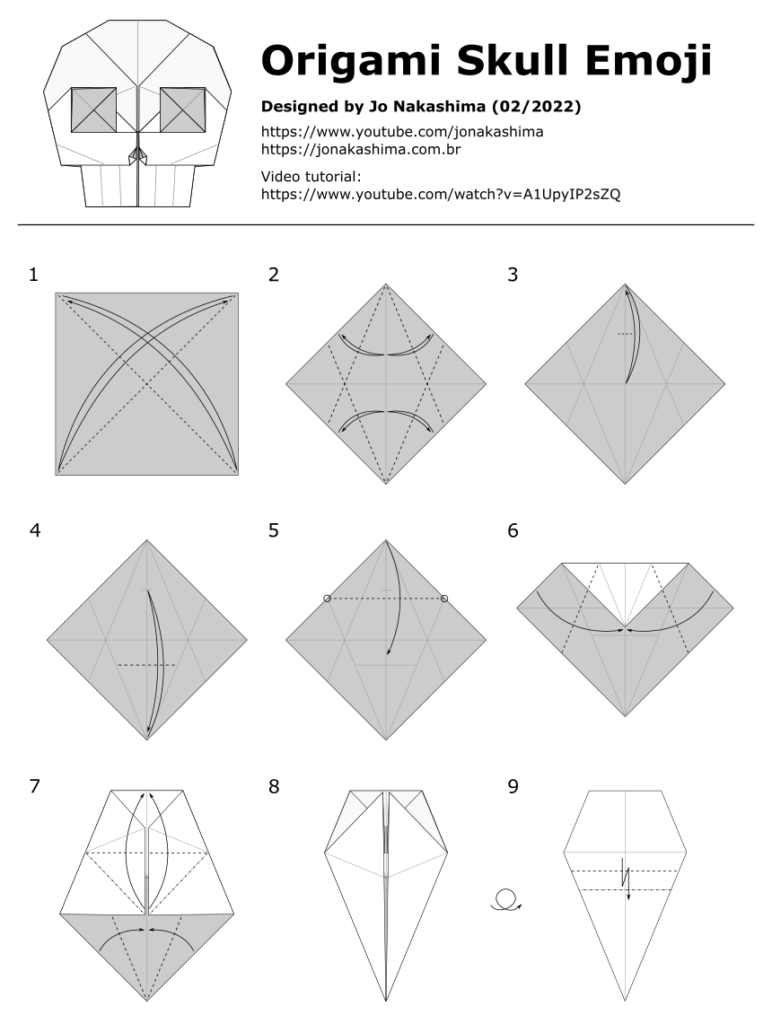
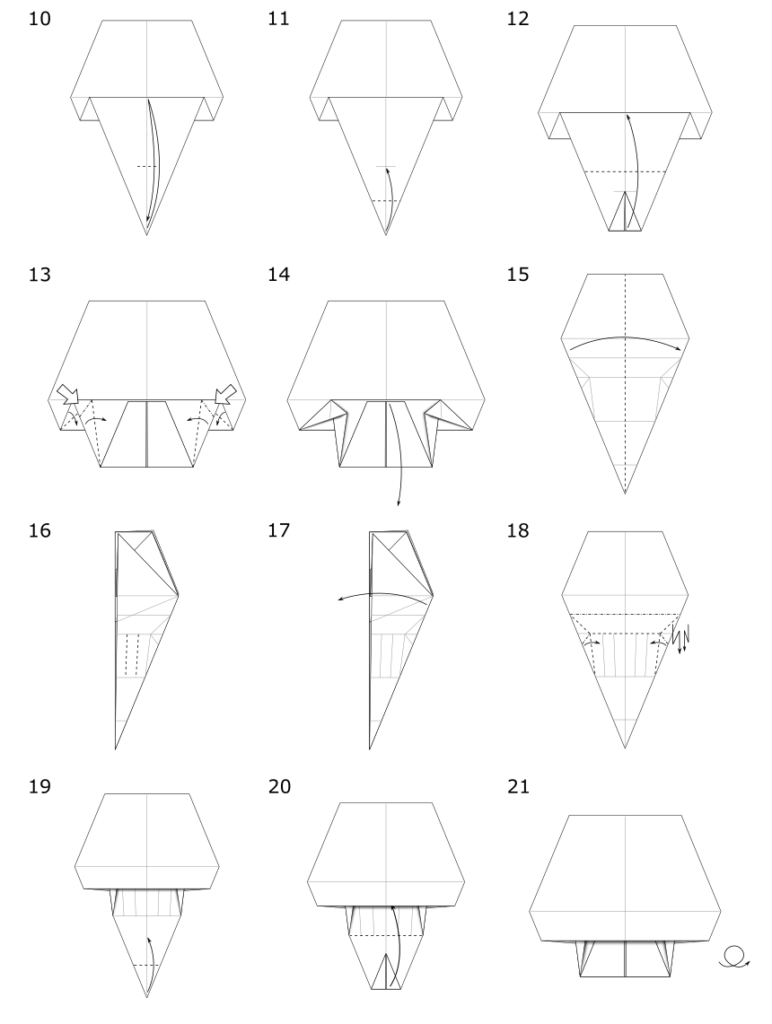
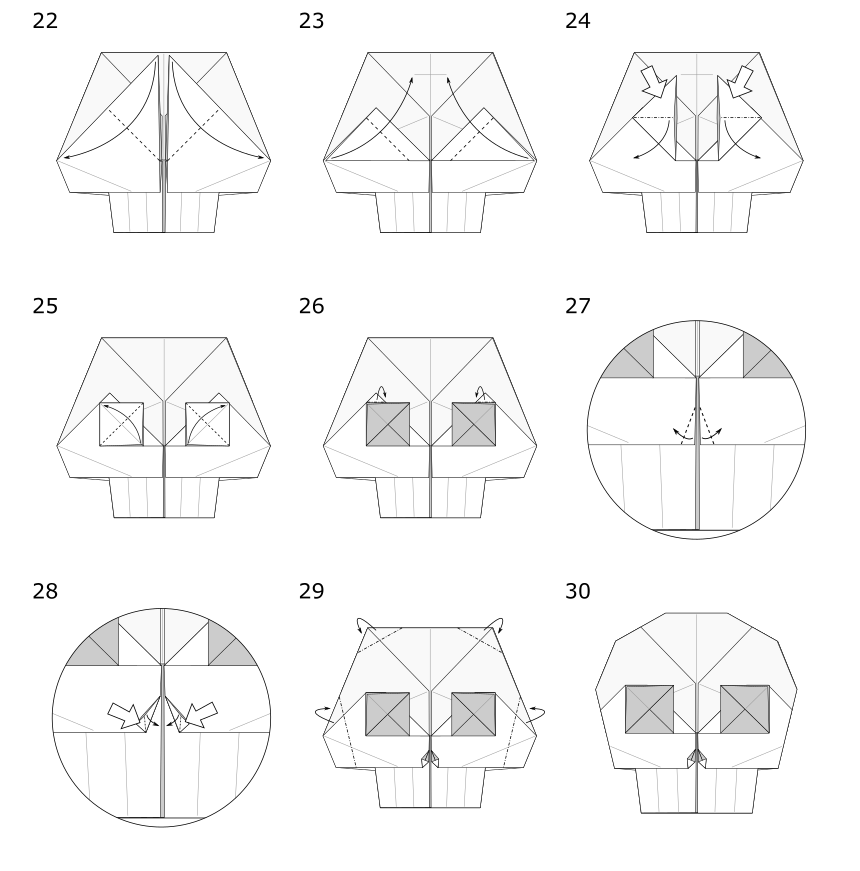
How to make an origami Skull Emoji Designed by Jo Nakashima (02/2022) Difficulty level: simple
In this video you’ll learn how to make an origami skull emoji. It’s easy and works well with standard origami paper. The recommended paper size for the emojis (including the previous ones) is 12cm x 12cm.
Origami Skull Emoji Diagrams
More origami emoji
See also more origami emoji tutorials in this playlist.
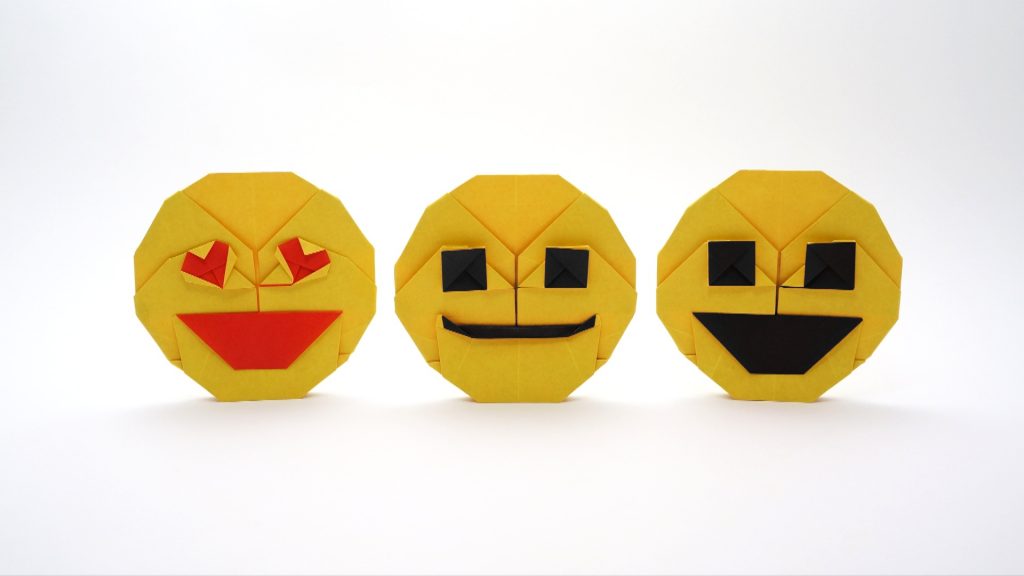
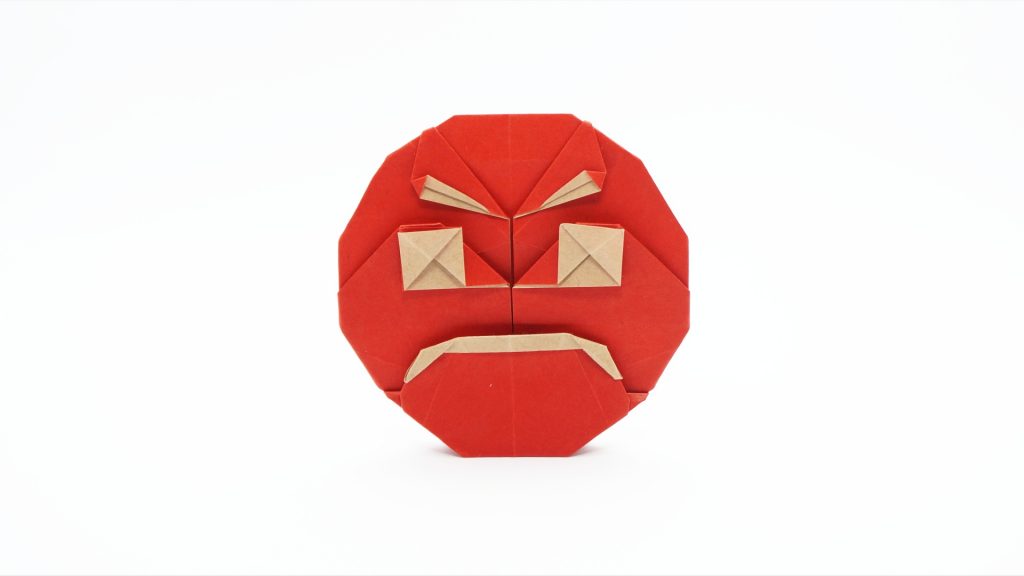
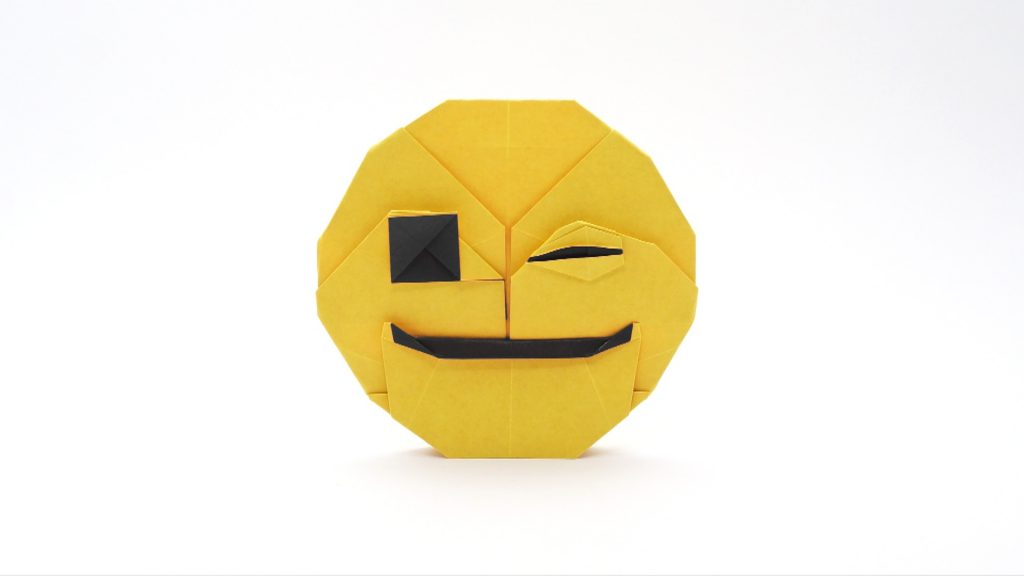
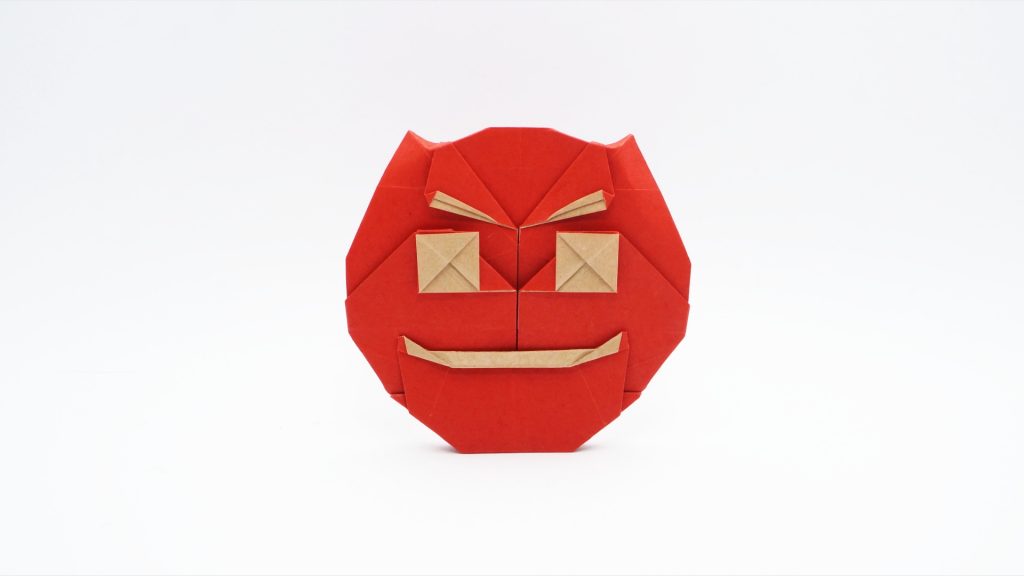
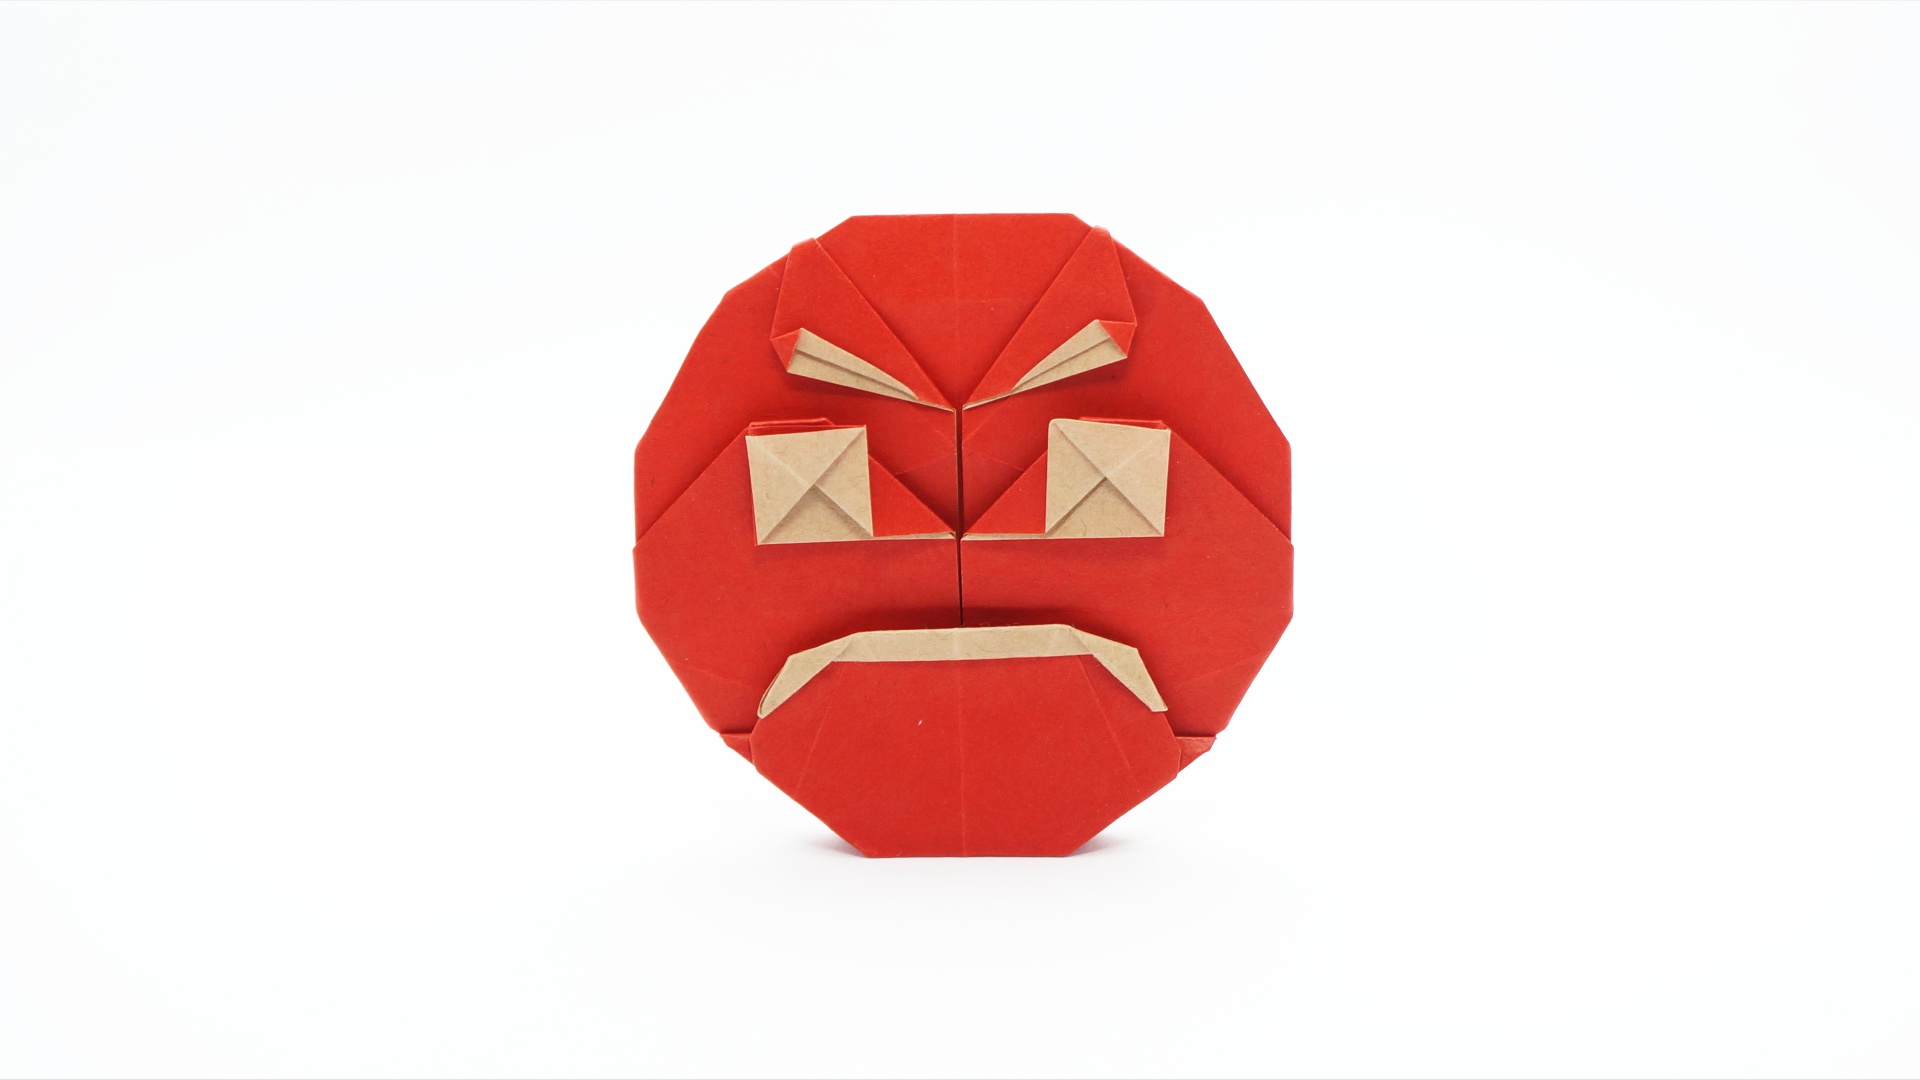
Poop emojiWink face emojiAngry face emojiDevil Emoji
Support my work!
If you like my work, please consider visiting and subscribing to my YouTube channel! You’ll find all my work, including models that are not in this website and also models from other origami artists. The easiest way to support my work is simply watching my videos, clicking the like button, leaving comments and subscribing to my channel!
You can also contribute with small donations on Patreon or YouTube Channel Membership. It’s basically like paying me a tip as a thanks for my work and get some rewards in return, like early access to my tutorials and your name in the video (the “thank you” list). They work with recurring payments, but you can cancel anytime so one-time donations are also possible.
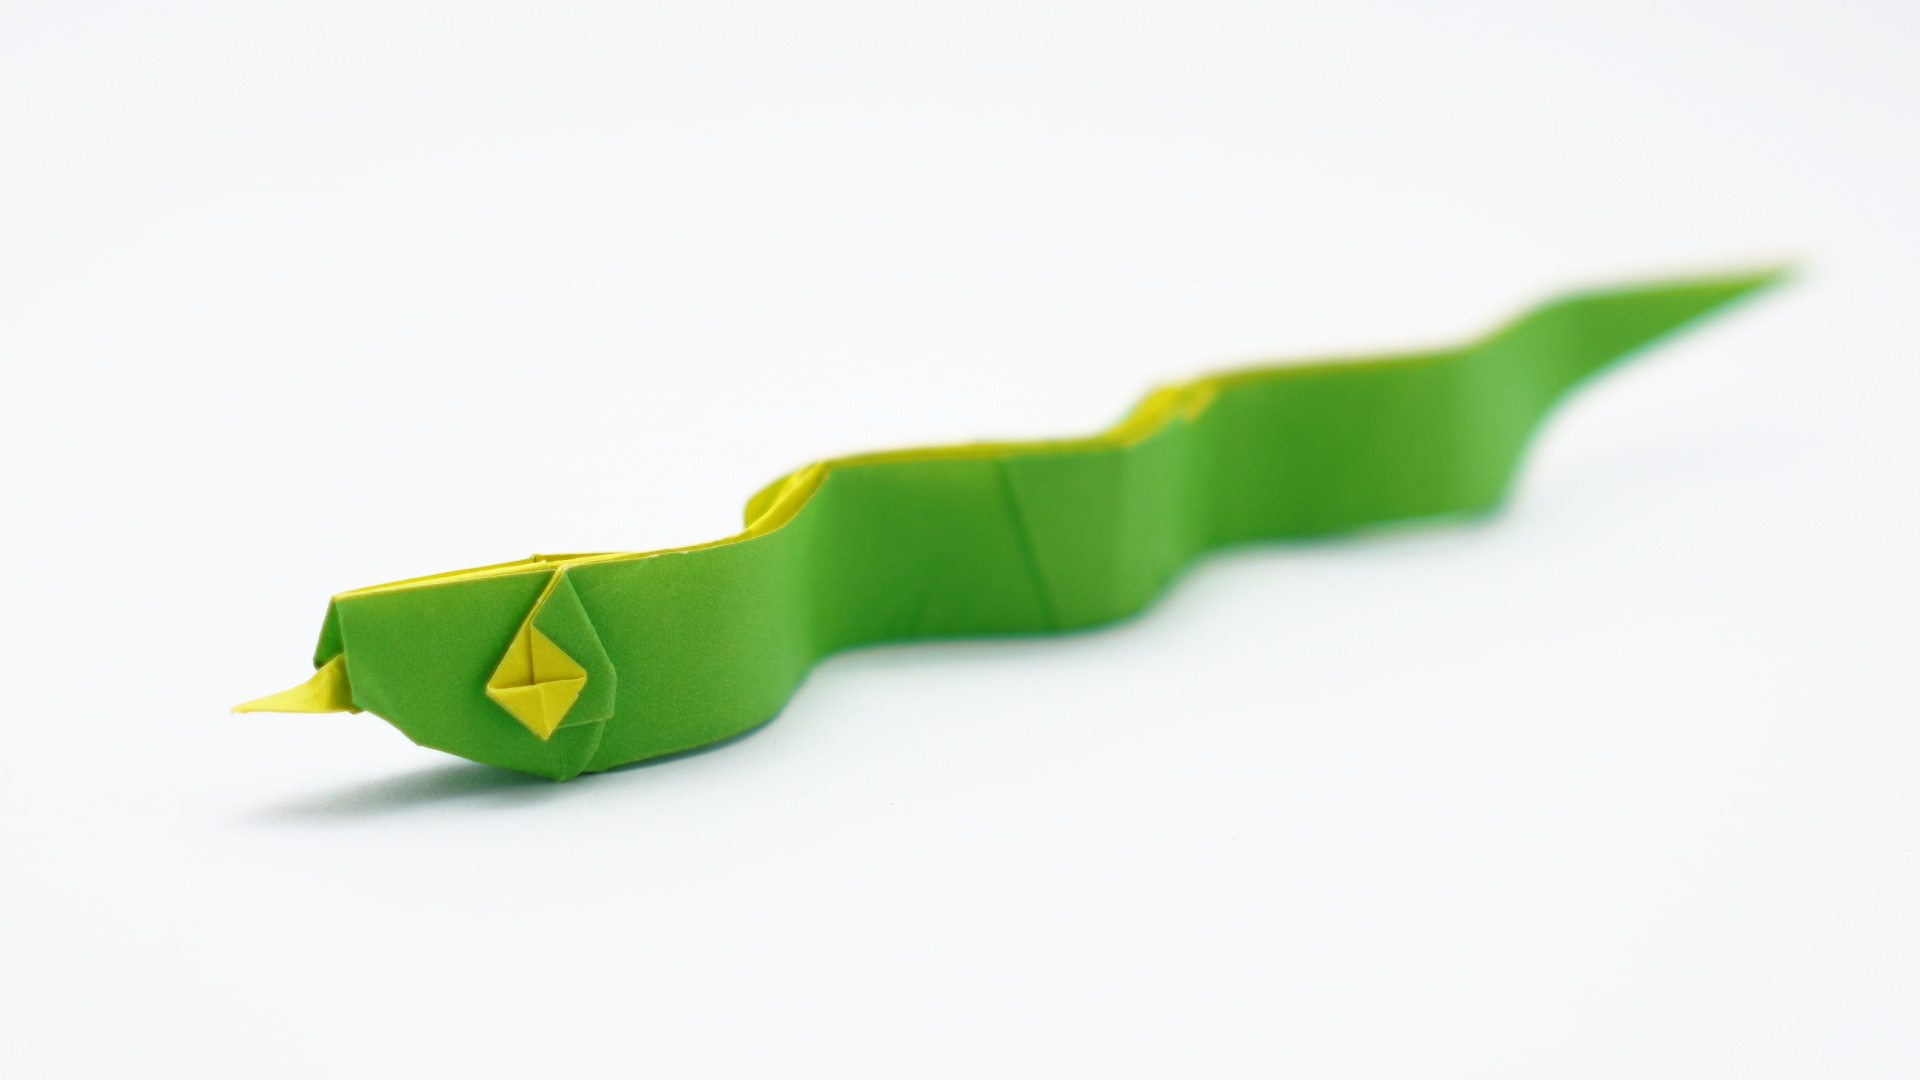
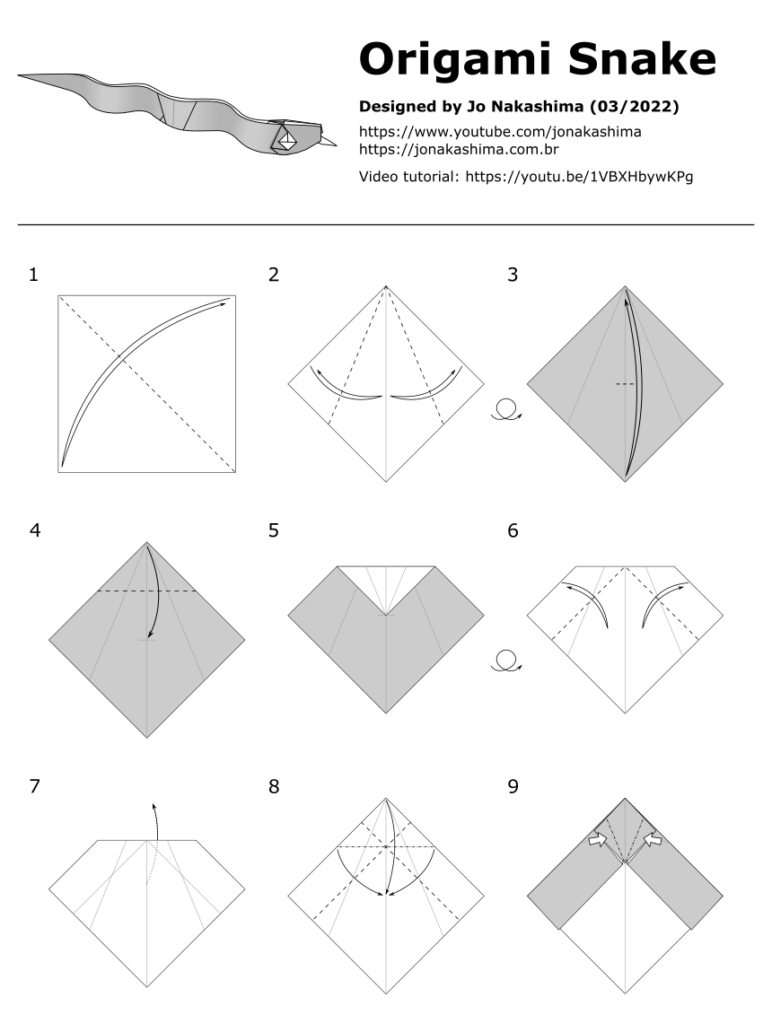
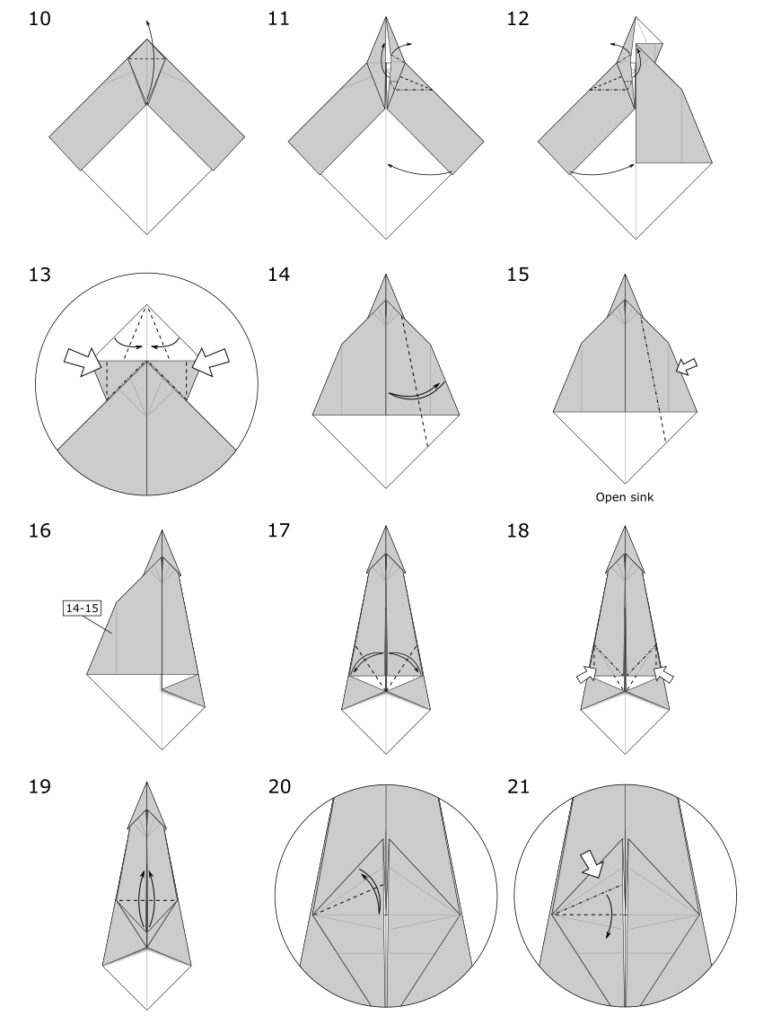
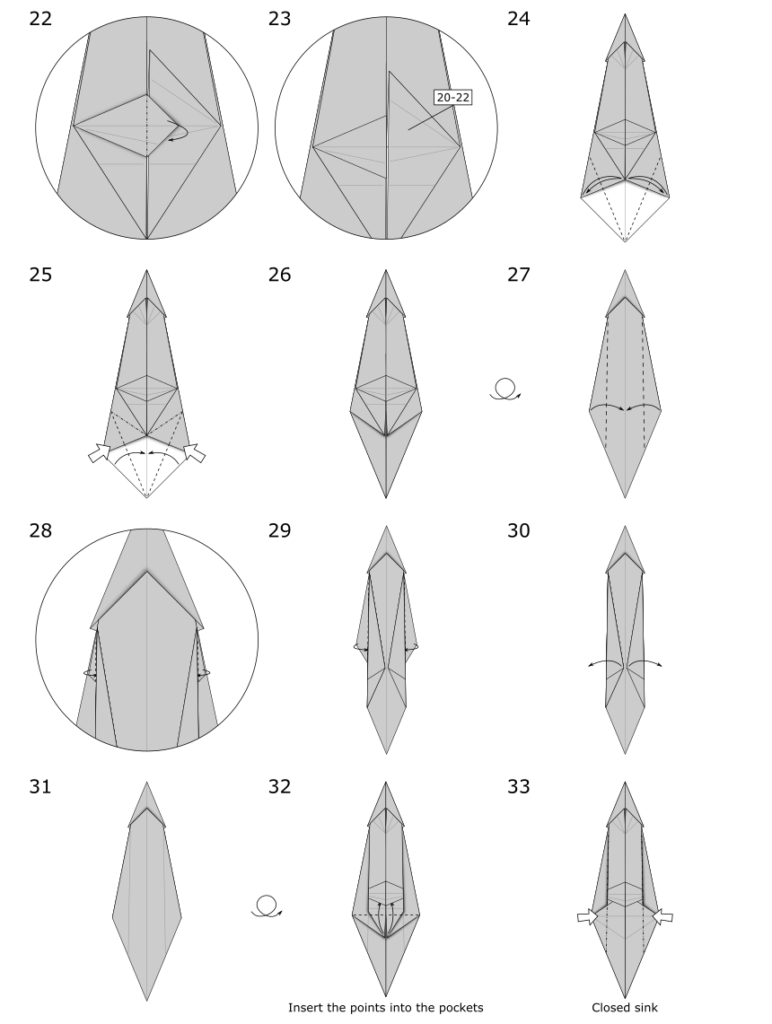
How to make an Origami Snake Designed by Jo Nakashima (03/2022) Difficulty level: low intermediate
In this video you’ll learn how to make an origami snake. At first it seems to be a very simple subject, since it’s not necessary to make many flaps. But the challenge is to make it cute and recognizable, even with so few features, and also hide all the excess paper nicely without leaving loose layers or points.
Origami Snake diagrams
If you have trouble on some steps, check out the video tutorial.
Support my work!
If you like my work, please consider visiting and subscribing to my YouTube channel! You’ll find all my work, including models that are not in this website and also models from other origami artists. The easiest way to support my work is simply watching my videos, clicking the like button, leaving comments and subscribing to my channel!
You can also contribute with small donations on Patreon or YouTube Channel Membership. It’s basically like paying me a tip as a thanks for my work and get some rewards in return, like early access to my tutorials and your name in the video (the “thank you” list). They work with recurring payments, but you can cancel anytime so one-time donations are also possible.
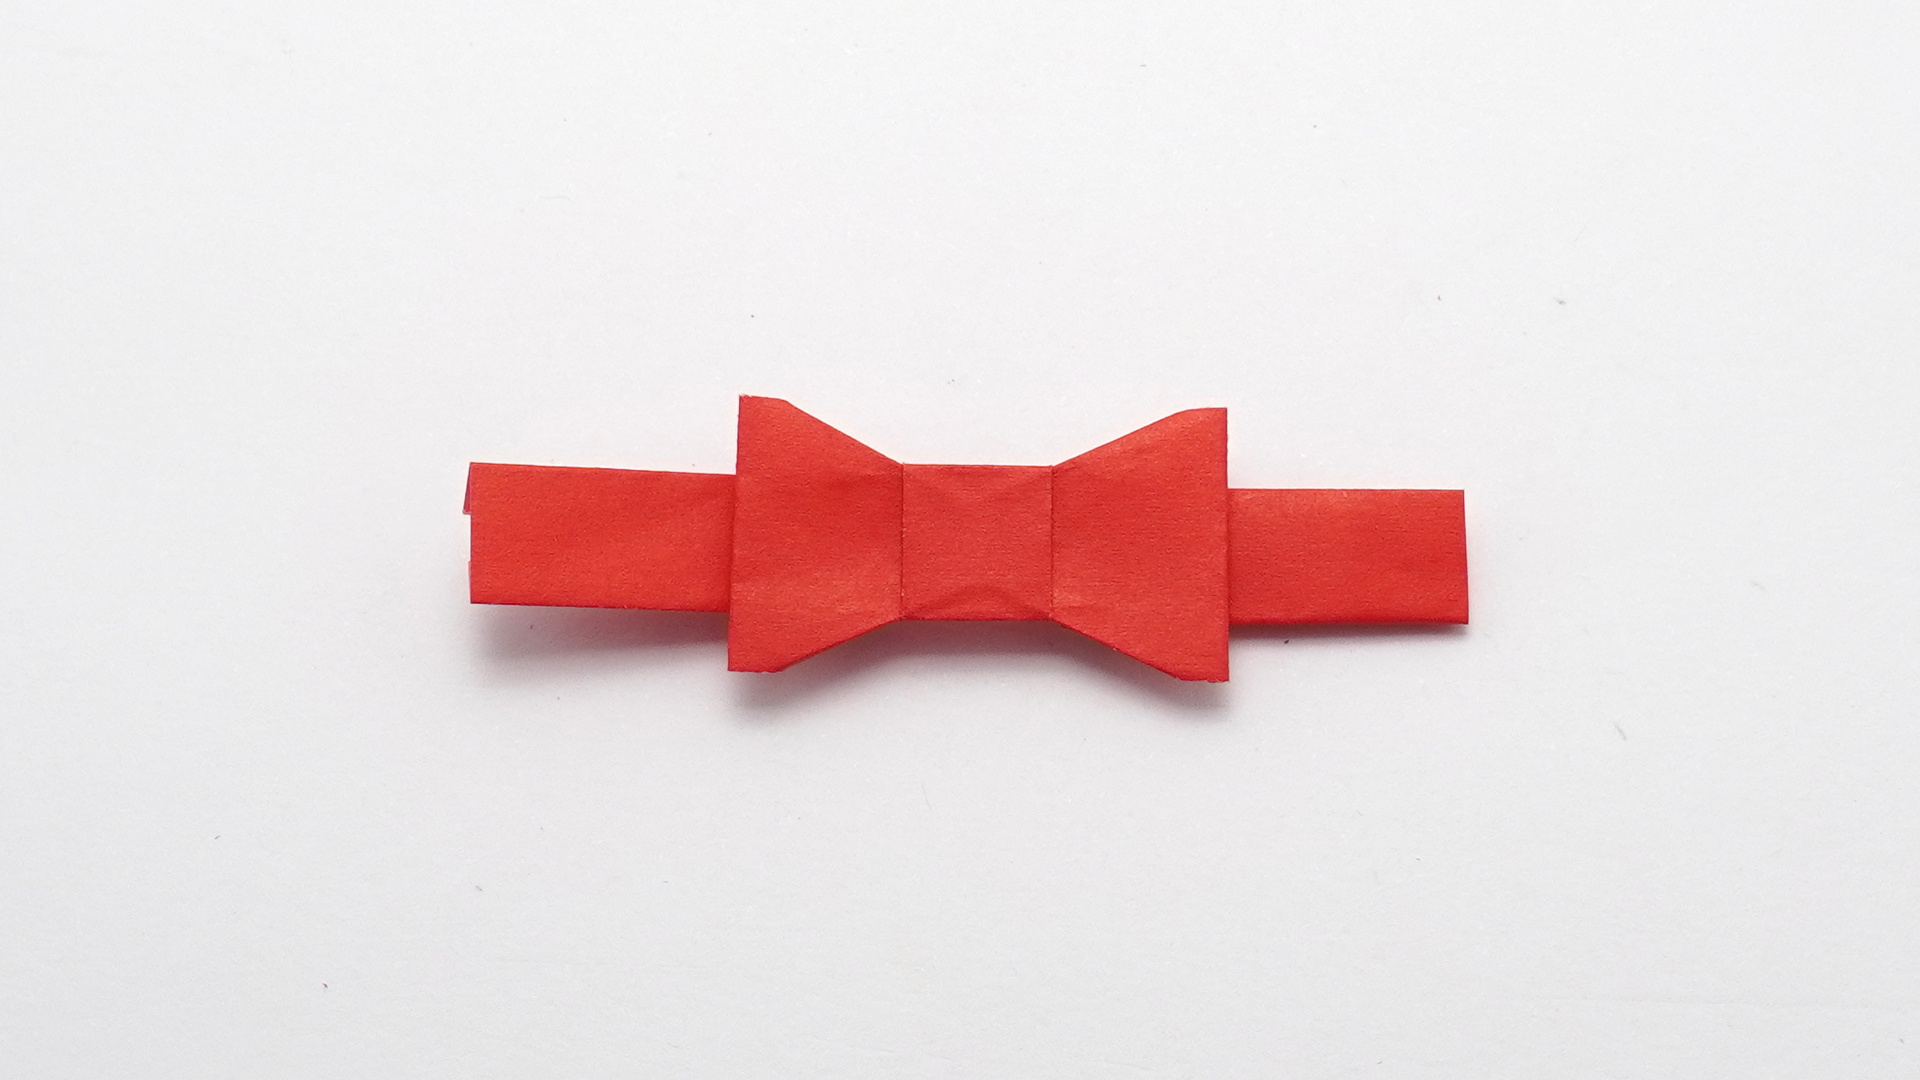
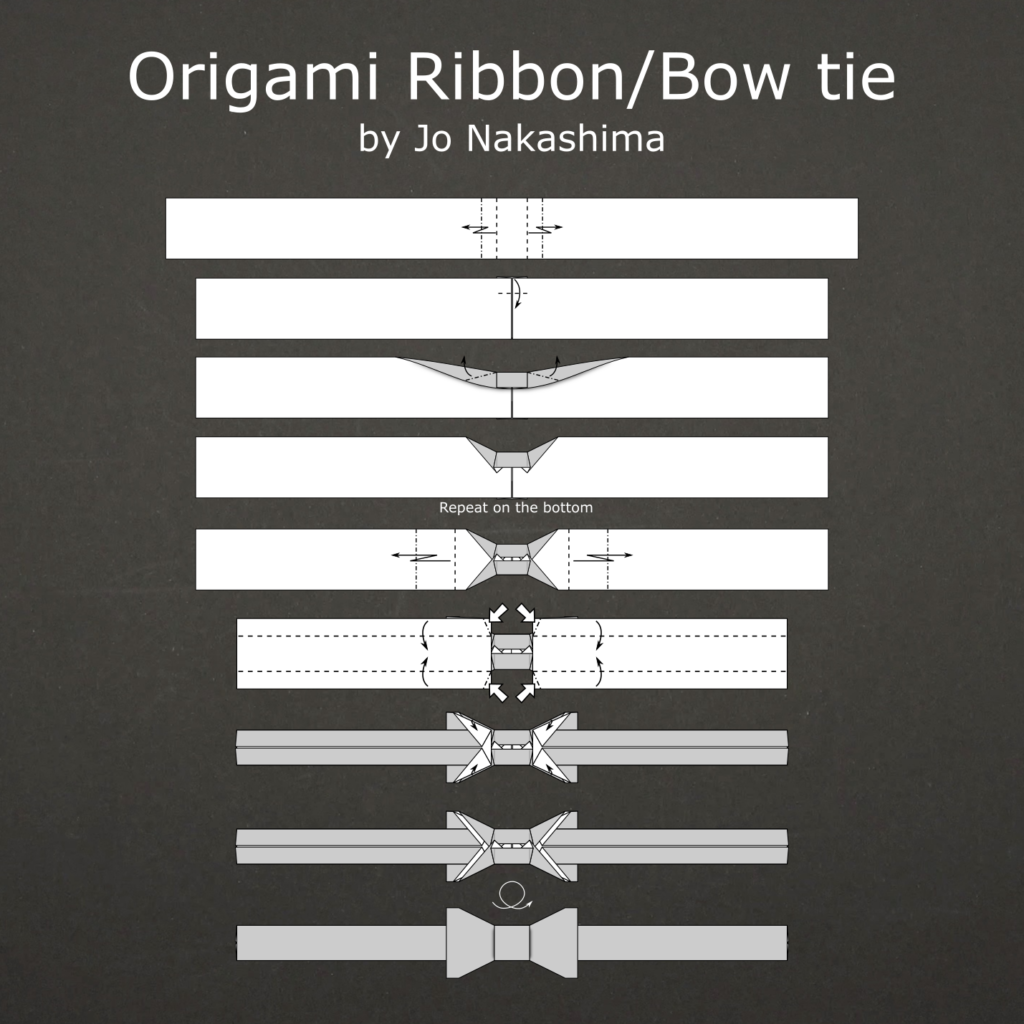
How to make an origami ribbon/bow tie Designed by Jo Nakashima (02/2022)
This is another very simple origami I made as an accessory for the origami Goose, based on the Untitled Goose Game. In this game you can get the goose dressed up with a red (or blue) ribbon:
If you like my work, please consider visiting and subscribing to my YouTube channel! You’ll find all my work, including models that are not in this website and also models from other origami artists. The easiest way to support my work is simply watching my videos, clicking the like button, leaving comments and subscribing to my channel!
You can also contribute with small donations on Patreon or YouTube Channel Membership. It’s basically like paying me a tip as a thanks for my work and get some rewards in return, like early access to my tutorials and your name in the video (the “thank you” list). They work with recurring payments, but you can cancel anytime so one-time donations are also possible.
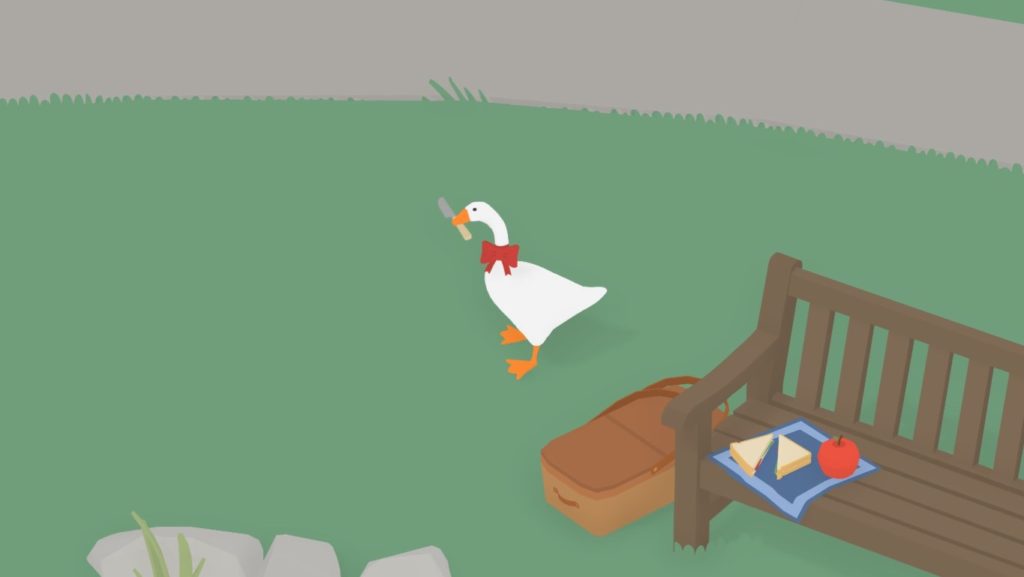
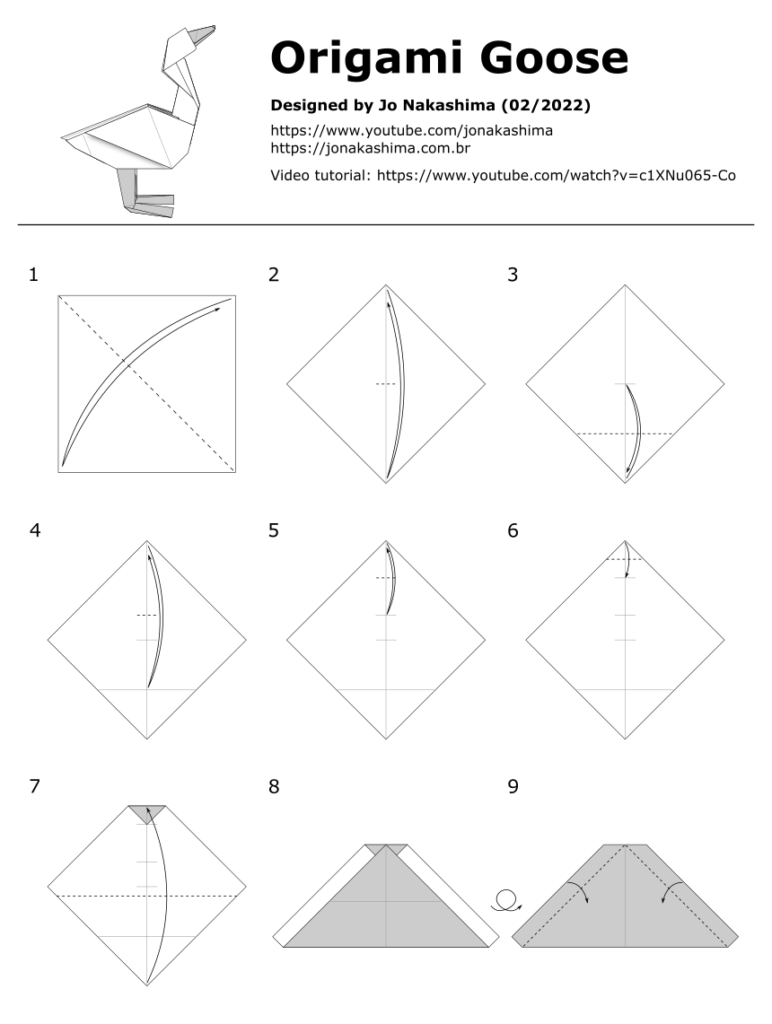
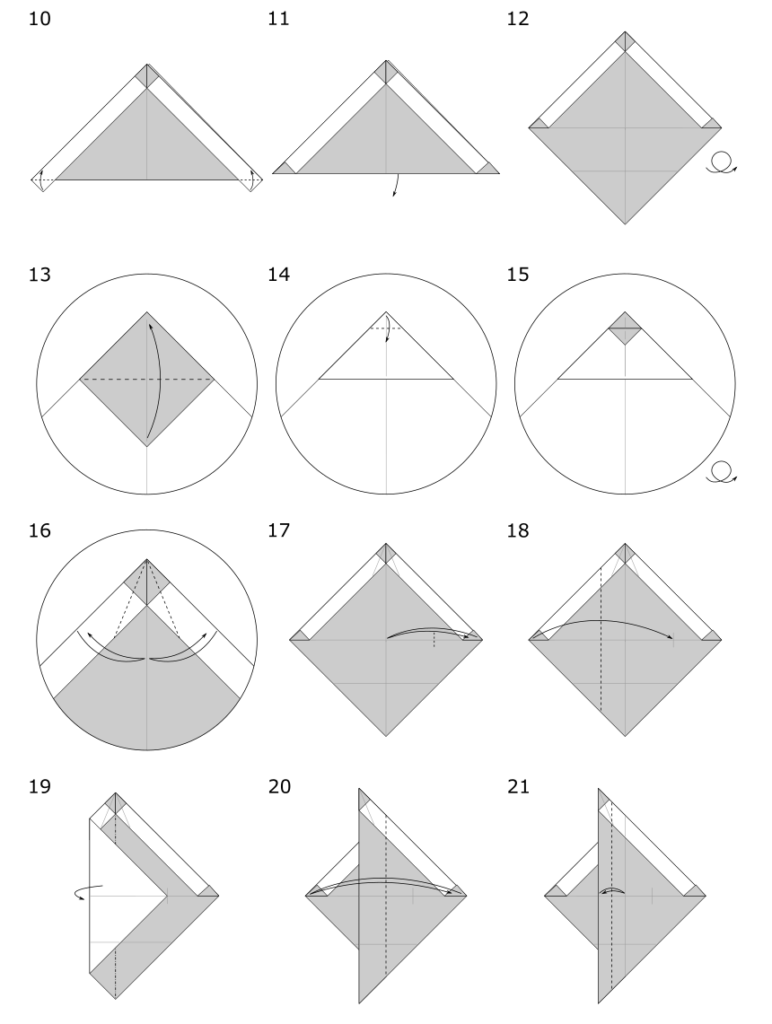
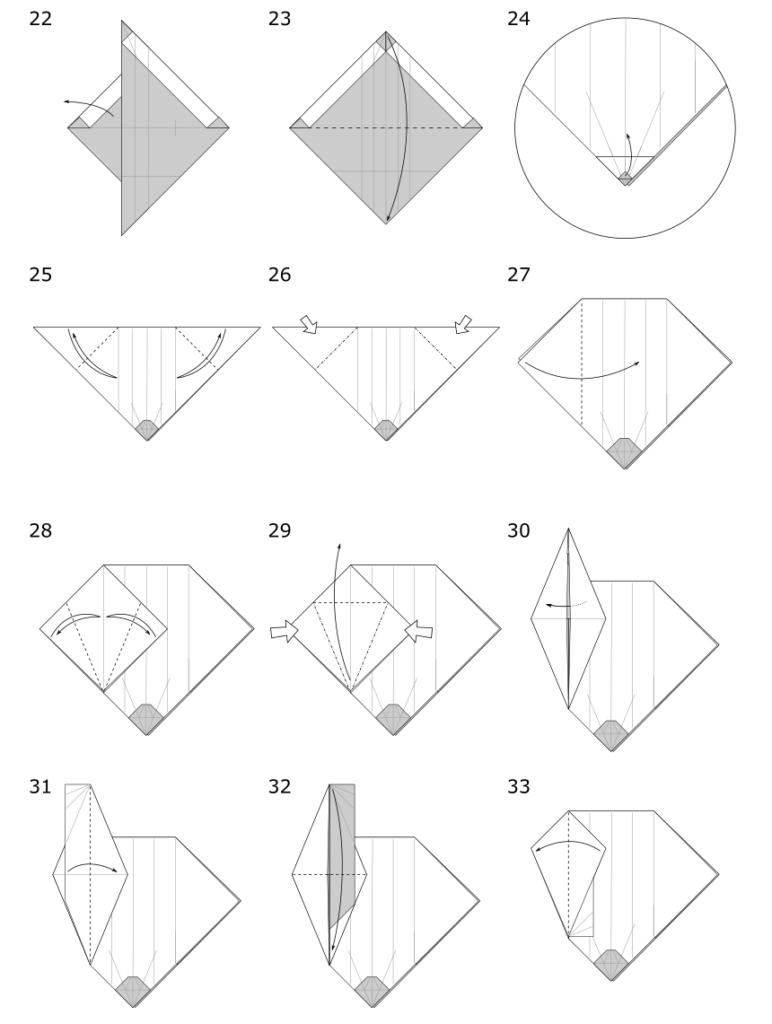
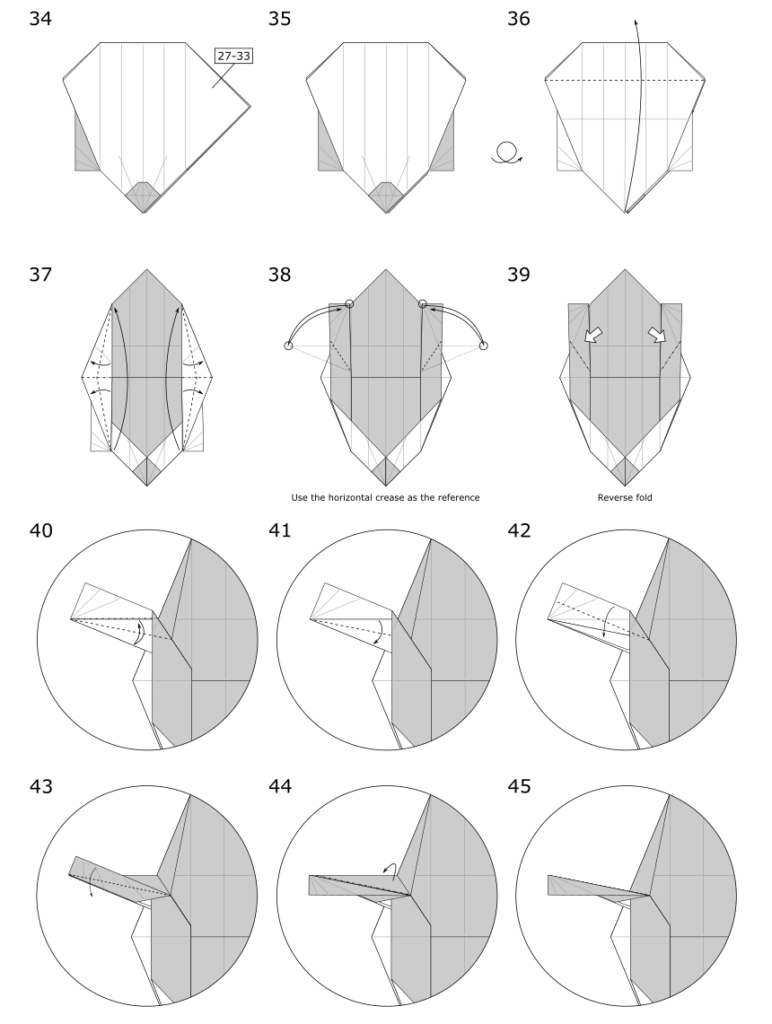
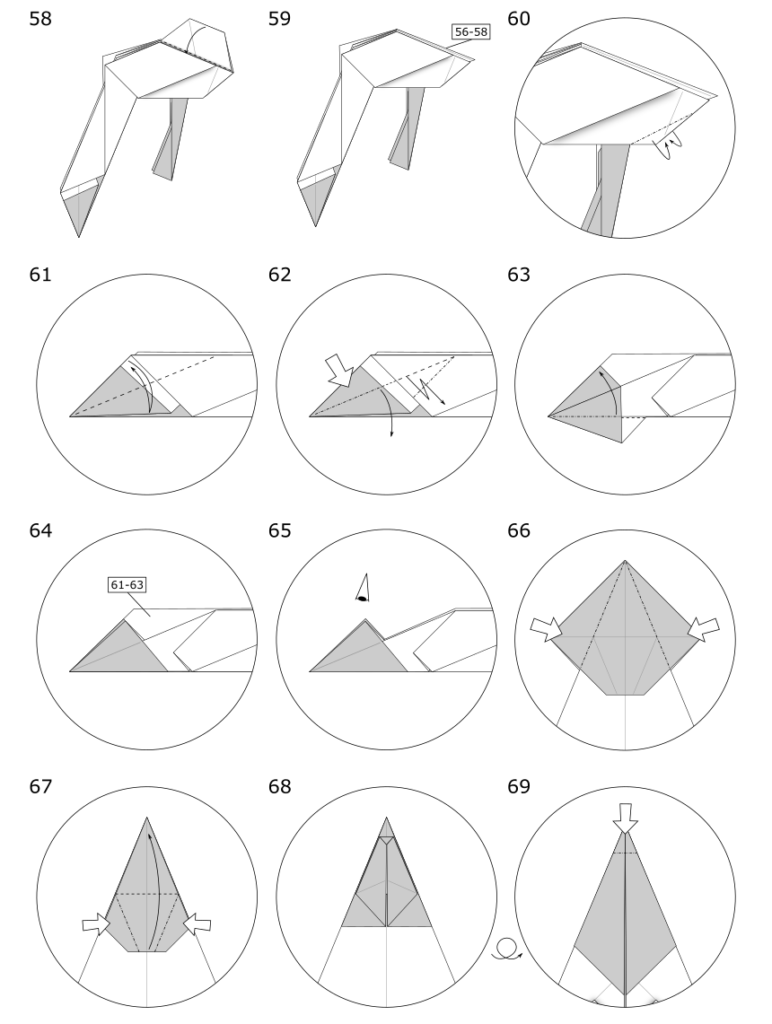
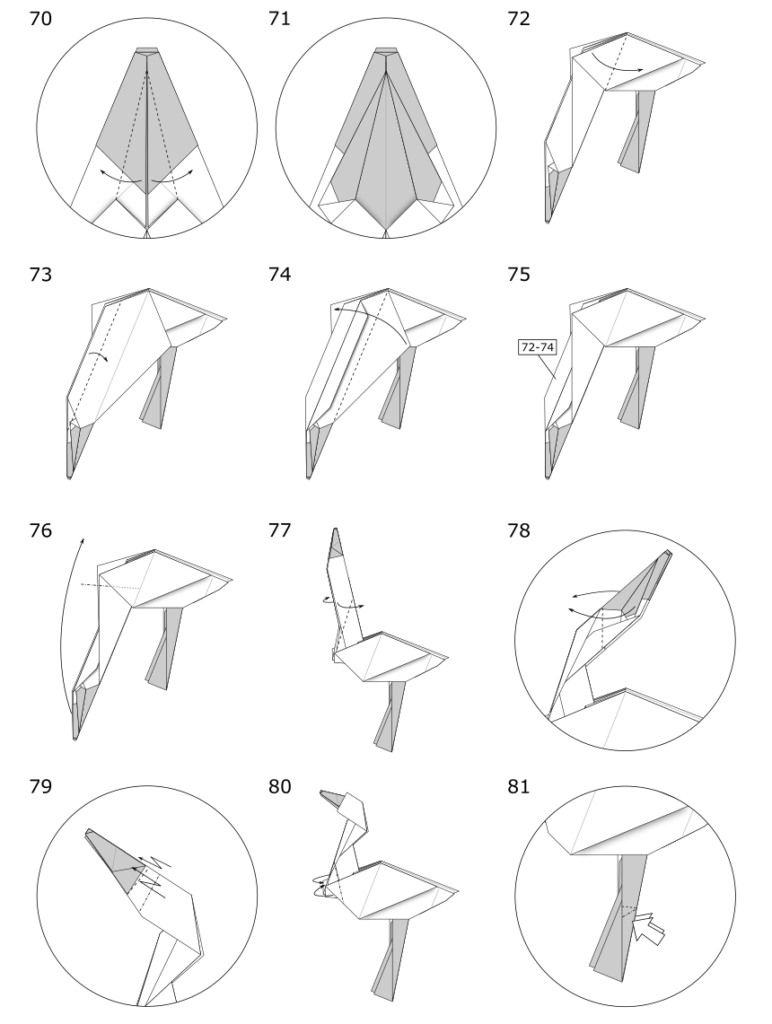
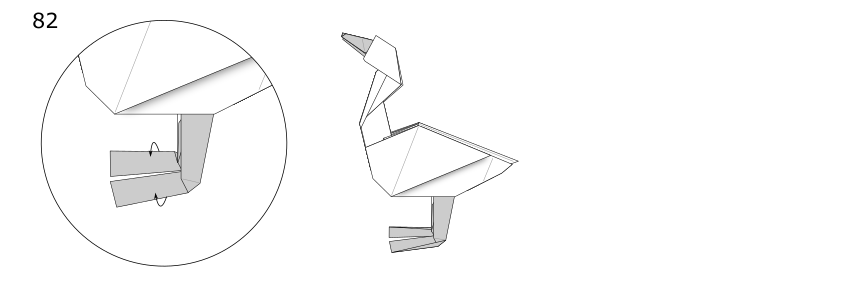
How to make an origami goose Designed by Jo Nakashima (02/2022)
After playing Untitled Goose Game I had to make an origami goose! This model a variation of my origami Duck. The steps are the same until 20m50s.
The beak can be opened the same way as in the origami duck, but I prefer it closed because it looks cuter and it can also hold the knife.
The step at 27m28s looks useless and not very elegant, but it was necessary to avoid ripping the paper while making the reverse fold of the head with too many layers pressuring the middle.
See also the origami knife and ribbon, two very popular items from the game.
Untitled Goose Game
Diagrams
If you have trouble on some steps, check out the video tutorial.
Support my work!
If you like my work, please consider visiting and subscribing to my YouTube channel! You’ll find all my work, including models that are not in this website and also models from other origami artists. The easiest way to support my work is simply watching my videos, clicking the like button, leaving comments and subscribing to my channel!
You can also contribute with small donations on Patreon or YouTube Channel Membership. It’s basically like paying me a tip as a thanks for my work and get some rewards in return, like early access to my tutorials and your name in the video (the “thank you” list). They work with recurring payments, but you can cancel anytime so one-time donations are also possible.
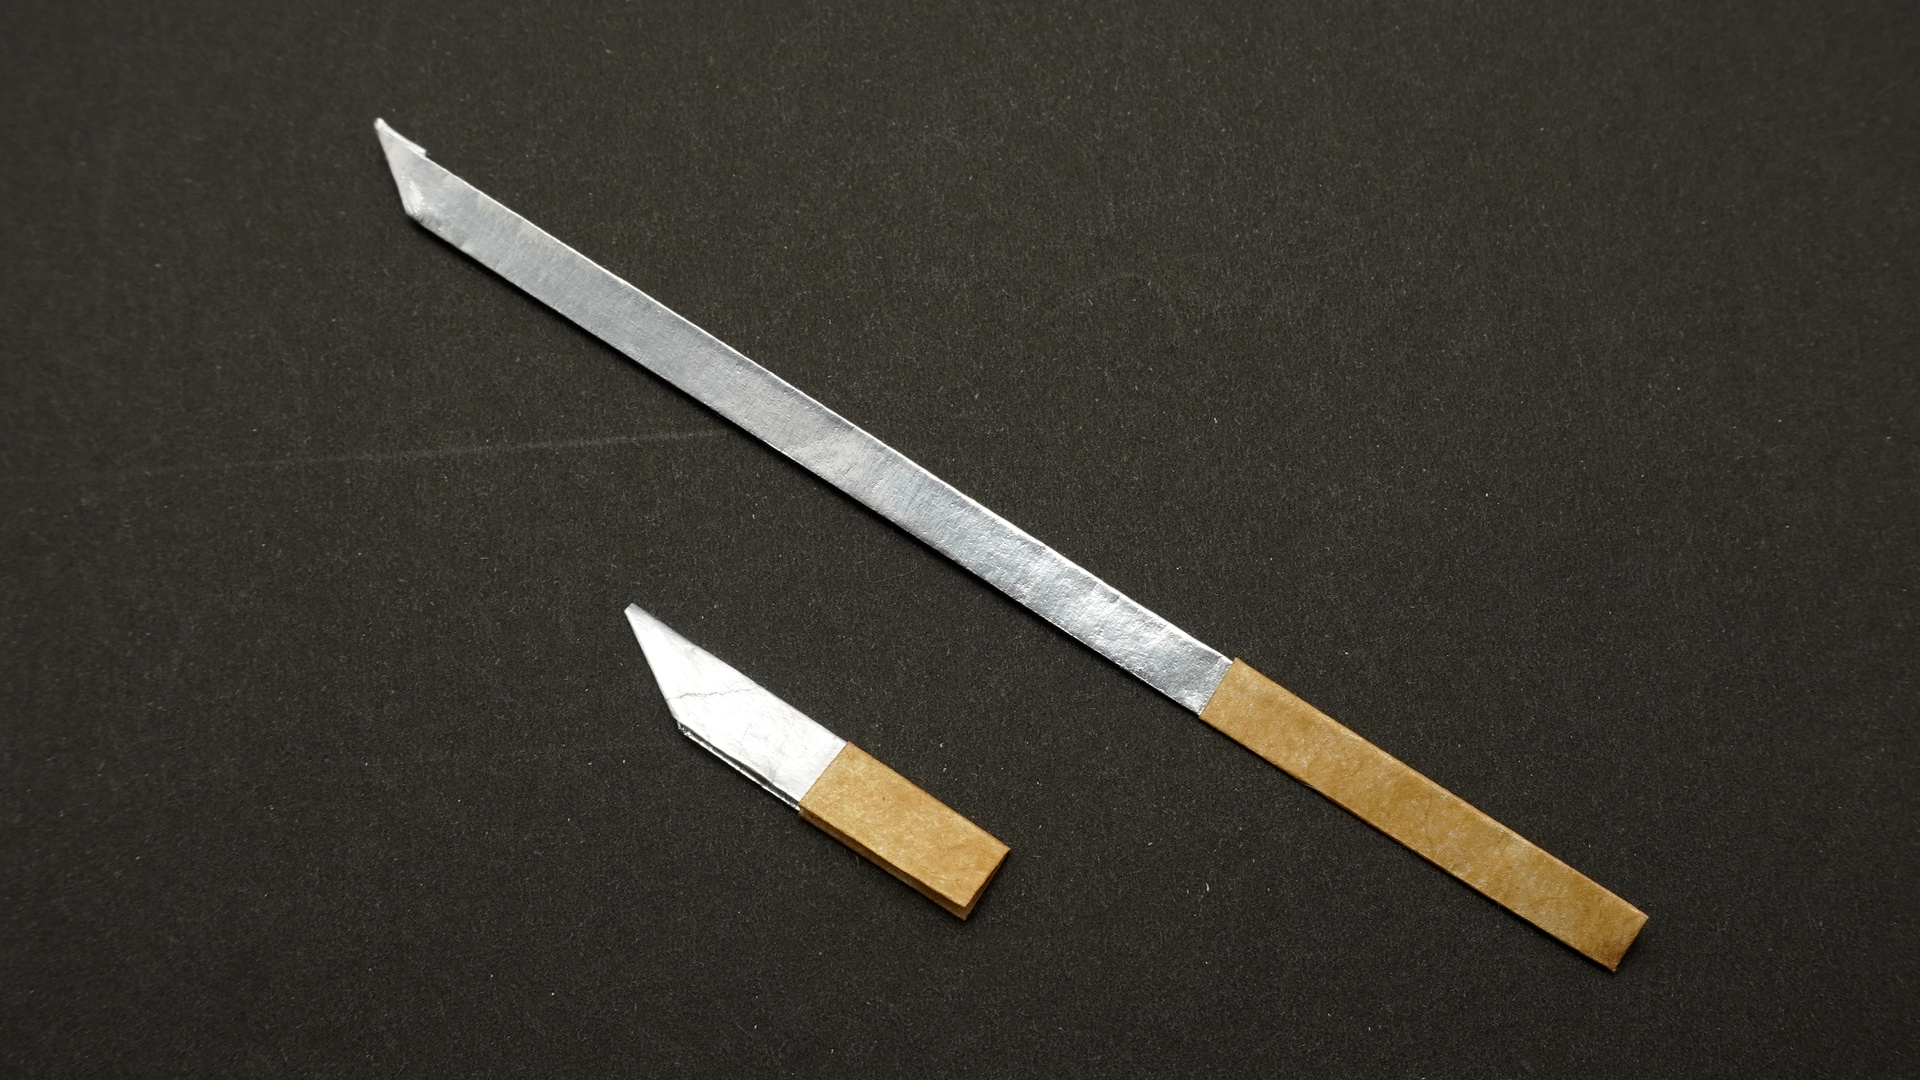
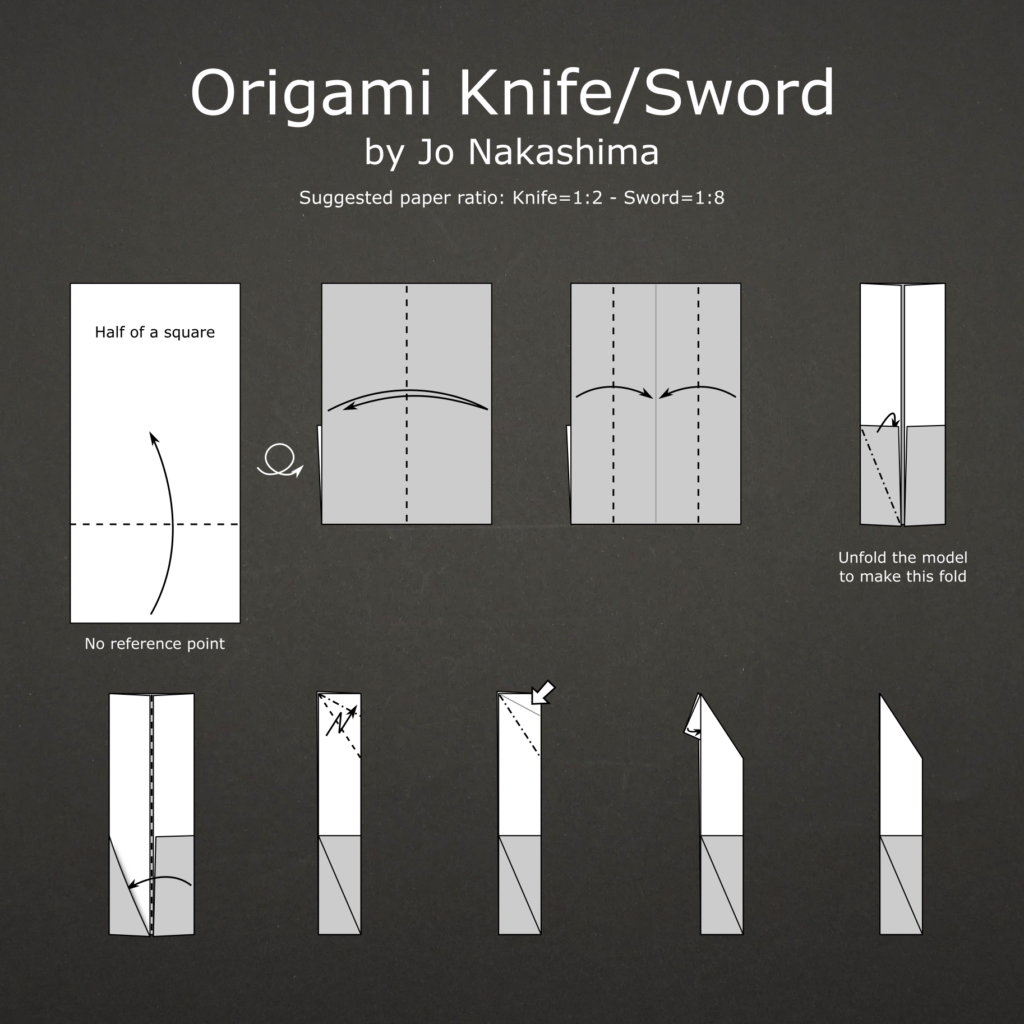
How to make an origami knife/sword Designed by Jo Nakashima (02/2022)
This is a very simple model made for the origami goose to make the meme “peace was never an option”. You can easily make a sword using a longer rectangle.
Diagrams
The first step doesn’t have a reference point: it will be the size you want for the handle of the knife/sword. Start with a rectangle with ratio 1:2 for a knife or longer for a sword (I suggest 1:8 for a sword, but the exact ratio doesn’t really matter).
If you wanna make a knife/sword with precise measurements, then: paper length= blade length+2x handle length paper width = 4x model width
Support my work!
If you like my work, please consider visiting and subscribing to my YouTube channel! You’ll find all my work, including models that are not in this website and also models from other origami artists. The easiest way to support my work is simply watching my videos, clicking the like button, leaving comments and subscribing to my channel!
You can also contribute with small donations on Patreon or YouTube Channel Membership. It’s basically like paying me a tip as a thanks for my work and get some rewards in return, like early access to my tutorials and your name in the video (the “thank you” list). They work with recurring payments, but you can cancel anytime so one-time donations are also possible.
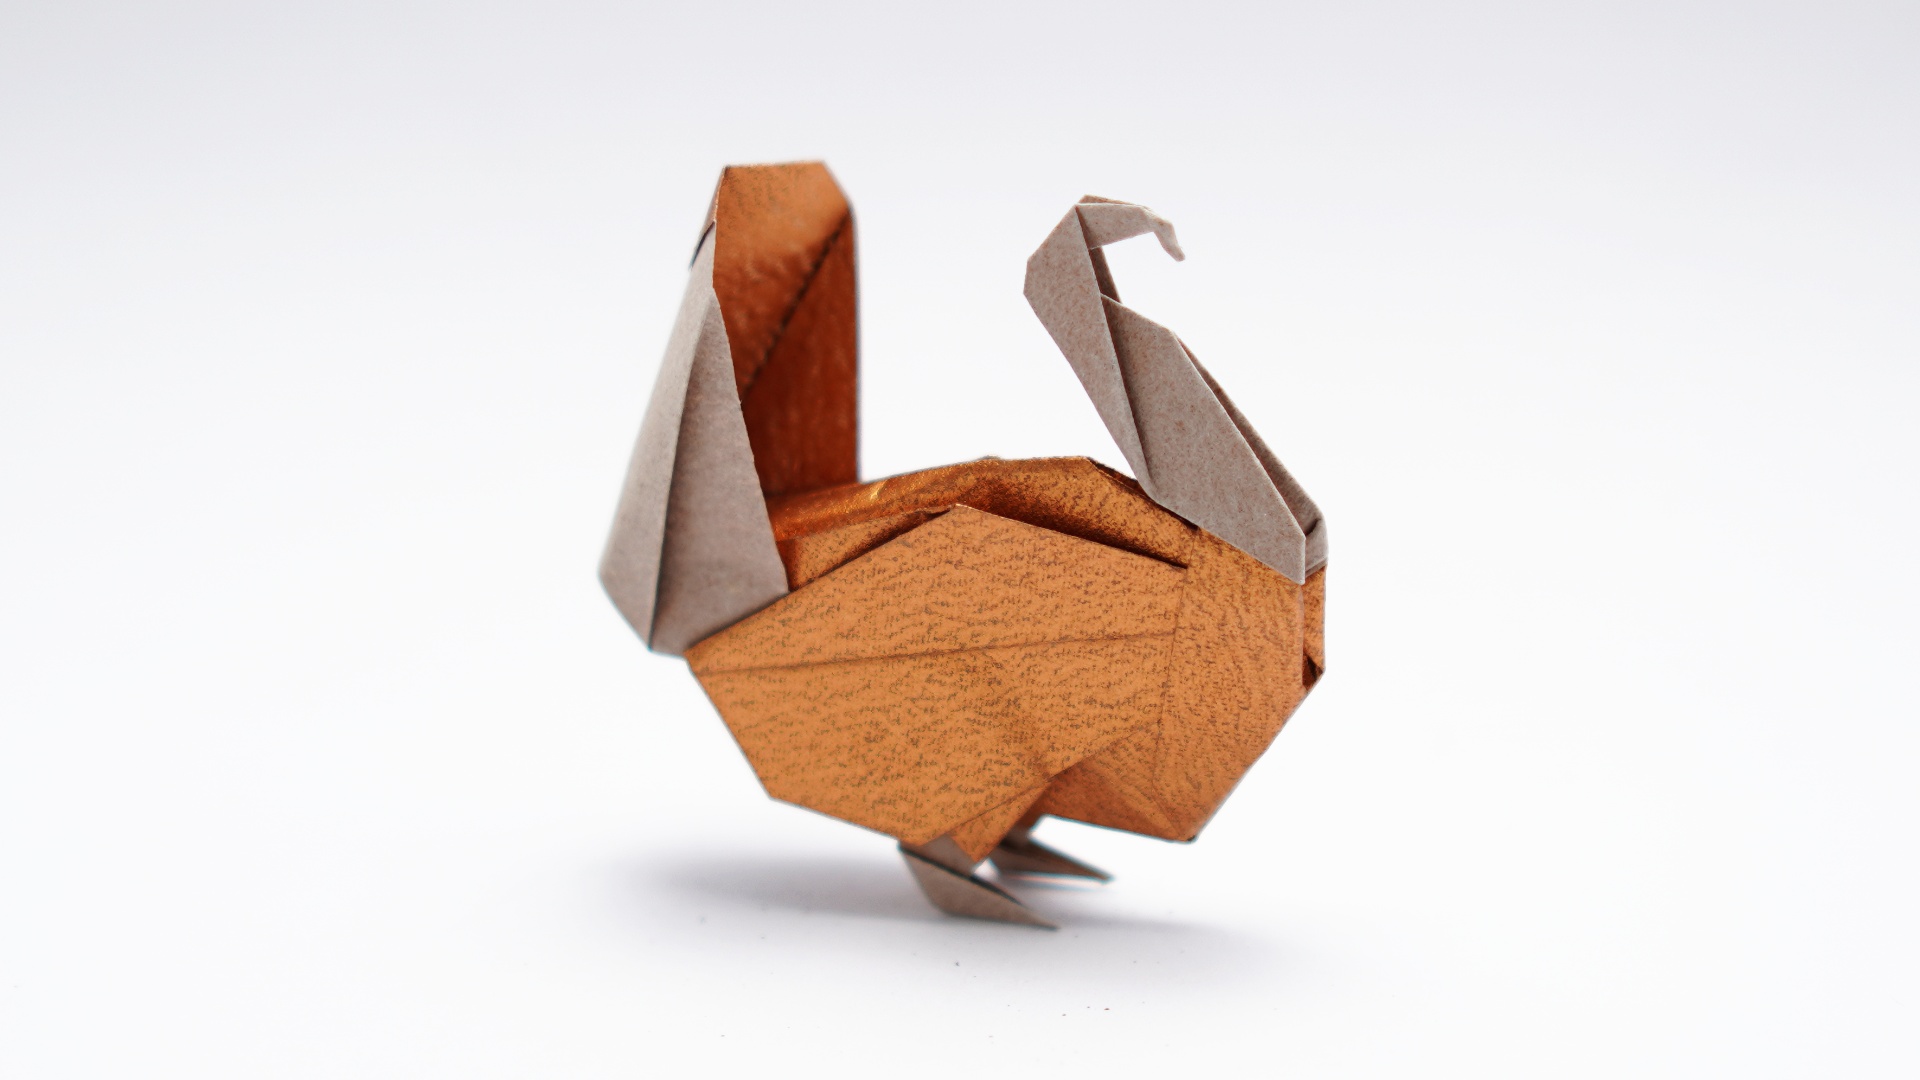
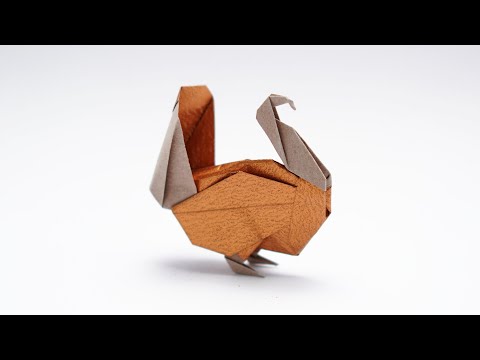
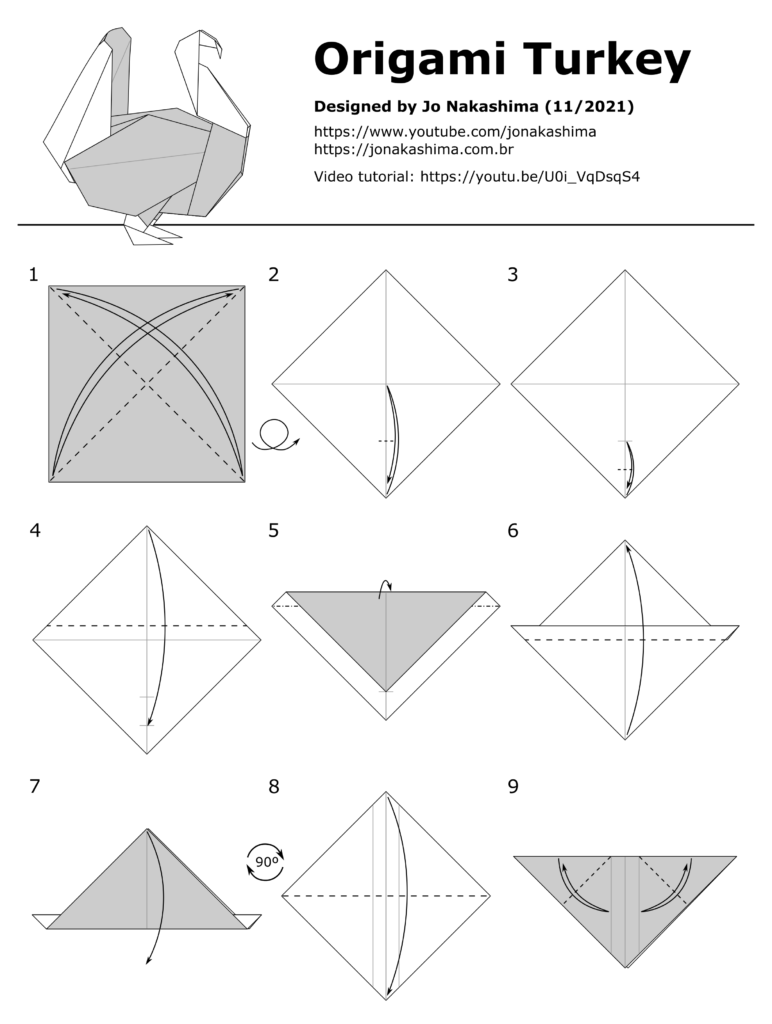
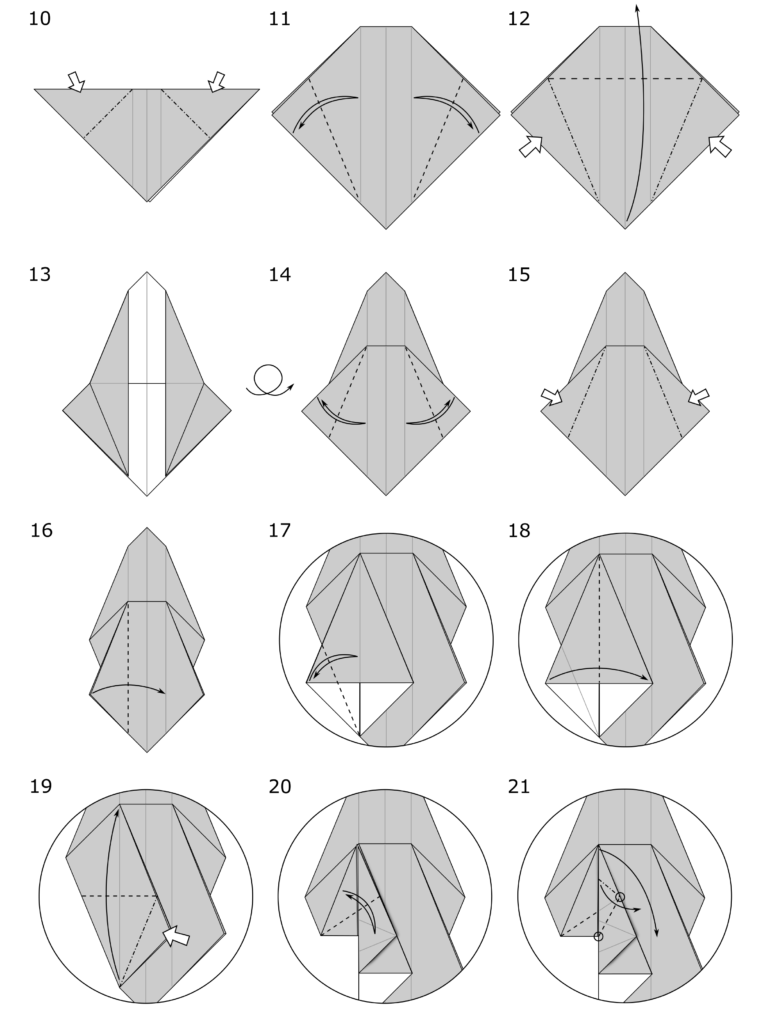
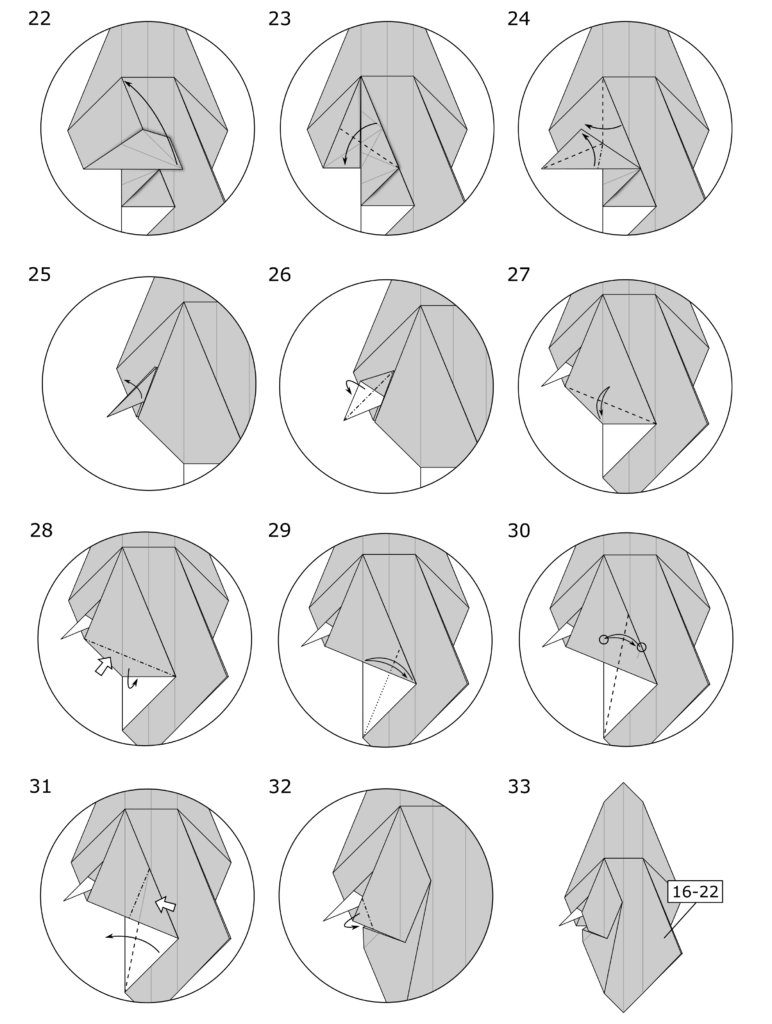
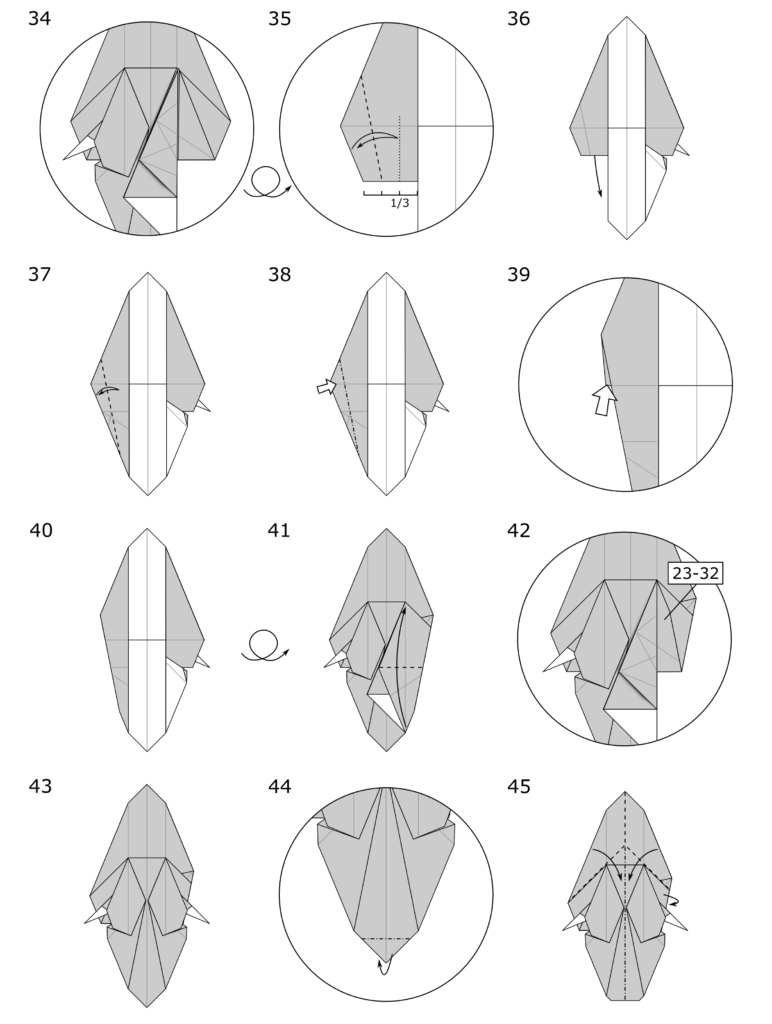
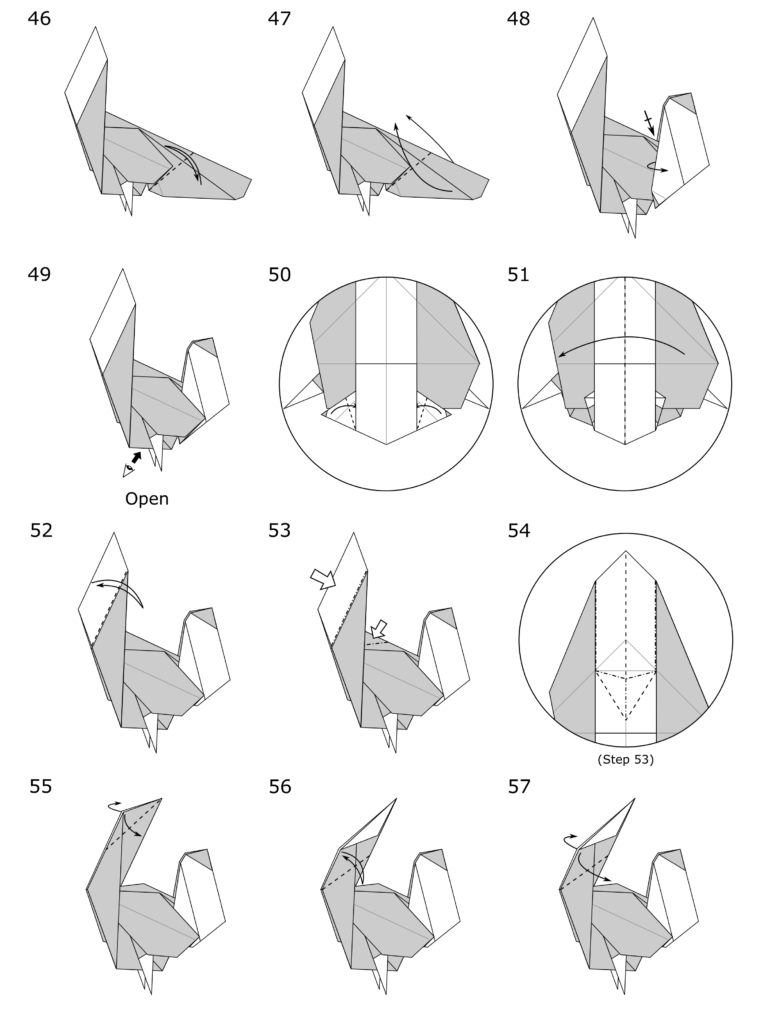
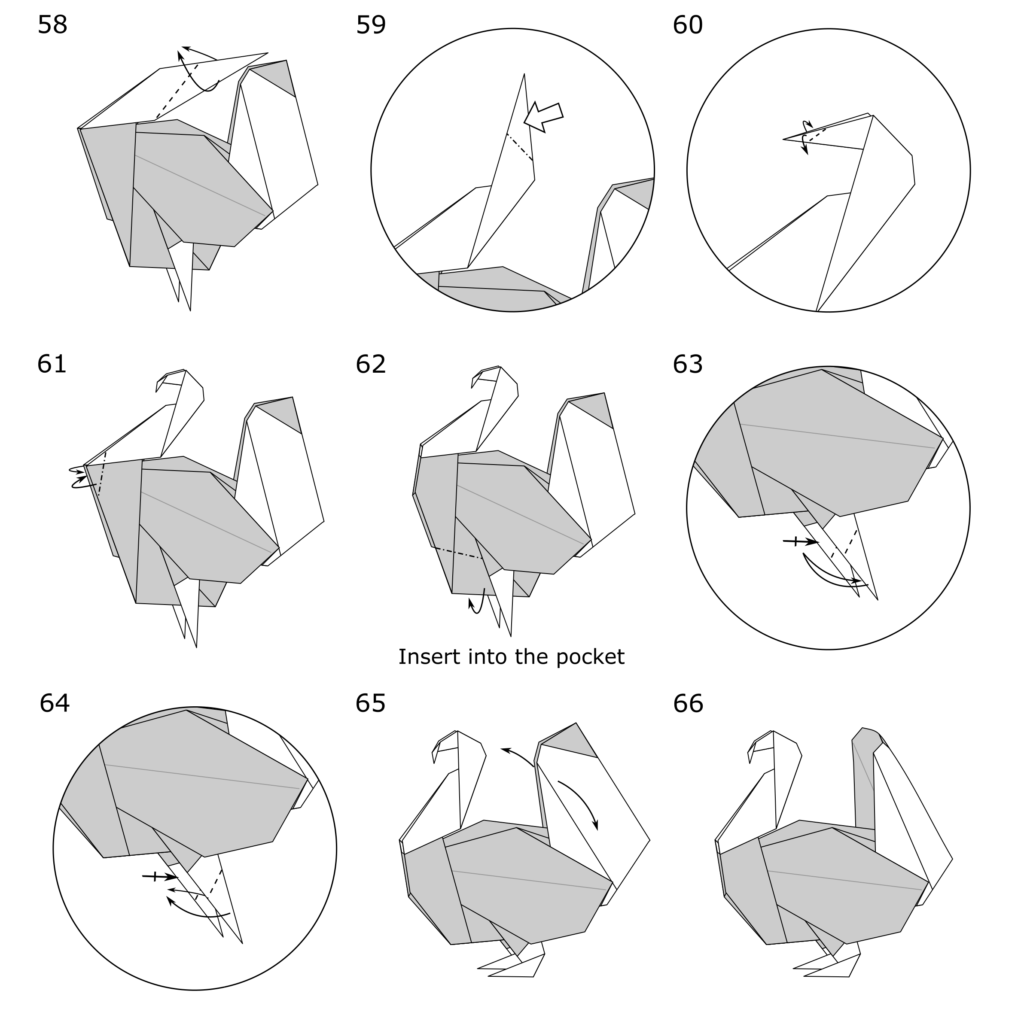
Origami Turkey Designed by Jo Nakashima (11/2021) Difficulty level: intermediate
In this tutorial you’ll learn how to make an origami turkey step by step. I used the same base (or variations of it) to make other birds like the Pigeon, Peacock, Java Sparrow and Cockatiel.
Origami Turkey Diagrams
Support my work!
If you like my work, please consider visiting and subscribing to my YouTube channel! You’ll find all my work, including models that are not in this website and also models from other origami artists. The easiest way to support my work is simply watching my videos, clicking the like button, leaving comments and subscribing to my channel!
You can also contribute with small donations on Patreon or YouTube Channel Membership. It’s basically like paying me a tip as a thanks for my work and get some rewards in return, like early access to my tutorials and your name in the video (the “thank you” list). They work with recurring payments, but you can cancel anytime so one-time donations are also possible.
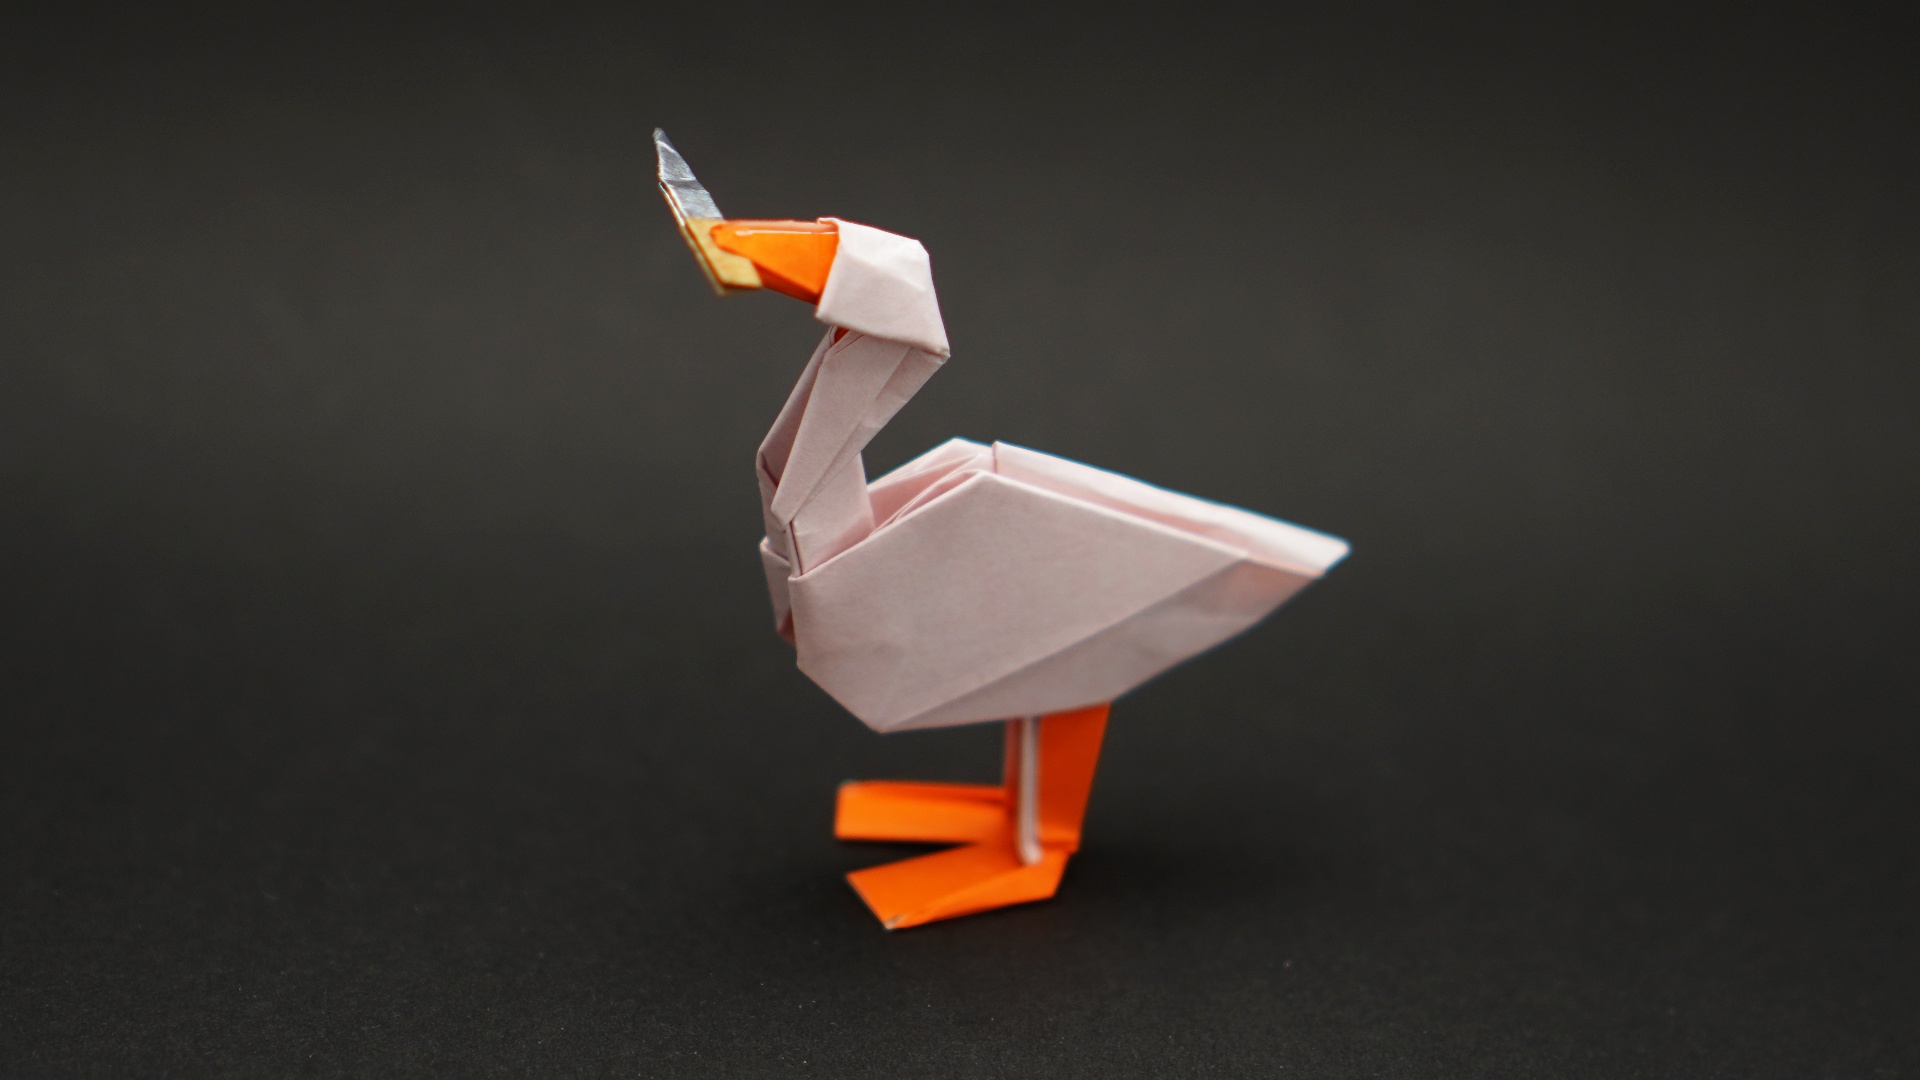
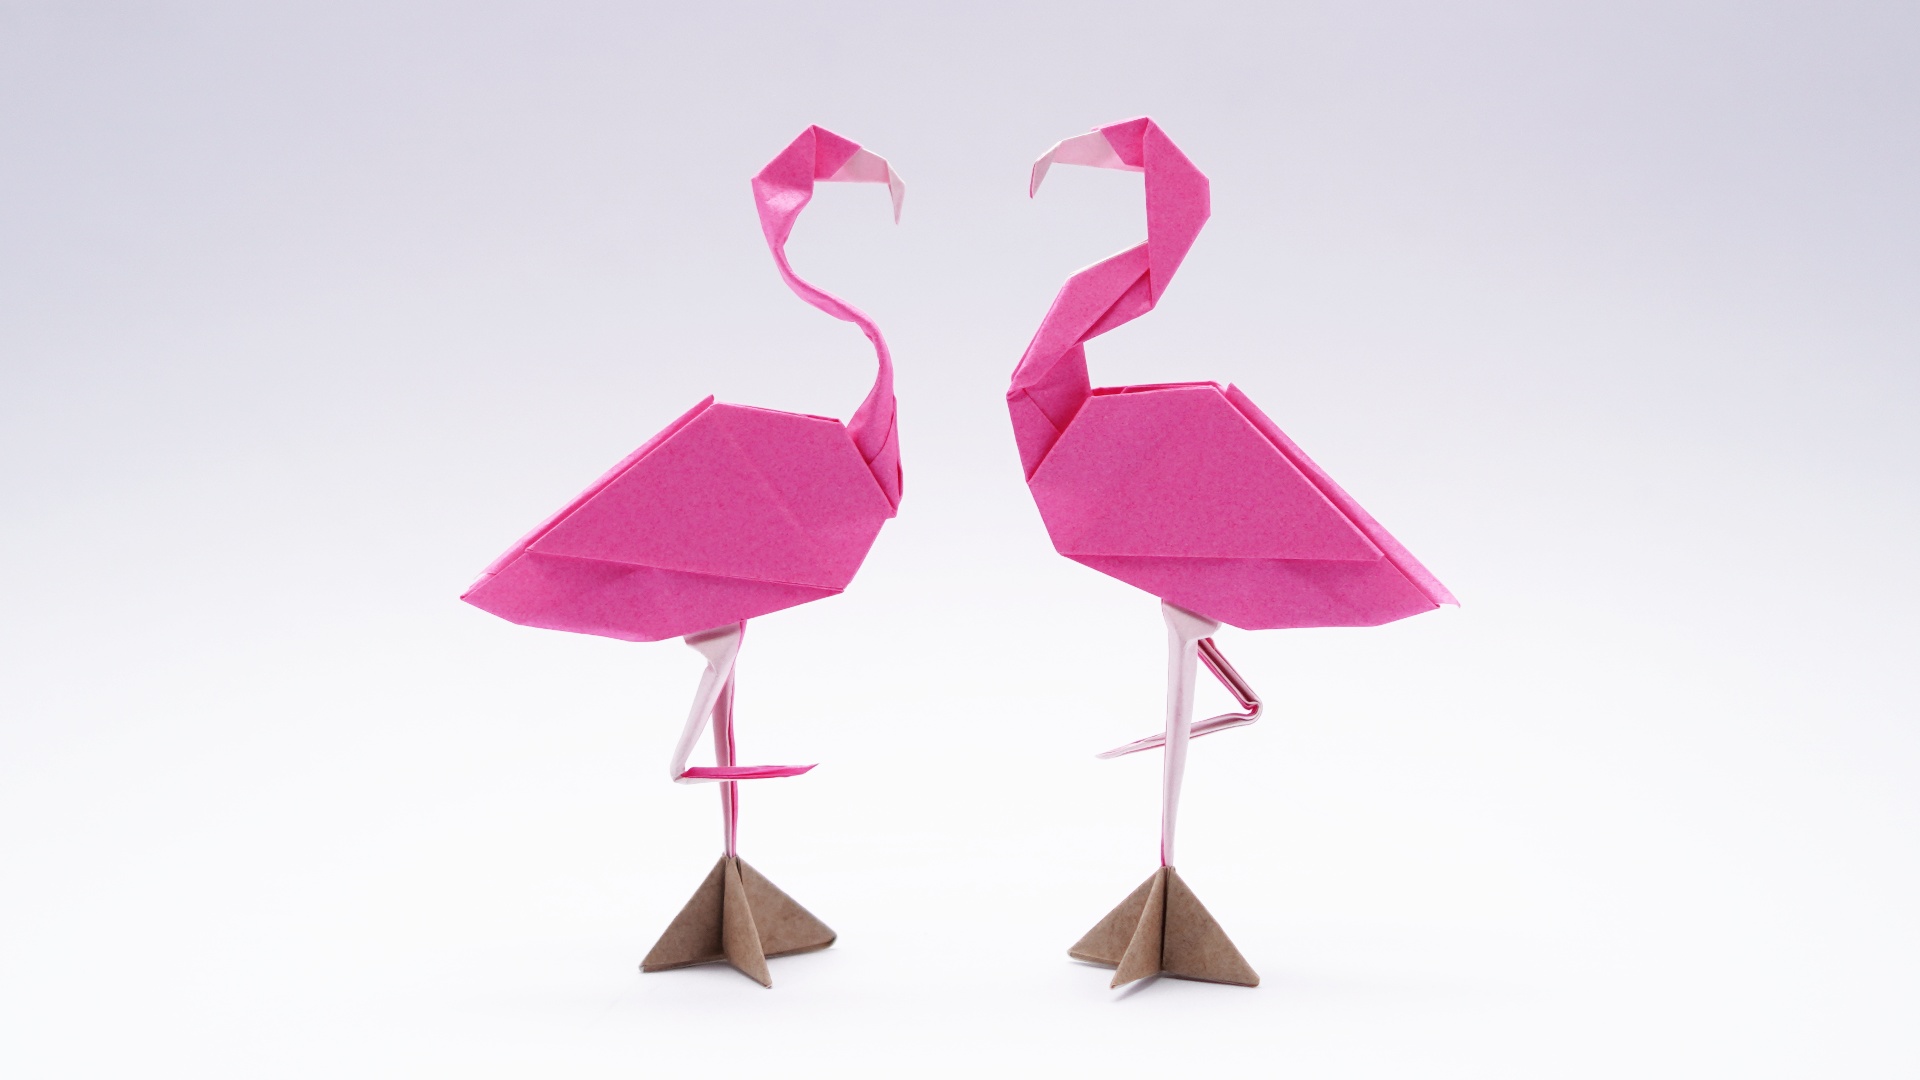
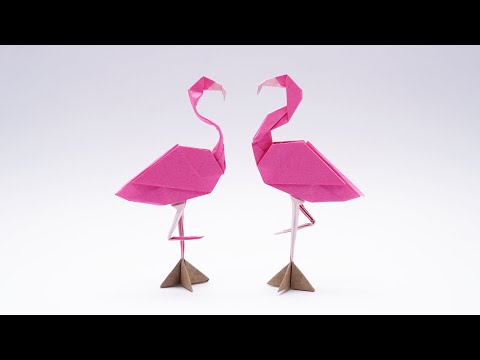
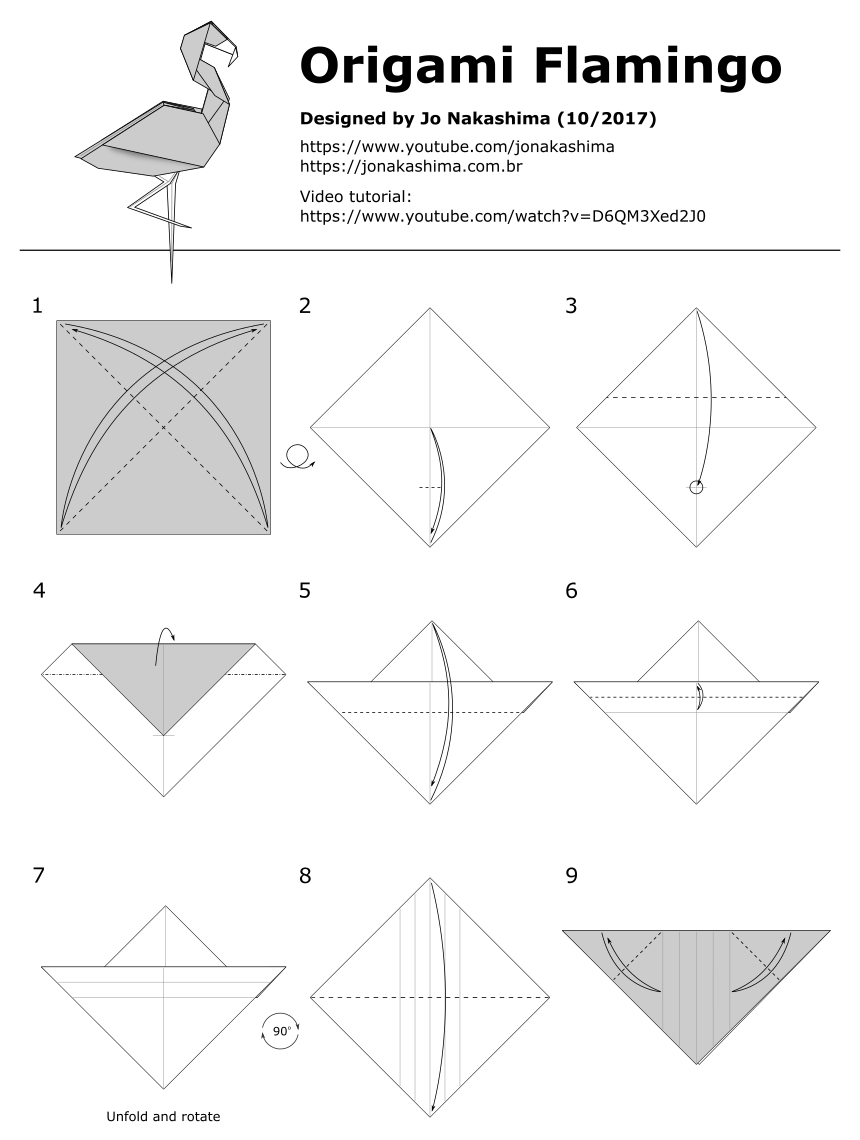
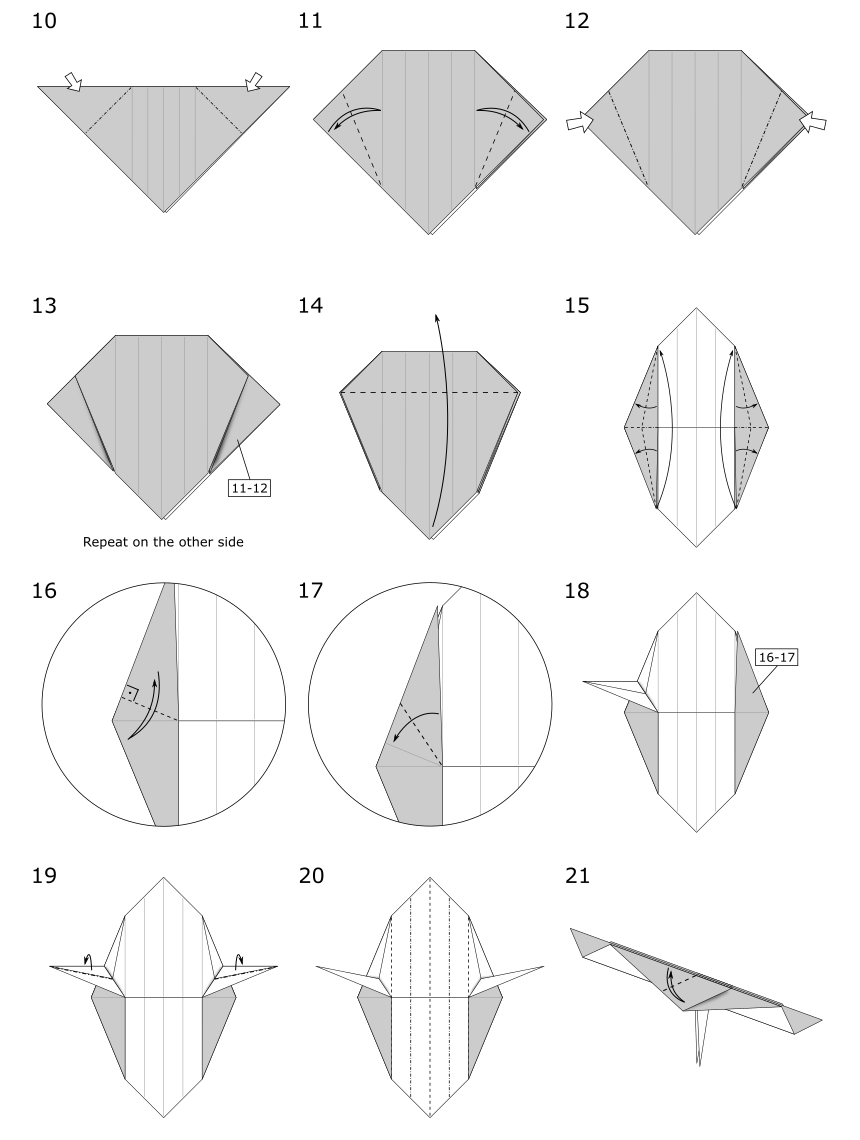
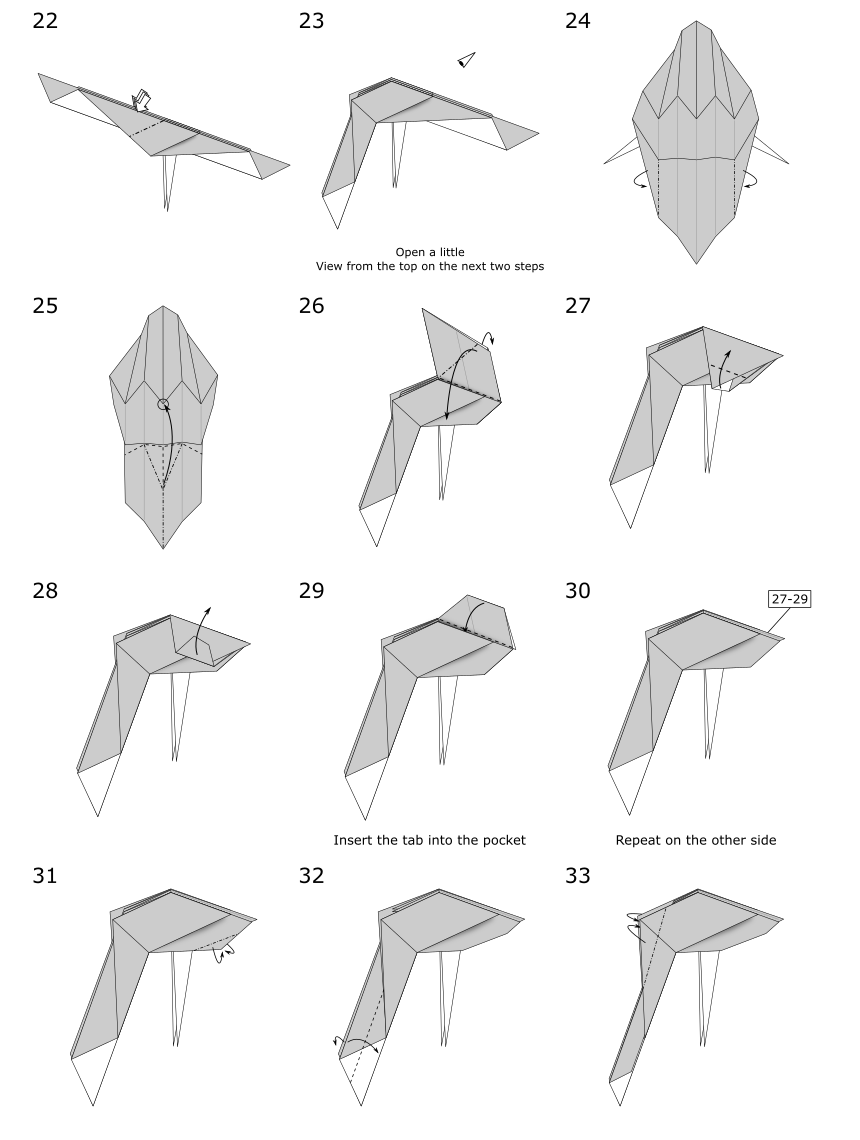
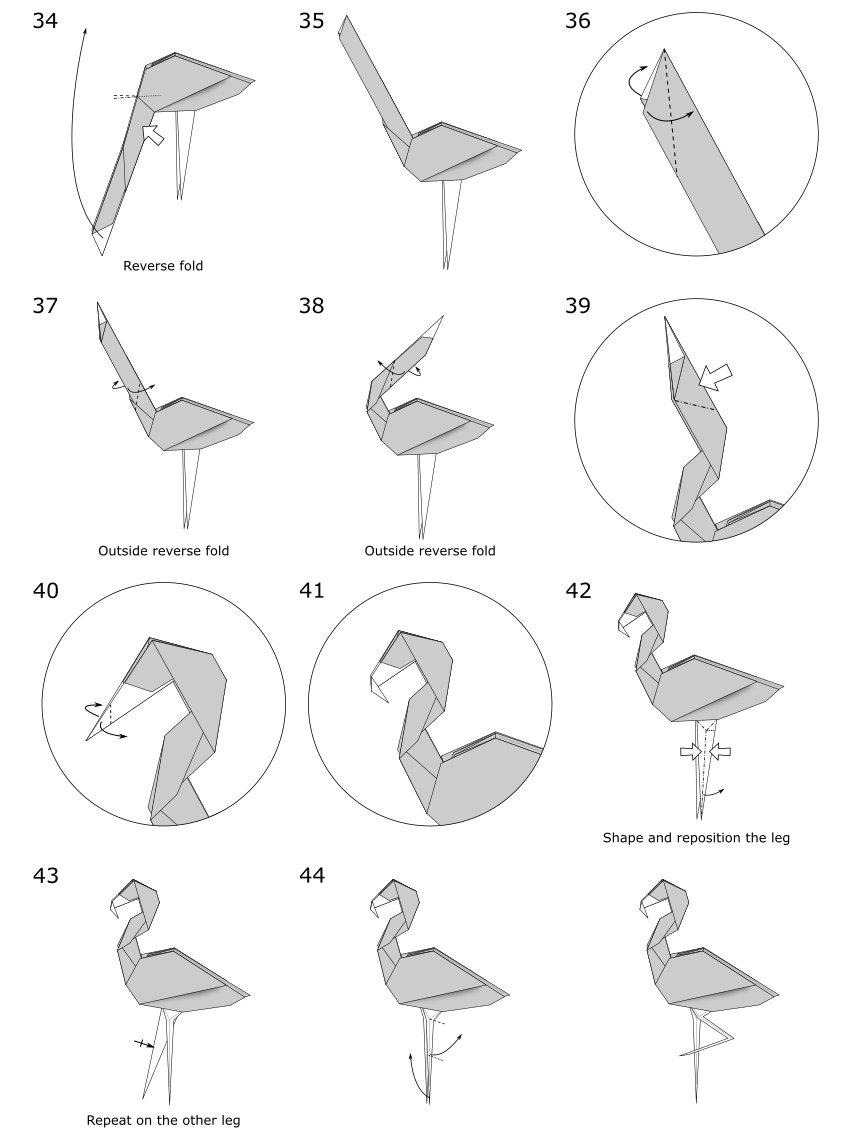
How to make an origami Flamingo Designed By Jo Nakashima (10/2021) Difficulty level: low intermediate
In this tutorial you’ll learn how to make an origami Flamingo step by step. There are 2 methods to shape the neck: curves and reverse folds (you can see both in the beginning, but I made a separate short video only for the curved version). Since this model can’t stand by itself, I also included a simple origami stand in the end of the video.
Diagrams
Support my work!
If you like my work, please consider visiting and subscribing to my YouTube channel! You’ll find all my work, including models that are not in this website and also models from other origami artists. The easiest way to support my work is simply watching my videos, clicking the like button, leaving comments and subscribing to my channel!
You can also contribute with small donations on Patreon or YouTube Channel Membership. It’s basically like paying me a tip as a thanks for my work and get some rewards in return, like early access to my tutorials and your name in the video (the “thank you” list). They work with recurring payments, but you can cancel anytime so one-time donations are also possible.


