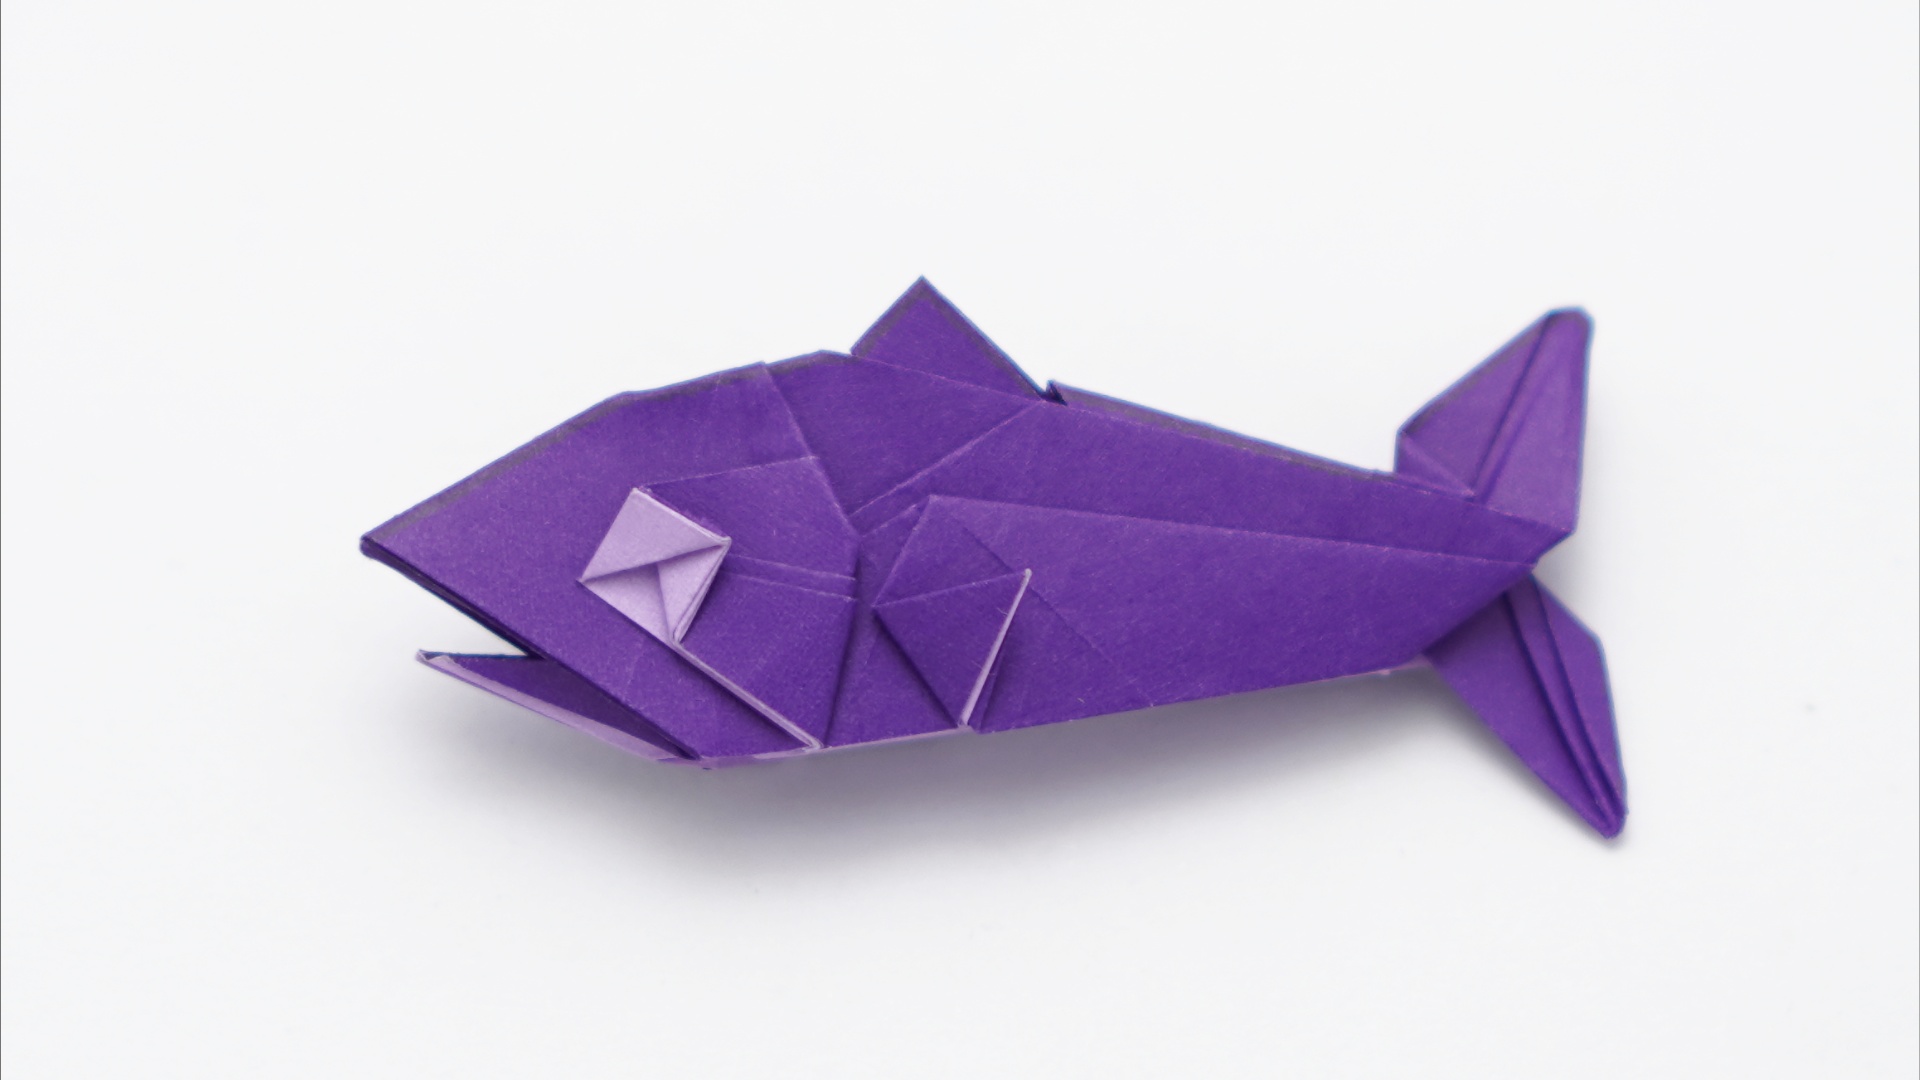
Origami Fish

Origami Fish by Jo Nakashima
YouTube Poster

How to make an origami Fish
Designed by Jo Nakashima (09/2021)
Difficulty level: low intermediate

In this tutorial you’ll learn how to make an origami Fish step by step. This model starts with the same base of the origami chameleon. Although the face looks the same, it is actually made on the other side of the paper: the hind legs and tail of the chameleon are the eyes and jaw of the fish!

Diagrams

Watch the video tutorial if you have any trouble!

Support my work!

If you like my work, please consider visiting and subscribing to my YouTube channel! You’ll find all my work, including models that are not in this website and also models from other origami artists. The easiest way to support my work is simply watching my videos, clicking the like button, leaving comments and subscribing to my channel!

You can also contribute with small donations on Patreon or YouTube Channel Membership. It’s basically like paying me a tip as a thanks for my work and get some rewards in return, like early access to my tutorials and your name in the video (the “thank you” list). They work with recurring payments, but you can cancel anytime so one-time donations are also possible.
Origami Chameleon

How to make an origami Chameleon
Designed by Jo Nakashima (08/2021)
Difficulty level: low intermediate

Learn how to make my origami Chameleon, it is super cute and not hard to fold! Standard 15cm x 15cm origami paper works very well for this model. Optionally, you can shape the tail with reverse folds to make the curl or make it straight. The color changing requires the magic of video editing.

If you like this origami chameleon, see also my origami Fish made from the same base!

Diagrams

Watch the video tutorial if you have any trouble!

Support my work!

If you like my work, please consider visiting and subscribing to my YouTube channel! You’ll find all my work, including models that are not in this website and also models from other origami artists. The easiest way to support my work is simply watching my videos, clicking the like button, leaving comments and subscribing to my channel!

You can also contribute with small donations on Patreon or YouTube Channel Membership. It’s basically like paying me a tip as a thanks for my work and get some rewards in return, like early access to my tutorials and your name in the video (the “thank you” list). They work with recurring payments, but you can cancel anytime so one-time donations are also possible.

Origami Sun

Origami Sun designed by Jo Nakashima (2010+2021)
Difficulty level: intermediate

My origami Sun was originally created in 2010. There were flaws in the design and the video quality was awful. Recently I decided to fold it again and managed to make a very nice improvement by locking the layers and also a better folding sequence.

Origami Sun diagrams

Notice: at first I’ve made these diagrams only for the video, not to be published separately. For this reason, some transitions or steps might not be so clear. If you find some step difficult, you can find more detailed instructions in the video tutorial.

Origami Sun variations

You can make some variations like the color change and shorter points:

Support my work!

If you like my work, please consider visiting and subscribing to my YouTube channel! You’ll find all my work, including models that are not in this website and also models from other origami artists. The easiest way to support my work is simply watching my videos, clicking the like button, leaving comments and subscribing to my channel!

You can also contribute with small donations on Patreon or YouTube Channel Membership. It’s basically like paying me a tip as a thanks for my work and get some rewards in return, like early access to my tutorials and your name in the video (the “thank you” list). They work with recurring payments, but you can cancel anytime so one-time donations are also possible.

Origami Horse

How to make an origami Horse
Designed by Jo Nakashima (12/jul/2014 + nov/2019)
Difficulty level: complex

This model was first designed in 2014, but this is an updated version with some “bug fixes” (legs are properly locked). It is a variation of my origami Unicorn, just hiding the horn. The steps are the same until 31 minutes of the video tutorial (step 68 on the diagrams).

The biggest flaw of the old version is that the legs and layers of the body would spread open after a while. This could be solved using foil paper or the wet folding technique, but in my opinion a good design should hold the shape well even with normal paper. So, to solve this problem, I’ve made some locks on the legs similar to the hind legs of my origami Reindeer. Additionally, I rearranged some layers on the crimp fold of the neck and added some locks inside the body too.

Origami Horse Diagrams

See also

Support my work!

If you like my work, please consider visiting and subscribing to my YouTube channel! You’ll find all my work, including models that are not in this website and also models from other origami artists. The easiest way to support my work is simply watching my videos, clicking the like button, leaving comments and subscribing to my channel!

You can also contribute with small donations on Patreon or YouTube Channel Membership. It’s basically like paying me a tip as a thanks for my work and get some rewards in return, like early access to my tutorials and your name in the video (the “thank you” list). They work with recurring payments, but you can cancel anytime so one-time donations are also possible.

Origami Monkey

Learn how to make an origami monkey.
Designed by Jo Nakashima (25/Feb/2016).

I came up with this model after creating the origami Mr. Heart because some of the intermediary steps resemble a monkey face.

In this video I’m using 15cm x 15cm Kraft paper. Standard origami paper works as well. I don’t recommend thick paper for this model.

Origami Monkey Diagrams

Notice: at first I’ve made these diagrams only for the video, not to be published separately. For this reason, some transitions or steps might not be so clear. If you find some step difficult, you can find more detailed instructions in the video tutorial.

Support my work!

If you like my work, please consider visiting and subscribing to my YouTube channel! You’ll find all my work, including models that are not in this website and also models from other origami artists. The easiest way to support my work is simply watching my videos, clicking the like button, leaving comments and subscribing to my channel!

You can also contribute with small donations on Patreon or YouTube Channel Membership. It’s basically like paying me a tip as a thanks for my work and get some rewards in return, like early access to my tutorials and your name in the video (the “thank you” list). They work with recurring payments, but you can cancel anytime so one-time donations are also possible.

Origami Baby Dragon

How to make the origami Baby Dragon
Designed by Jo Nakashima (22/Apr/2015)
Difficulty level: low intermediate

The origami Baby Dragon was based on my origami Chinchilla. The outer layers of the body became the wings and I made horns instead of the ears.

Origami Baby Dragon and Chinchilla

I used a similar base on my origami mouse (2020) and squirrel (2018).

Paper

I’m using 20cm x 20cm red tissue-foil in this tutorial. Special paper is not required for this model, regular 15cm x 15cm origami paper works well for this model.

Diagrams

Notice: at first I’ve made these diagrams only for the video, not to be published separately. For this reason, some transitions or steps might not be so clear. If you find some step difficult, you can find more detailed instructions in the video tutorial.

Support my work!

If you like my work, please consider visiting and subscribing to my YouTube channel! You’ll find all my work, including models that are not in this website and also models from other origami artists. The easiest way to support my work is simply watching my videos, clicking the like button, leaving comments and subscribing to my channel!

You can also contribute with small donations on Patreon or YouTube Channel Membership. It’s basically like paying me a tip as a thanks for my work and get some rewards in return, like early access to my tutorials and your name in the video (the “thank you” list). They work with recurring payments, but you can cancel anytime so one-time donations are also possible.

Origami Devil Dragon v3

How to make the origami Devil Dragon v3
Designed by Jo Nakashima (01/2021)
Difficulty level: complex
Paper: 30cm x 30cm red tissue-foil

This is a new version of the origami Devil Dragon with the improvements from de Dragon v3. It has a better structure compared to the original version, a longer neck and tail. The face, hands and wings are the same from version 1.

Paper

I recommend using a large sheet of paper (at least 30cm x 30cm), otherwise some of the details will be difficult to make. It’s doable with standard origami paper, but I recommend higher quality papers like red tissue-foil for best results. The white side of the paper is visible at the snout and wings, so you might prefer using paper with color on both sides.

Diagrams

Notice: at first I’ve made these diagrams only for the video, not to be published separately. For this reason, some transitions or steps might not be so clear. If you find some step difficult, you can find more detailed instructions in the video tutorial.

Support my work!

If you like my work, please consider visiting and subscribing to my YouTube channel! You’ll find all my work, including models that are not in this website and also models from other origami artists. The easiest way to support my work is simply watching my videos, clicking the like button, leaving comments and subscribing to my channel!

You can also contribute with small donations on Patreon or YouTube Channel Membership. It’s basically like paying me a tip as a thanks for my work and get some rewards in return, like early access to my tutorials and your name in the video (the “thank you” list). They work with recurring payments, but you can cancel anytime so one-time donations are also possible.

Origami Pixels

How to make origami Pixels
Designed by Jo Nakashima (09/2020)
Difficulty level: simple

In this tutorial you’ll learn how to make origami pixels. Each unit is made from a square sheet of paper and everything is connected without glue. There are two ways you can use it:

  • the front side is neat and perfect for pixel art, chess board and fractals like the Sierpiński carpet ;
  • the back side can be used as sets of 4 changeable pixels. Great to make panels where you can make letters, numbers and other patterns using only two colors.

Although the units are very simple to make, the connections can be a little tricky for beginners. They are similar to the ones I made for the Seamless Moving Cubes.

Paper

In the video I’m using 7.5cm x 7.5cm origami paper. The pixel (front side) will be 1/4 of the square length, so, to make a pixel with 1cm, use 4cm x 4cm.

Diagrams

Changeable Origami Pixels sample pictures

Support my work!

If you like my work, please consider visiting and subscribing to my YouTube channel! You’ll find all my work, including models that are not in this website and also models from other origami artists. The easiest way to support my work is simply watching my videos, clicking the like button, leaving comments and subscribing to my channel!

You can also contribute with small donations on Patreon or YouTube Channel Membership. It’s basically like paying me a tip as a thanks for my work and get some rewards in return, like early access to my tutorials and your name in the video (the “thank you” list). They work with recurring payments, but you can cancel anytime so one-time donations are also possible.

Origami Peacock

How to make an origami Peacock
Designed by Jo Nakashima (10/Aug/2020)
Difficulty level: low intermediate
My paper: 15cm x 15cm origami paper

In this tutorial you’ll learn how to make an origami peacock step by step. This model has the same base of some of my other origami birds (Pigeon, Java Sparrow and Cockatiel), but with different locks on the bottom and neck. It can’t spread the tail, but I’ll try to make a different version that can do it.

Optional steps

This model isn’t hard to make, but some parts can be simplified. These points are also indicated in the progress bar (video chapters – it works only if you watch on youtube, not in the embedded video player):

  • Legs: in this tutorial I show how to make color changed legs. But you can make an easier version without color change, like in the Pigeon tutorial. Skip all the “Left/Right wings and legs” (starting at 6:28) and follow the pigeon tutorial for these steps (the progress bar indicates the segments you’ll need): https://youtu.be/mY_Ja3p6e5I?t=303
  • Tail: you can skip this part (13:28 to 15:23) and narrow it with one fold on each side.
  • Neck: you can skip the neck color change and lock (19:25)
  • Feet: it’s not a hard step, but I think it looks more elegant without feet.

Diagrams

Support my work!

If you like my work, please consider visiting and subscribing to my YouTube channel! You’ll find all my work, including models that are not in this website and also models from other origami artists. The easiest way to support my work is simply watching my videos, clicking the like button, leaving comments and subscribing to my channel!

You can also contribute with small donations on Patreon or YouTube Channel Membership. It’s basically like paying me a tip as a thanks for my work and get some rewards in return, like early access to my tutorials and your name in the video (the “thank you” list). They work with recurring payments, but you can cancel anytime so one-time donations are also possible.

Origami Dragon v3

How to make an origami Dragon (version3)
Designed by Jo Nakashima (12/July/2020)
Difficulty level: intermediate

This new version of my origami dragon has not only a better shape, but also more improvements! It has a longer neck, tail and horns, better structure with less tension (so it holds better the shape) and a better folding sequence. I hope the video length does not discourage you to fold it, it’s not that hard! (actually, maybe it’s even easier than the origami dragon v1 because the folding sequence is better)

Paper

This origami dragon doesn’t require special paper and even the standard 15cm x 15cm origami paper works. For best results I recommend 25cm x 25cm and the finished model will be about 8cm tall. If you want to use some special paper, here are some suggestions:

Lizard Hide

This paper has a very nice texture imitating skin of reptiles. It is a bit thick, but works great if you wet-fold it. Click here to buy it from origam-shop.

Texture detail

Biogami

Like the previous one, Biogami is also thick and works better if you wet-fold it. Buy it from origam-shop.

Red Tissue-foil

This is the paper I used in the tutorial. It is thin and works great for almost any model. Click here to buy it from origami-shop.

Diagrams

Origami Brachiosaurus

The origami Brachiosaurus’ base is similar to the Giraffe and the Unicorn. If you like dinosaurs, see also the T-Rex and the Velociraptor.

Origami Brachiosaurus designed by Jo Nakashima (28/Jun/2015)
Difficulty level: low intermediate
My paper: origami paper 15cm x 15cm

Diagrams

Notice: at first I’ve made these diagrams only for the video, not to be published separately. For this reason, some transitions or steps might not be so clear. If you find some step difficult, you can find more detailed instructions in the video tutorial.

Origami Butterfly

There are two versions of my origami butterfly. The version 1 has a color change on the body, but it is made from a rectangle with ratio 2:1. The version 2 is made from a square sheet of paper and it’s easier to fold, but there’s no color change.

Designed by Jo Nakashima (20/apr/2016)
Difficulty level: low intermediate (version 1) or simple (version 2)
Suggested sizes: 20cm x 10cm (version 1) or 10cm x 10cm (version 2)
The nice paper used in the first version is called Copper Tissue-Foil and you can buy it here.

Diagrams – Version 1

Diagrams – Version 2

One Sheet Origami Tree v4

How to make the One Sheet Origami Tree v4
Designed by Jo Nakashima (02/2020)
Difficulty level: complex

This is the ultimate version of my One Sheet Origami Tree, after 3 flat versions. Despite of the simple look, it is actually the hardest of my origami trees.

Paper

I start the tutorial with a 15cm x 15cm sheet of origami paper, but after some steps I change to a 24cm x 24cm sheet to make the steps easier to see. It’s possible to finish it with the 15cm square, but the recommended size is 24cm to get a good size for the finished model.

Diagrams

Notice: at first I’ve made these diagrams only for the video, not to be published separately. For this reason, some transitions or steps might not be so clear. If you find some step difficult, you can find more detailed instructions in the video tutorial.

Previous Christmas Trees

In addition to the One Sheet Trees, I’ve created also some of modular trees. They are easier to fold (especially the Easy Christmas Tree as its name suggests) and doesn’t need glue to connect their units. Click here to open my Christmas playlist with all my trees.

One Sheet Origami Tree v1, v2 (star) and v3 (tsuru)
My modular origami Christmas Trees

Origami Groom

Learn how to make the origami Groom. See also the origami Bride.

Designed by Jo Nakashima (11/2010)
Difficulty level: intermediate
Paper size: 21cm x 9cm (7:3 ratio) – black and white

Diagrams

Notice: at first I’ve made these diagrams only for the video, not to be published separately. For this reason, some transitions or steps might not be so clear. If you find some step difficult, you can find more detailed instructions in the video tutorial.

See also the bride tutorial

Origami Bride and Princess

Info and diagrams

The origami Bride and the Princess are basically the same, but the bride needs a longer paper for the veil. The Princess video has a better quality and the printable pattern has marks to help you to fold it (the Bride video is older and unfortunatelly I used white paper on white background, bad choice).
You can get Princess Peach (and other Super Mario characters) printables here.

Designed by Jo Nakashima (Nov/2010)
Difficulty level: simple
Recommended paper size: 22.5cm x 4.5cm
Diagrams: Download [PDF]

See also

Origami Airplane

How to make an origami airplane
Designed by Jo Nakashima (17/05/2016)
Difficulty level: low intermediate

I’ve created this model to look like an airliner, but unfortunately it can’t fly (nor transport passengers). This plane isn’t hard to fold, but there is one step that can be tricky for beginners (narrowing the wings – 8:10 in the video or steps 17-18 in the diagrams). However, you can just skip this step if you think it’s too difficult.

Paper

In this tutorial I’m using a 15cm x 15cm sheet of origami paper. You can use any square size to make this origami airplane.

Diagrams

Support my work!

If you like my work, please consider visiting and subscribing to my YouTube channel! You’ll find all my work, including models that are not in this website and also models from other origami artists. The easiest way to support my work is simply watching my videos, clicking the like button, leaving comments and subscribing to my channel!

You can also contribute with small donations on Patreon or YouTube Channel Membership. It’s basically like paying me a tip as a thanks for my work and get some rewards in return, like early access to my tutorials and your name in the video (the “thank you” list). They work with Recurring payments, but you can cancel anytime so one-time donations are also possible.

Exit mobile version