Download this awesome Santa Claus Christmas Wallpaper created by Camila Zeymer! Available for both desktop and mobile devices. Click below to open the full size version and save the image
Santa Claus Wallpaper (Desktop version)Santa Claus Wallpaper (Mobile version)
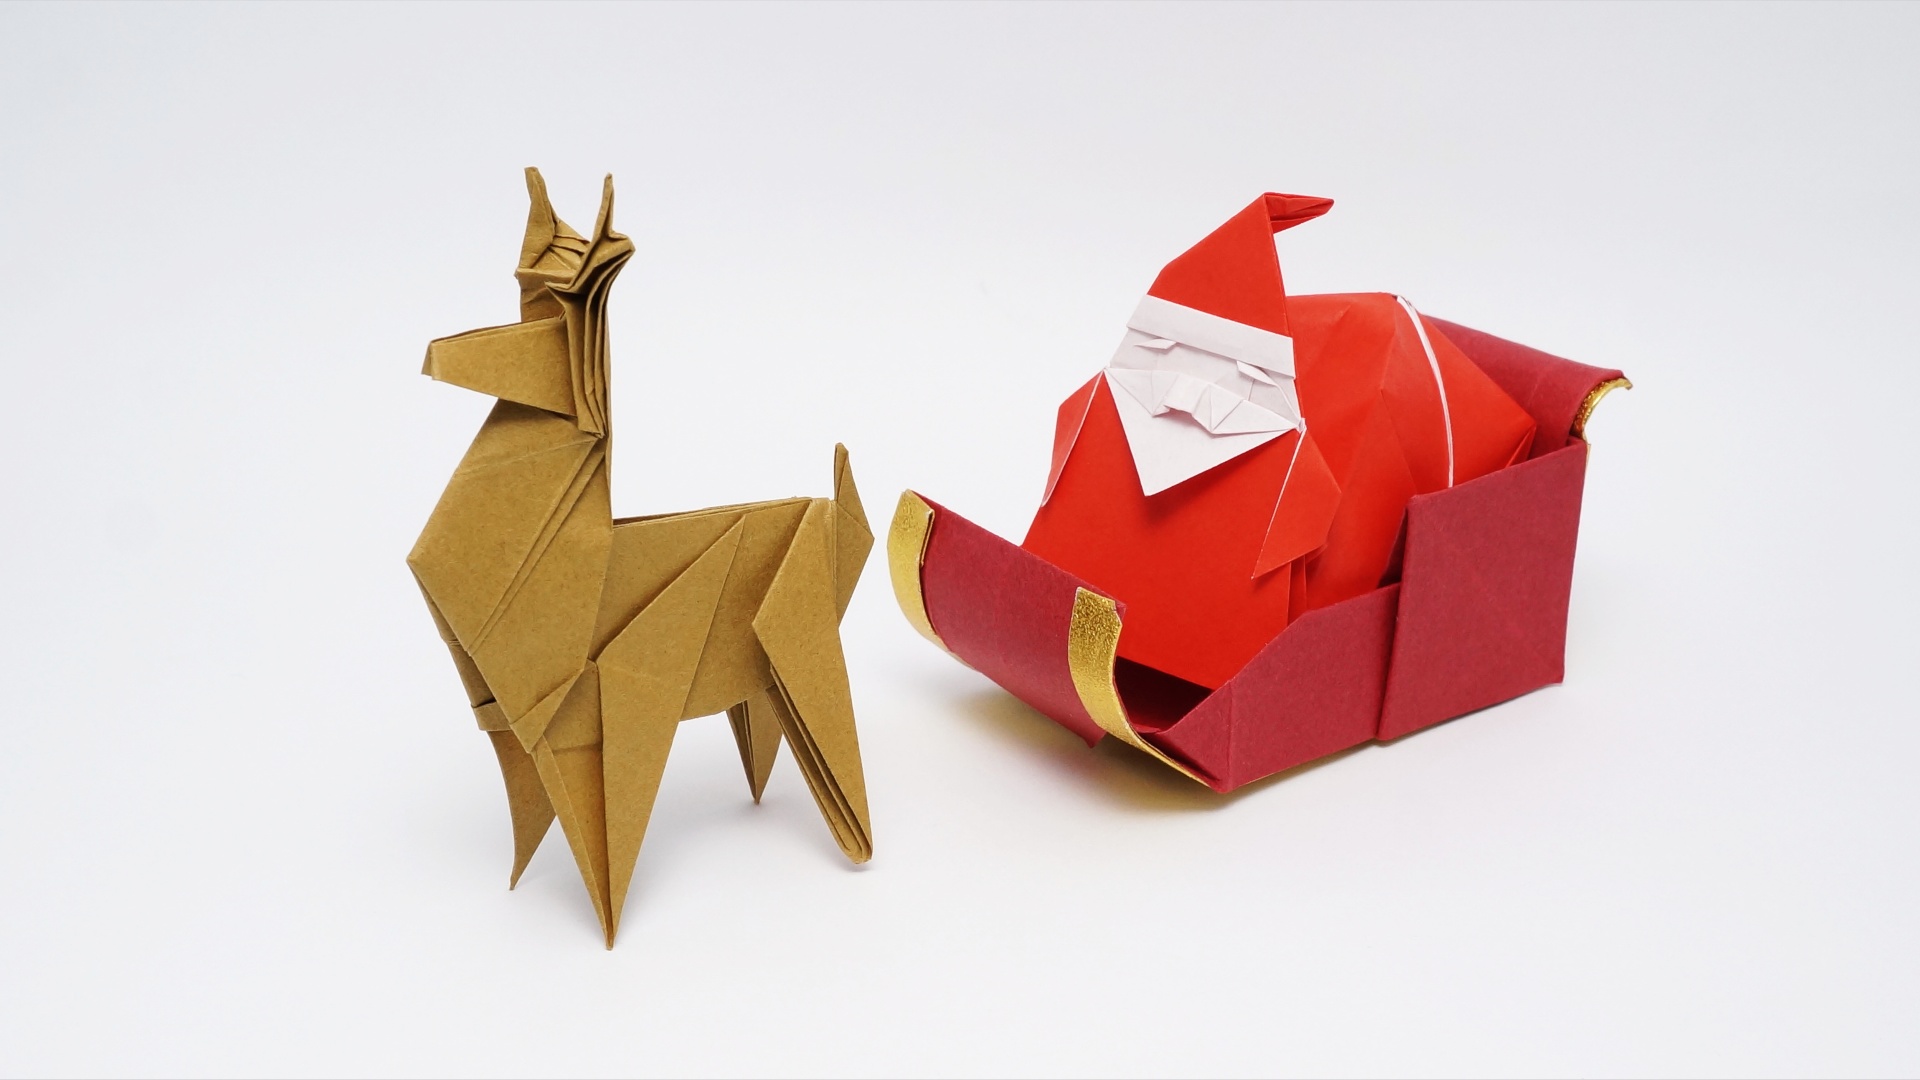
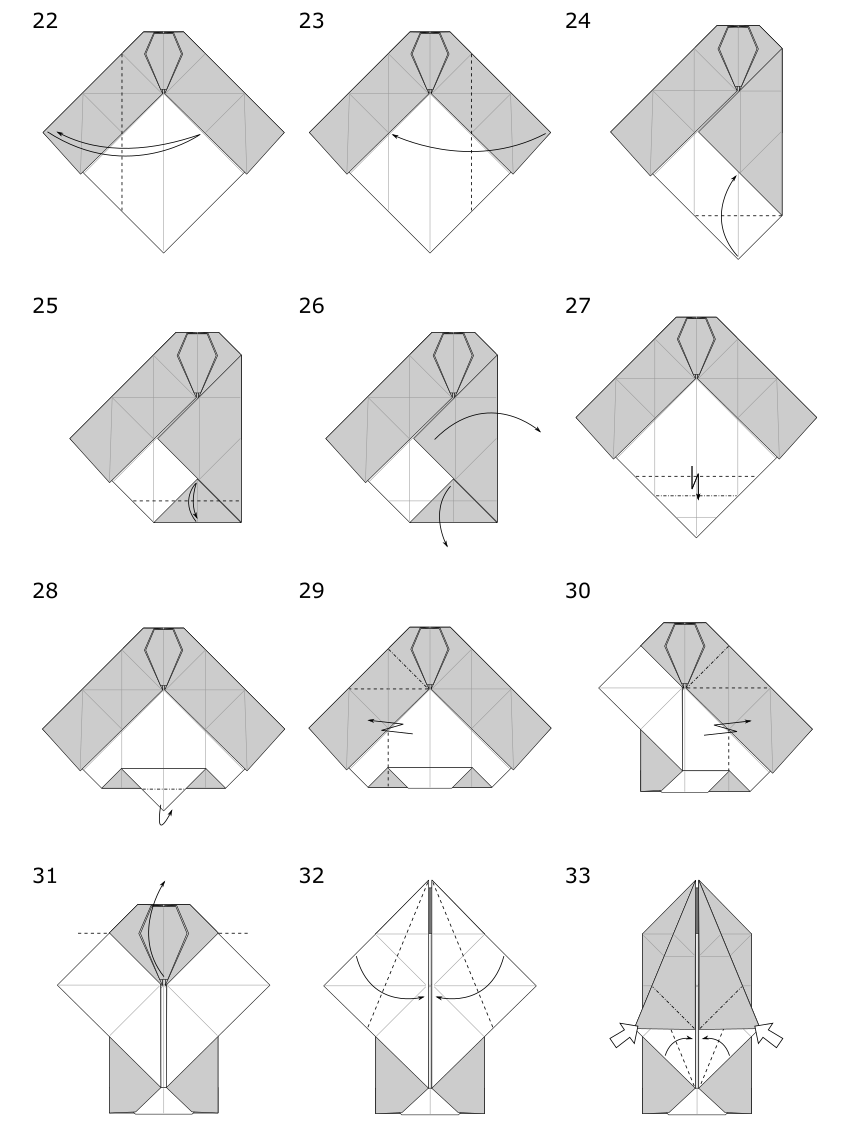
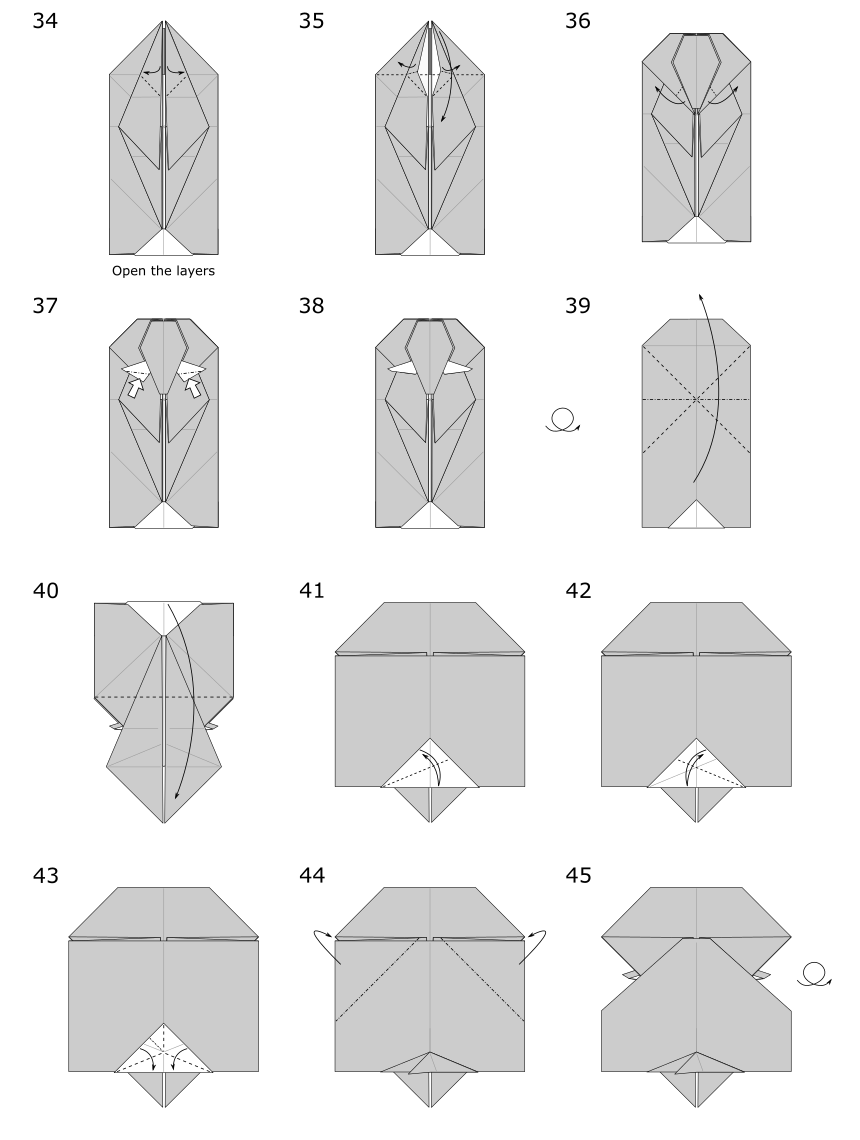
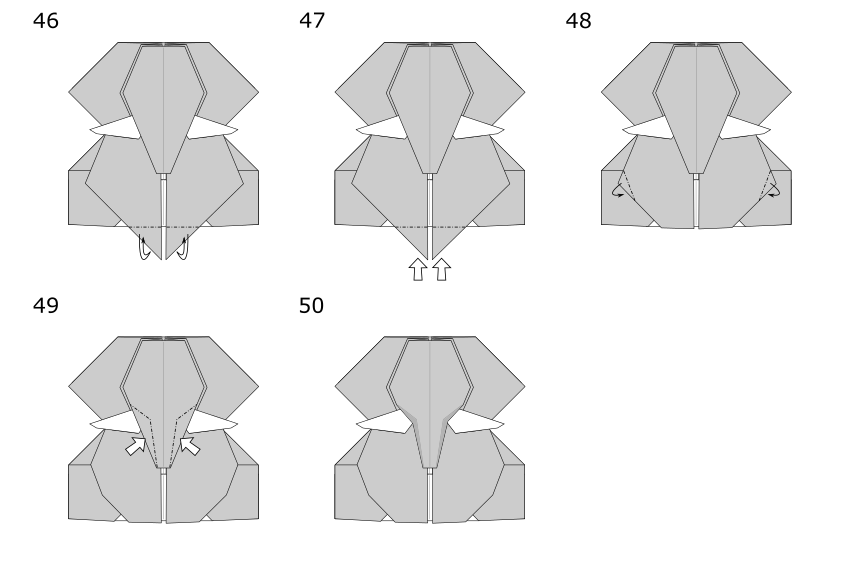
How to make an origami Reindeer Origami Reindeer designed by Jo Nakashima (15/Dec/2016) Difficulty level: low intermediate
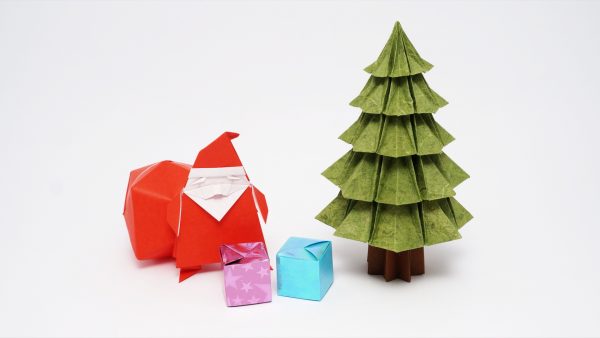
The origami reindeer can be nicely combined with other Christmas models, such as the Sleigh, Santa Claus and his bag!
I’am really satisfied with the result, especially with the lock at the end that keeps it closed.
Use paper with the same color on both sides.
Paper
The paper I used is 20cm x 20cm SATOGAMI from Origami-shop. It’s a thin paper with beautiful colors and texture. Click here to buy this paper.
Standard origami paper and copy paper works for this model too.
More Christmas models
The origami reindeer can be nicely combined with other Christmas models. Check out my playlist on YouTube to find all I’ve made for Christmas, including many different trees, Snowman, and other figures.
Here are some of the more closely related models:
Origami Santa Claus
Santa Claus Bag – acutally, just a traditional waterbomb!
Santa’s Sleigh – you can put Santa and his bag inside!
Suggested sizes
If you plan to fold all the models, you’ll want them in a good relative size, right? Here are some suggested paper sizes for each model:
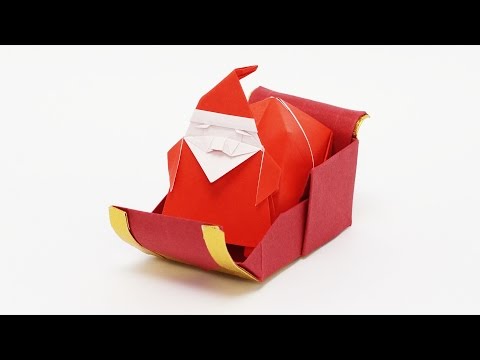
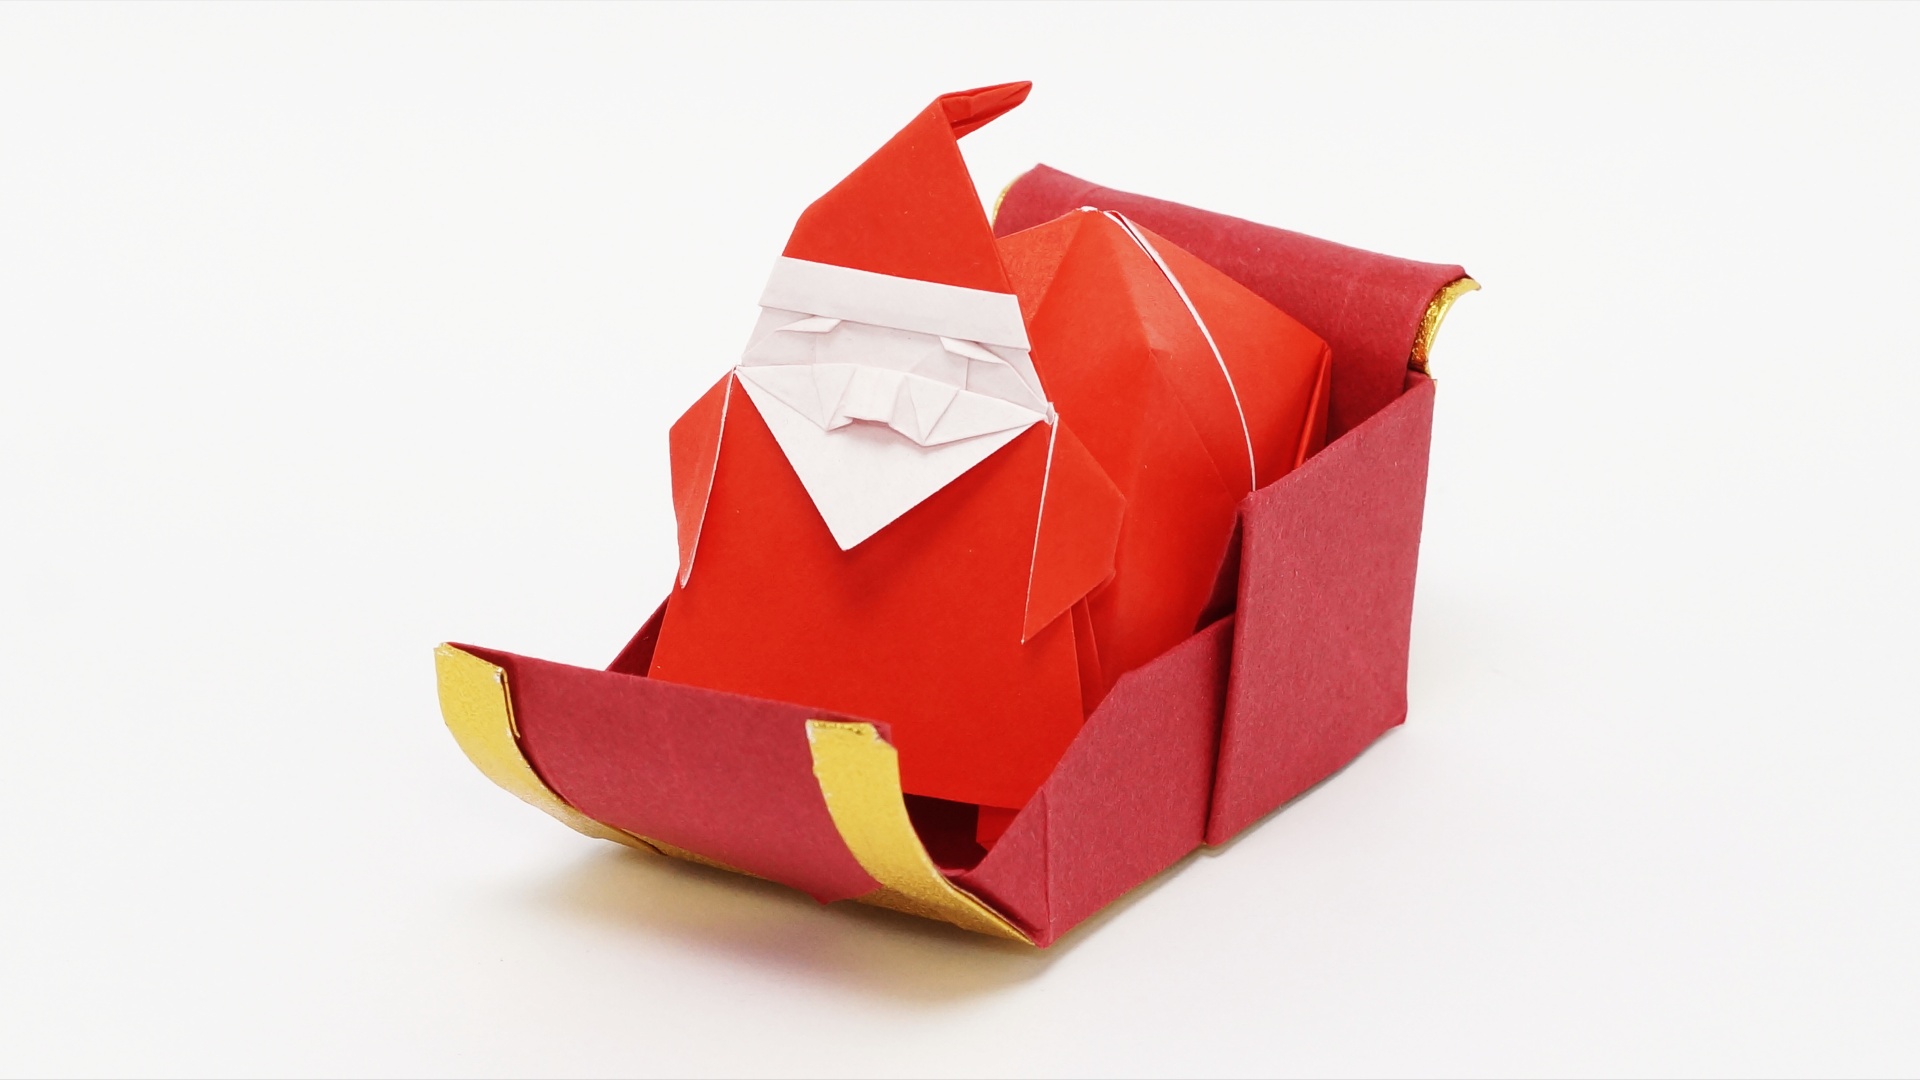
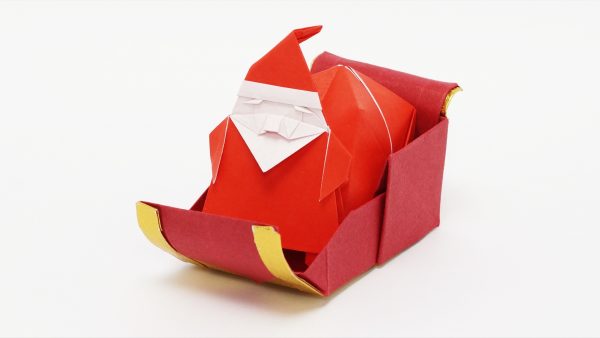
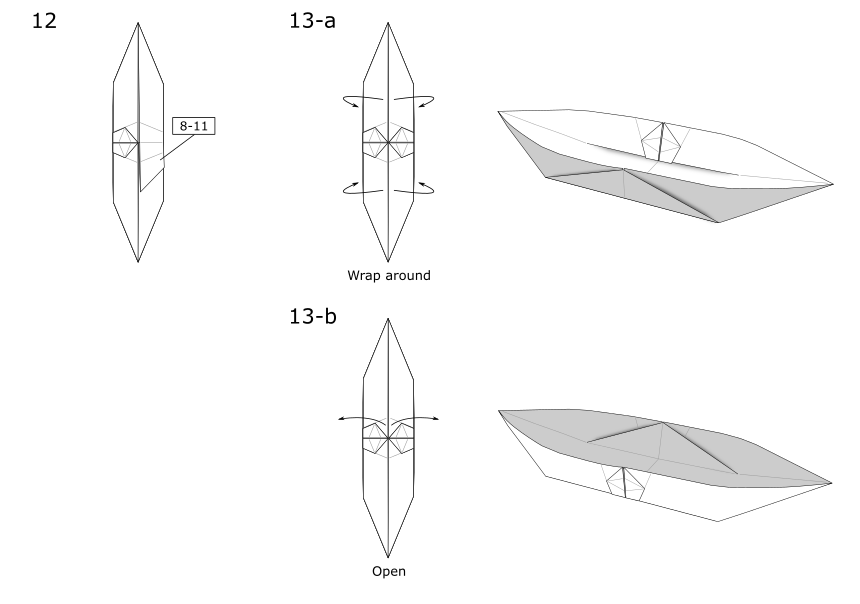
Now our little origami Santa Claus has a Sleigh! You can put both Santa and his bag inside of it. I really liked the locks, the color changes and the curves.
Santa’s Sleigh Designed by Jo Nakashima (26/Nov/2016) Difficulty level: simple Paper size: 15cm x 15cm for a 12.5cm x 12.5cm Santa Claus and Bag Diagrams: not available
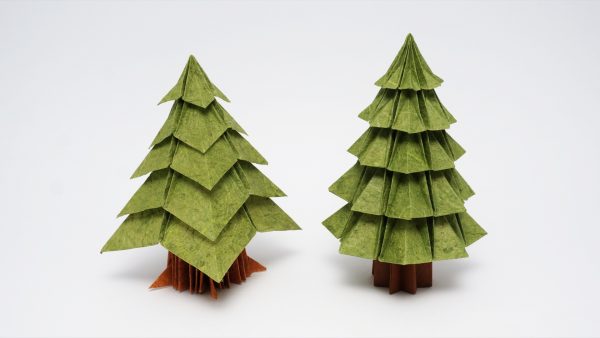
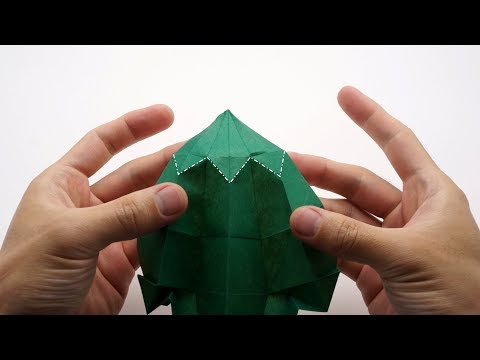
This origami Christmas Tree is a variation of another one I made previously, but now using an octagonal unit (you can also fold it from other polygons). Click here to see the first version.
Origami Christmas Tree Designed by Jo Nakashima Difficulty level: simple My Paper: Kraft
This model requires multiple square sheets of paper. I recommend 3-5 green sheets, but you can use more or less units. Recommended sizes for a small tree:
Green units: 15cm, 12.5cm, 10cm, 7.5cm, 5cm
Trunk: 15cm Diagrams: not available
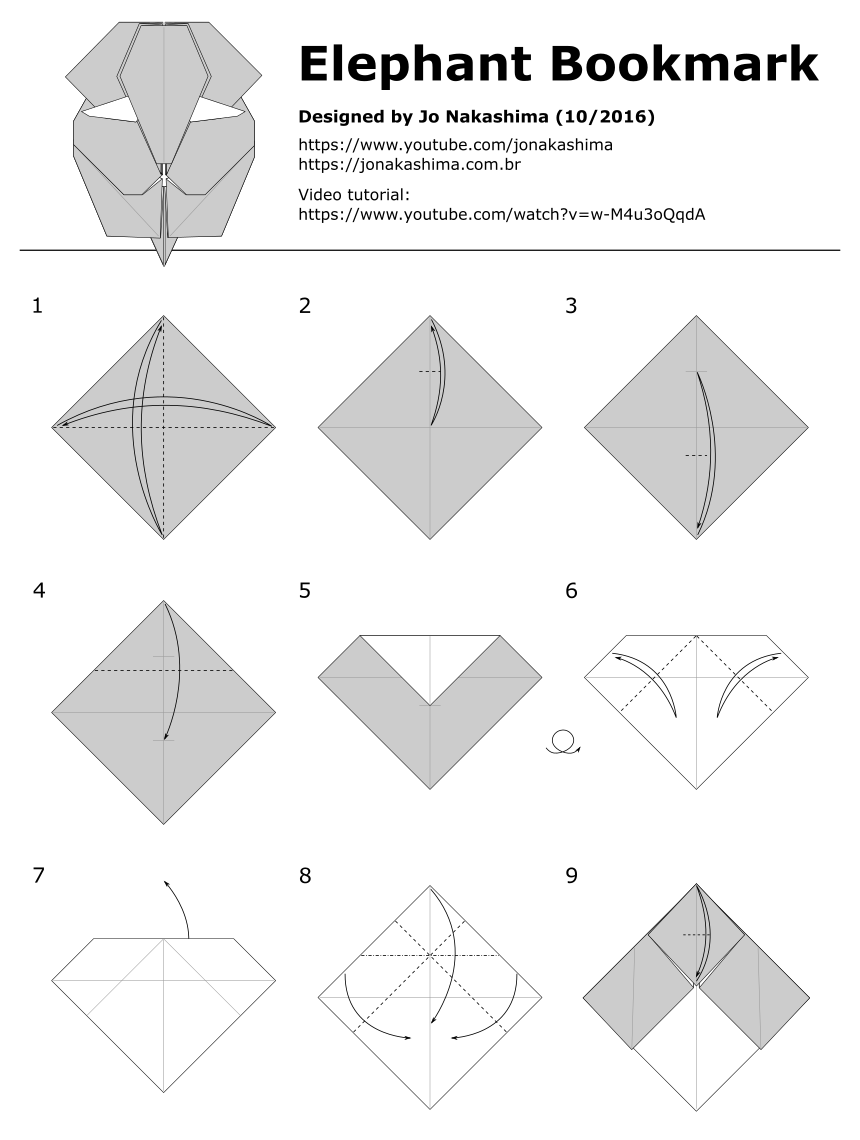
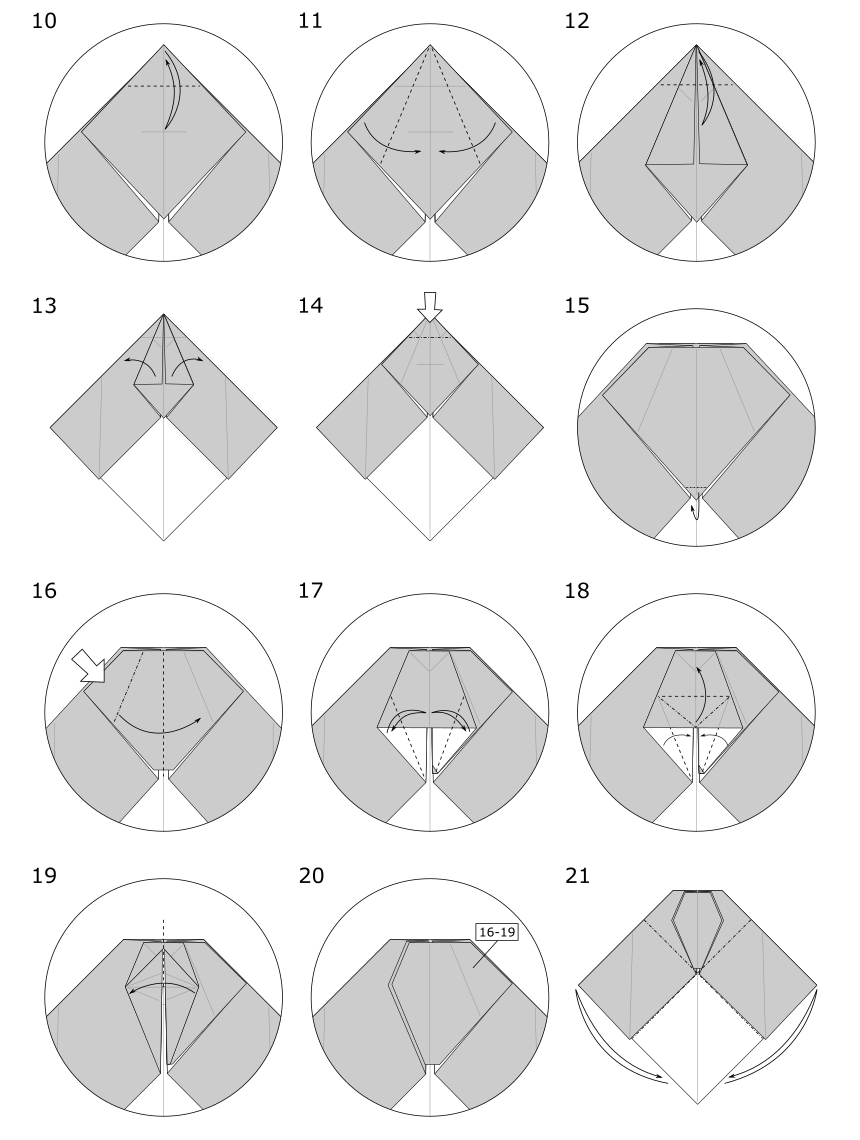
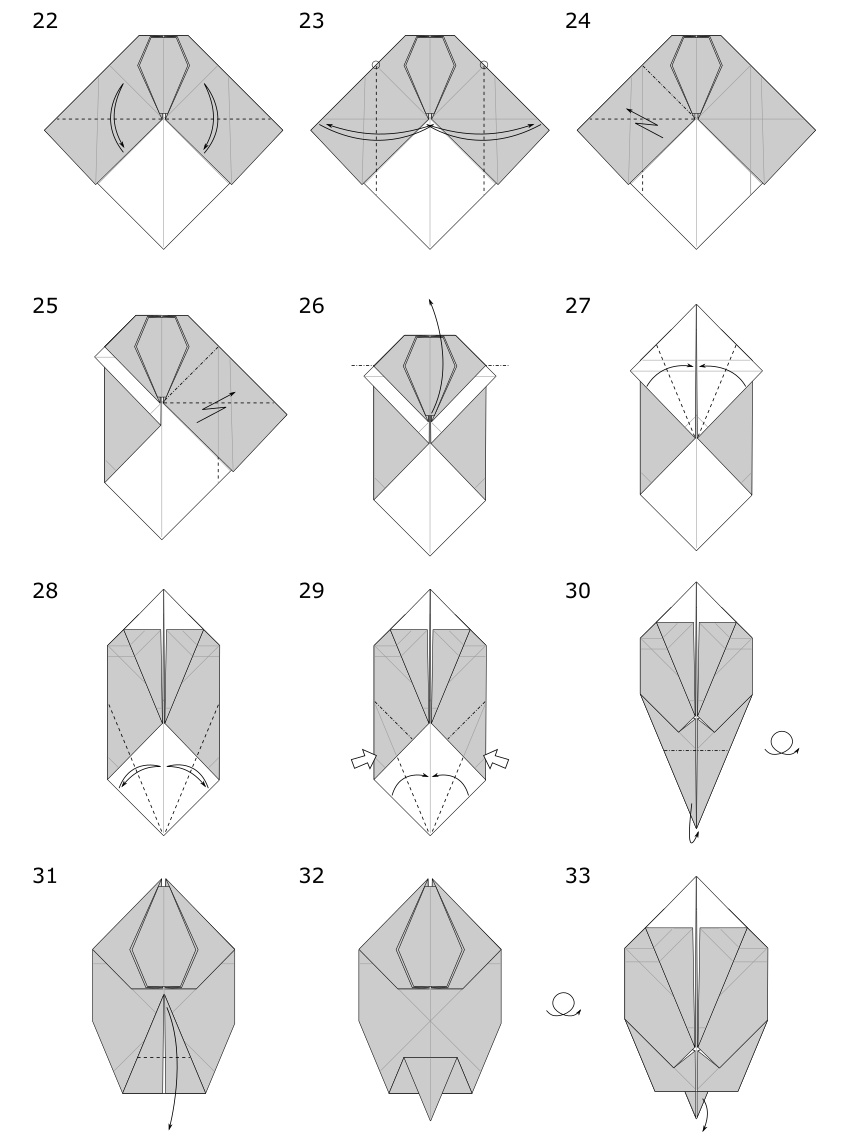
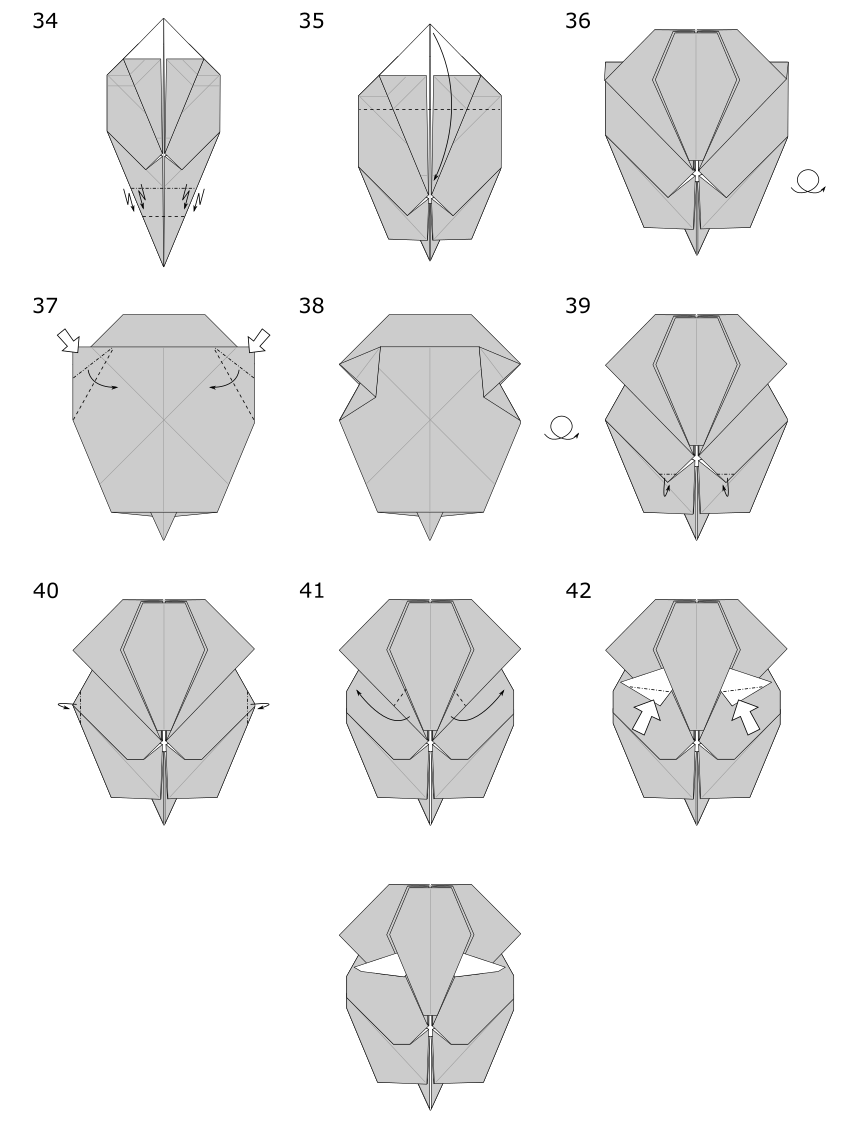
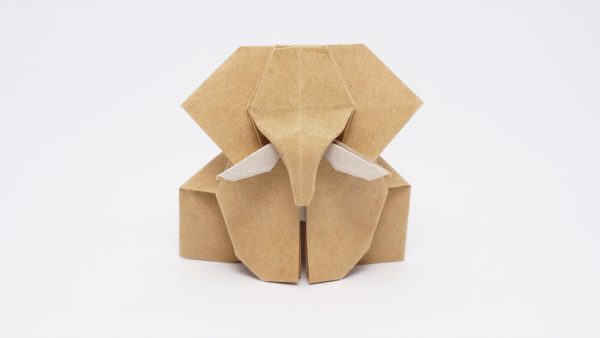
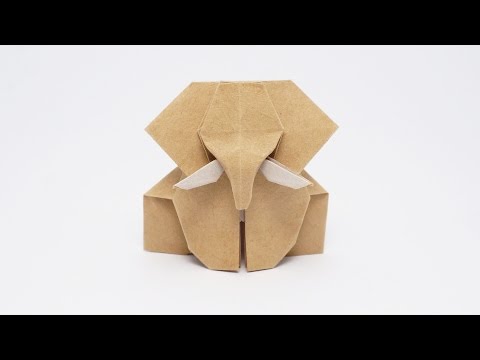
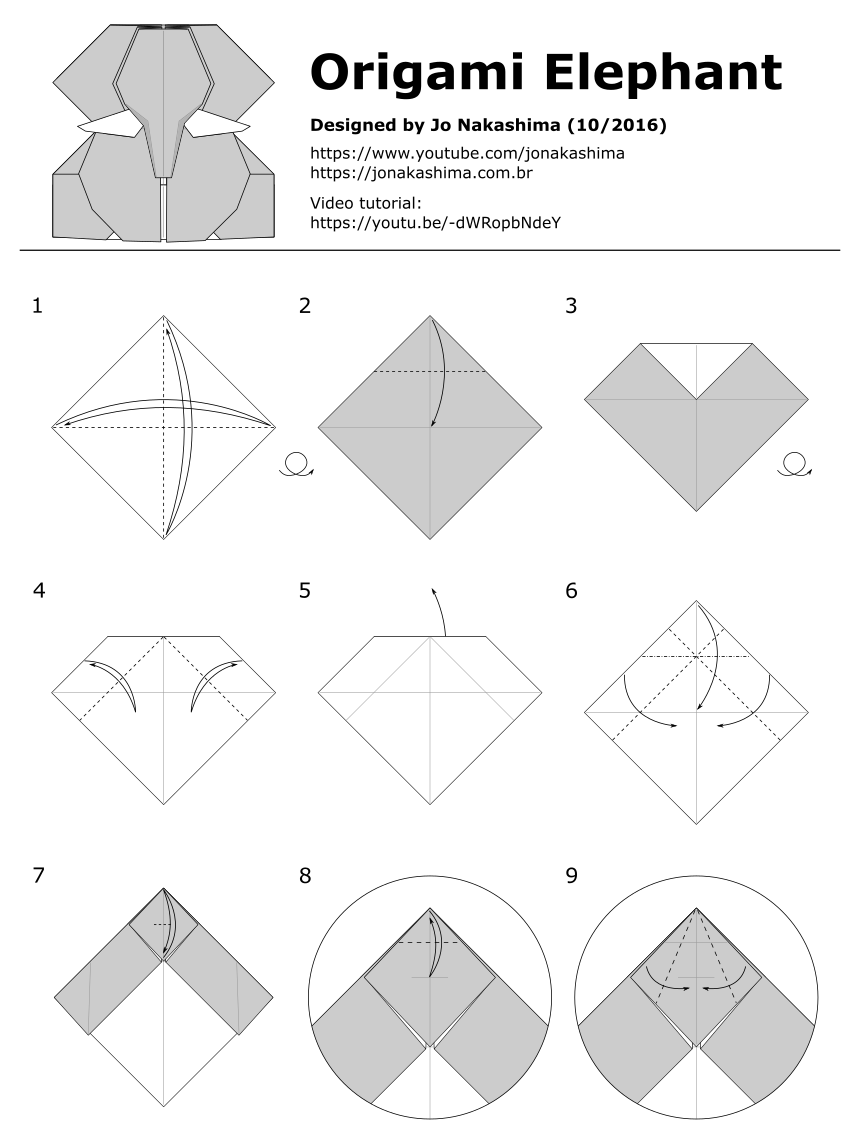
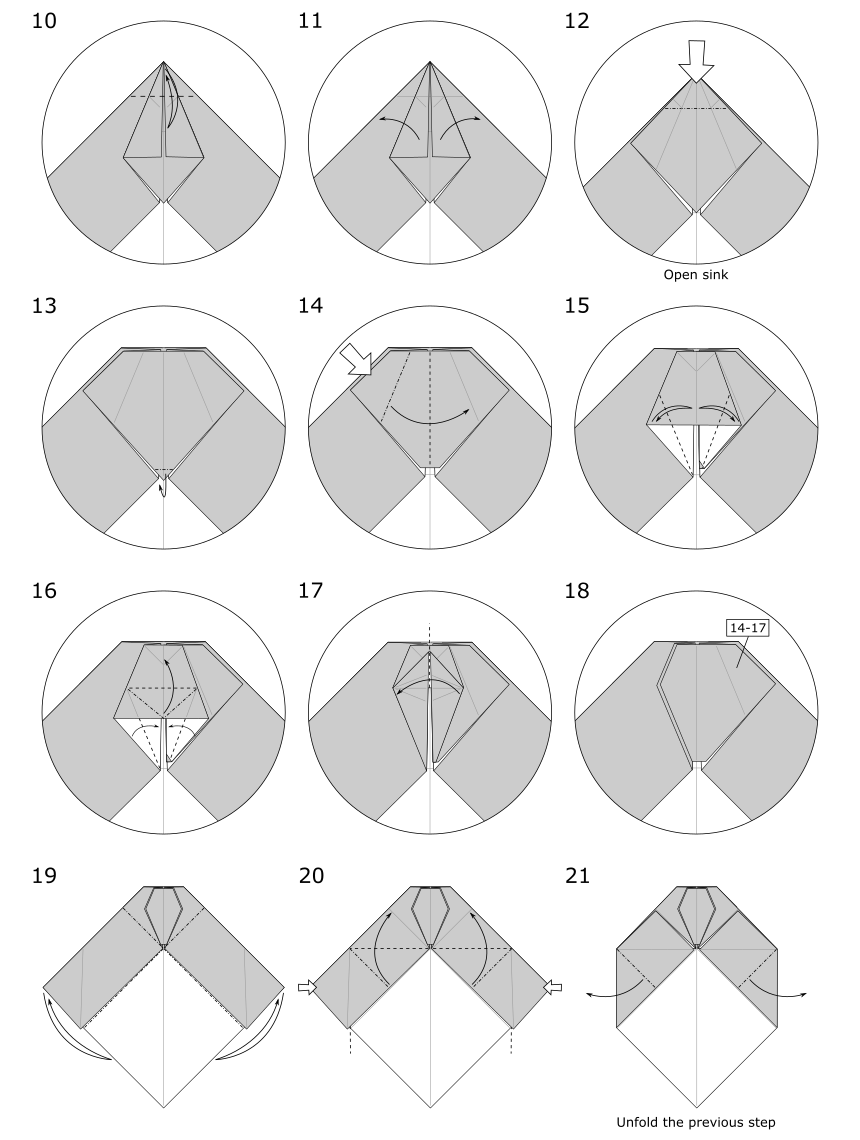
I’ve created the head of the origami elephant in june/2016, but only recently I decided to complete it with a body. There are now two versions, this one and the bookmark . I made this one seated to follow the same style of my origami money cat, money dog and money bunny.
Origami Elephant Designed by Jo Nakashima (10/2016) Difficulty level: low intermediate My paper: 15cm x 15cm kraft
The origami flower pot with stem is made from a single sheet of paper, making a good use of the colors of both sides. It can be connected with many different types of origami flowers, including my own designs, other artist’s designs and traditional models.
Designed by Jo Nakashima (04/Jun/2016) Difficulty level: simple My paper: 15cm x 15cm Kraft Diagrams: not available
Origami Daisy Flower
This is the first flower that I designed specially to use with the Flower Pot. The back side also looks very nice.
Designed by Jo Nakashima (26/may/2016) Difficulty level: intermediate My paper: 15cm x 15cm origami paper (for a 15cm x 15cm flower pot) Diagrams: not available
Origami Rose in a Pot
An improved version of my origami rose to be used with the origami Pot.
Designed by Jo Nakashima (07/2016) Difficulty level: intermediate My paper: 20cm x 20cm Red Tissue Foil (for a 15cm x 15cm Flower Pot) Diagrams: not available
Origami Leaf
A simple origami leaf that can be connected to stem without glue.
Designed by Jo Nakashima (07/2016) Difficulty level: simple My paper: 7.5cm x 7.5cm kraft (use 1/4 of the width of the paper used for the flower pot. Eg: if the vase was made from 15cm x 15cm sheet of paper, use 3.75cm x 3.75cm) Diagrams: not available
Mori’s Rose
Designed by Tadashi Mori Difficulty level: simple Paper: 15cm x 15cm (for a 15cm x 15cm Flower Pot)
Origami Tulip
You can also connect this traditional model with the Flower Pot+stem!
Traditional model Difficulty level: simple My paper: 15cm x 15cm copy paper (for a 15cm x 15cm Flower Pot)
Origami Lily
I made a little change on the traditional origami Lily to connect it to the stem of my flower pot (or any other stem)
Traditional model modified by Jo Nakashima Difficulty level: simple My paper: 12cm x 12cm origami paper (for a 15cm x 15cm Flower Pot)
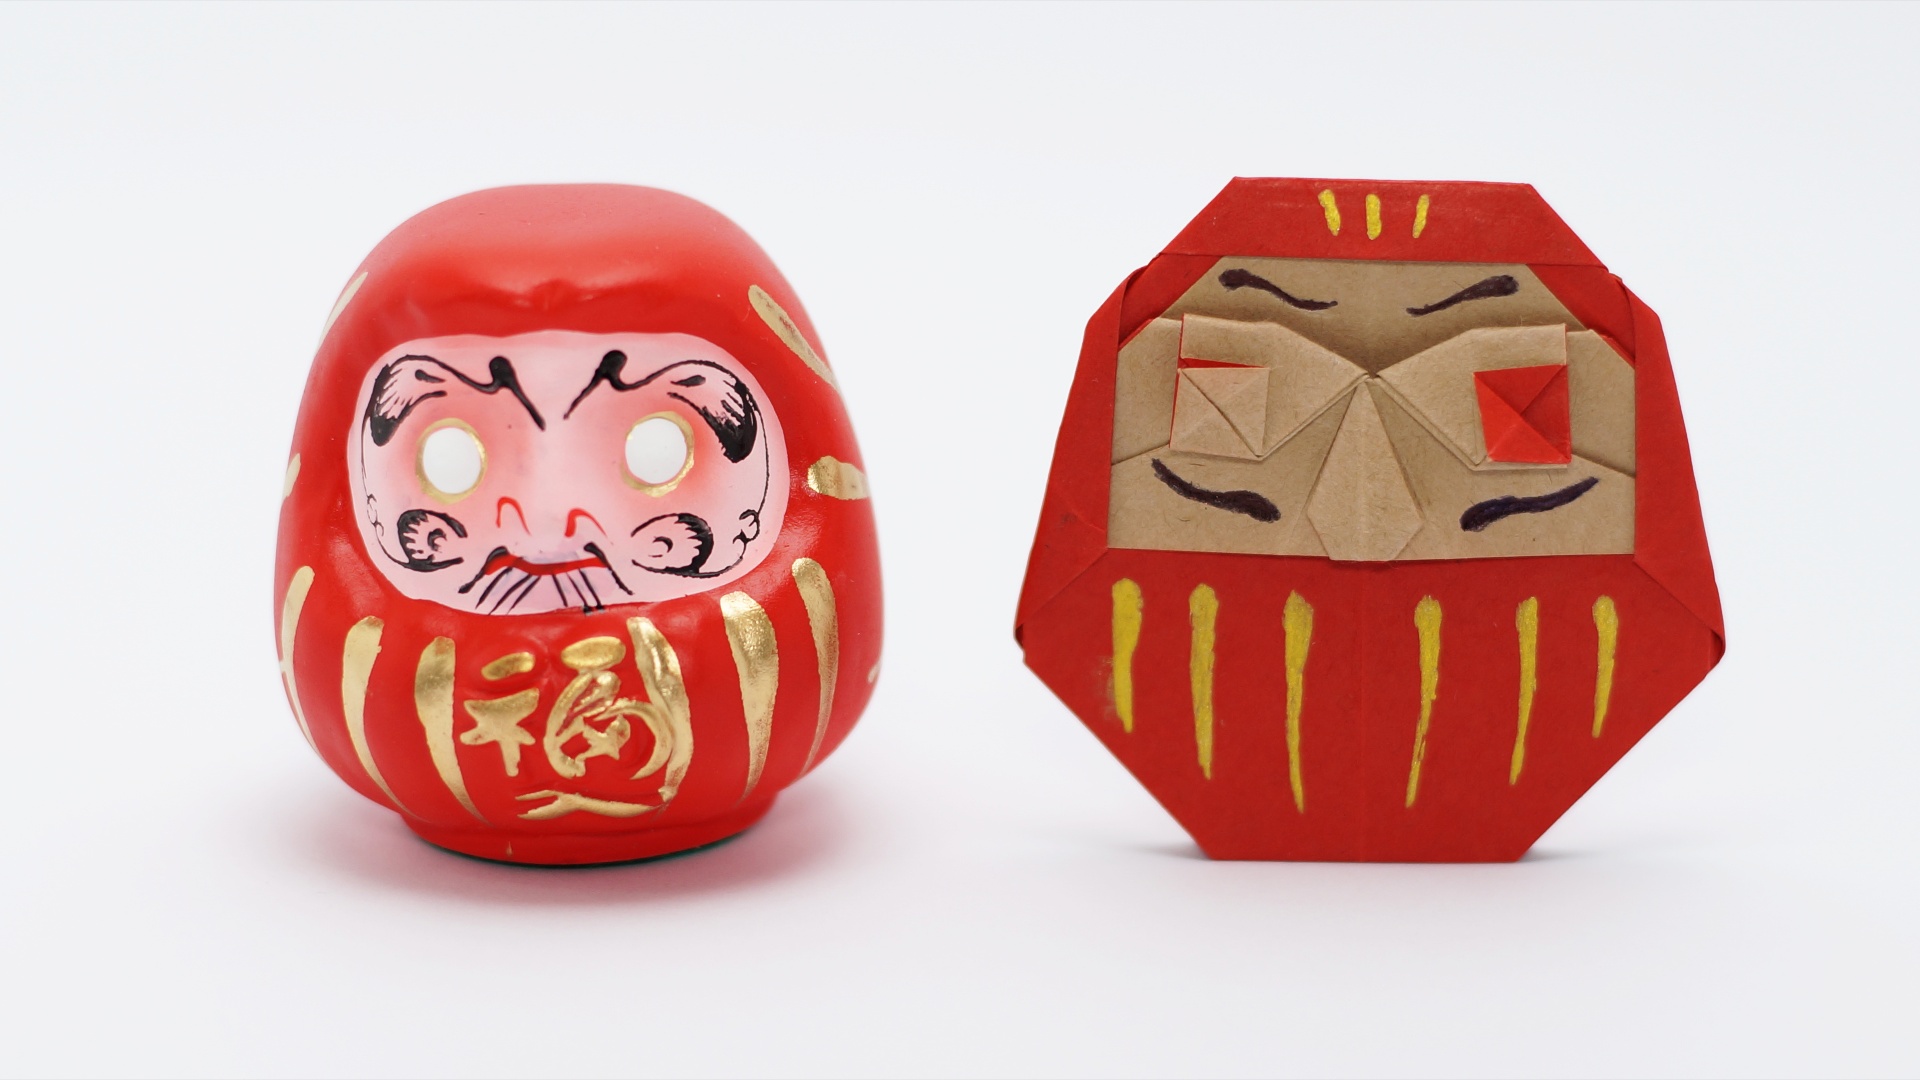
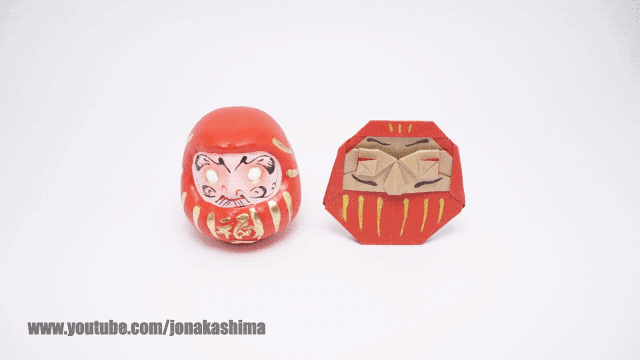
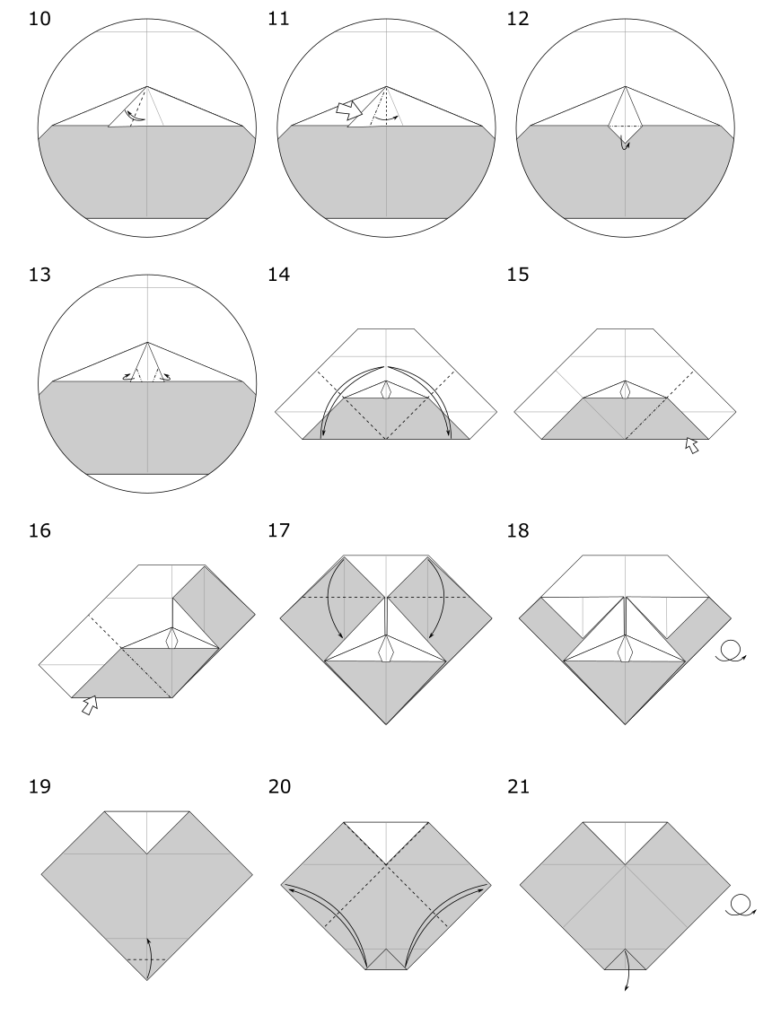
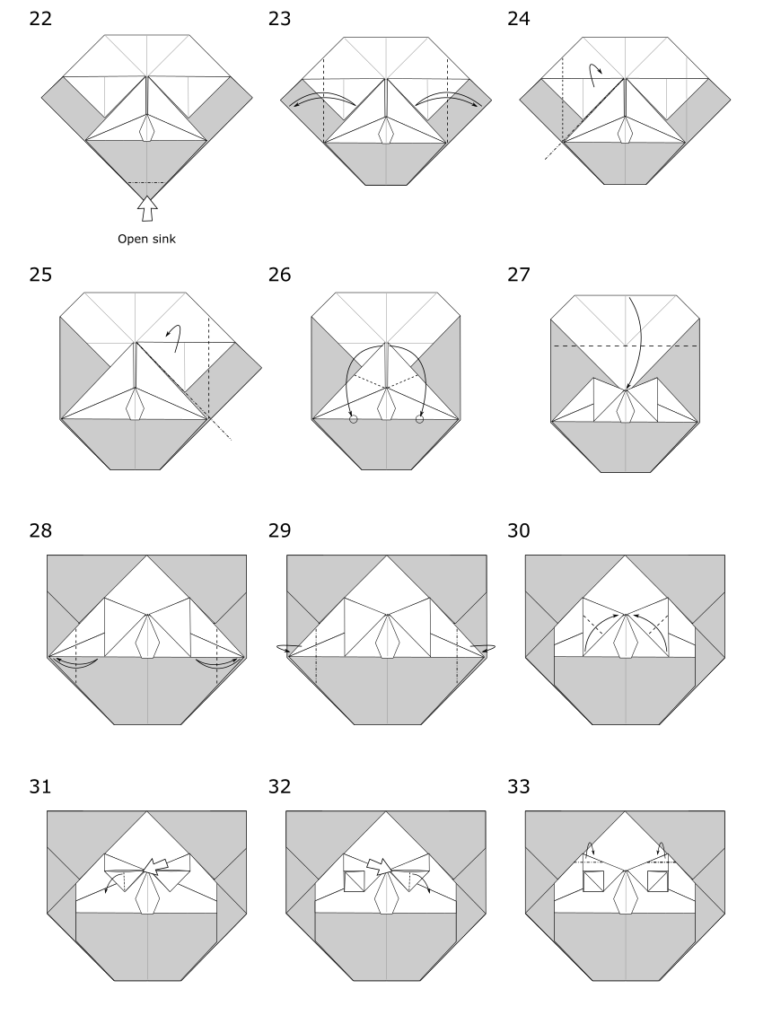
Daruma is a traditional japanese doll, symbol of perseverance and good luck. Fill one eye and make a wish (or set a goal); fill the other one when it is achieved. In this origami Daruma you can fill the eyes by making a simple valley-fold as shown in the gif above! If you like japanese culture, see also the Maneki Neko and the Mount Fuji!
Designed by Jo Nakashima (28/sep/2016) Difficulty level: low intermediate My paper: 15cm x 15cm kraft
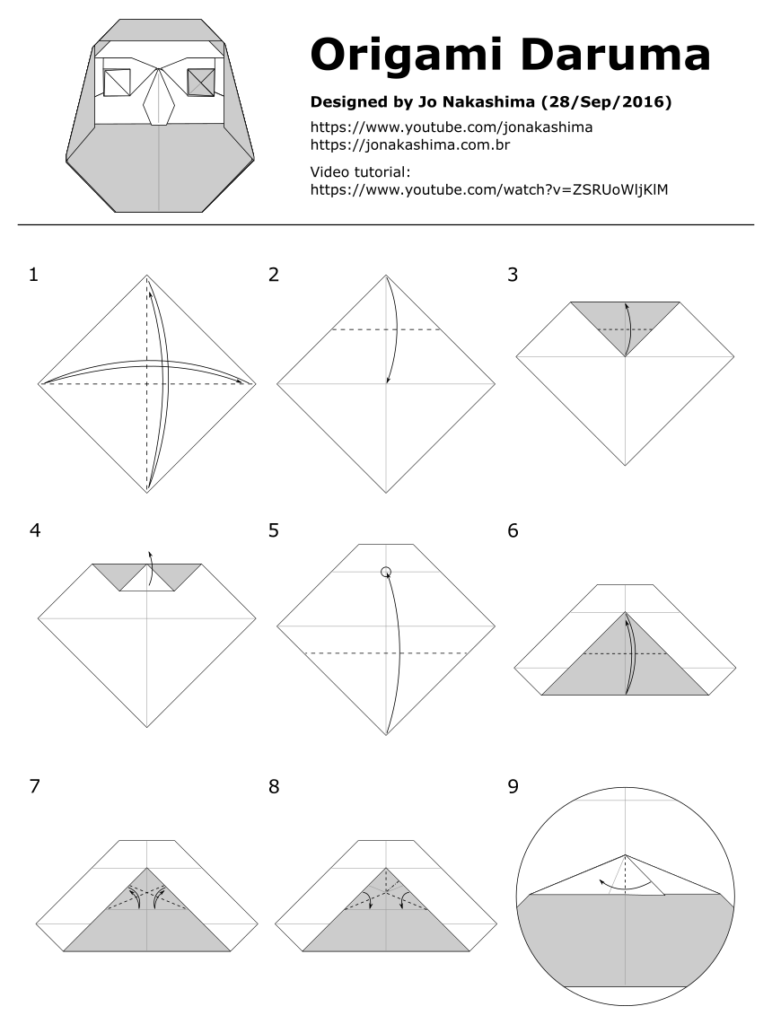
Origami Daruma Tutorial
Origami Daruma Diagrams
Notice: at first I’ve made these diagrams only for the video, not to be published separately. For this reason, some transitions or steps might not be so clear. If you find some step difficult, you can find more detailed instructions in the video tutorial.
Support my work!
If you like my work, please consider visiting and subscribing to my YouTube channel! You’ll find all my work, including models that are not in this website and also models from other origami artists. The easiest way to support my work is simply watching my videos, clicking the like button, leaving comments and subscribing to my channel!
You can also contribute with small donations on Patreon or YouTube Channel Membership. It’s basically like paying me a tip as a thanks for my work and get some rewards in return, like early access to my tutorials and your name in the video (the “thank you” list). They work with recurring payments, but you can cancel anytime so one-time donations are also possible.
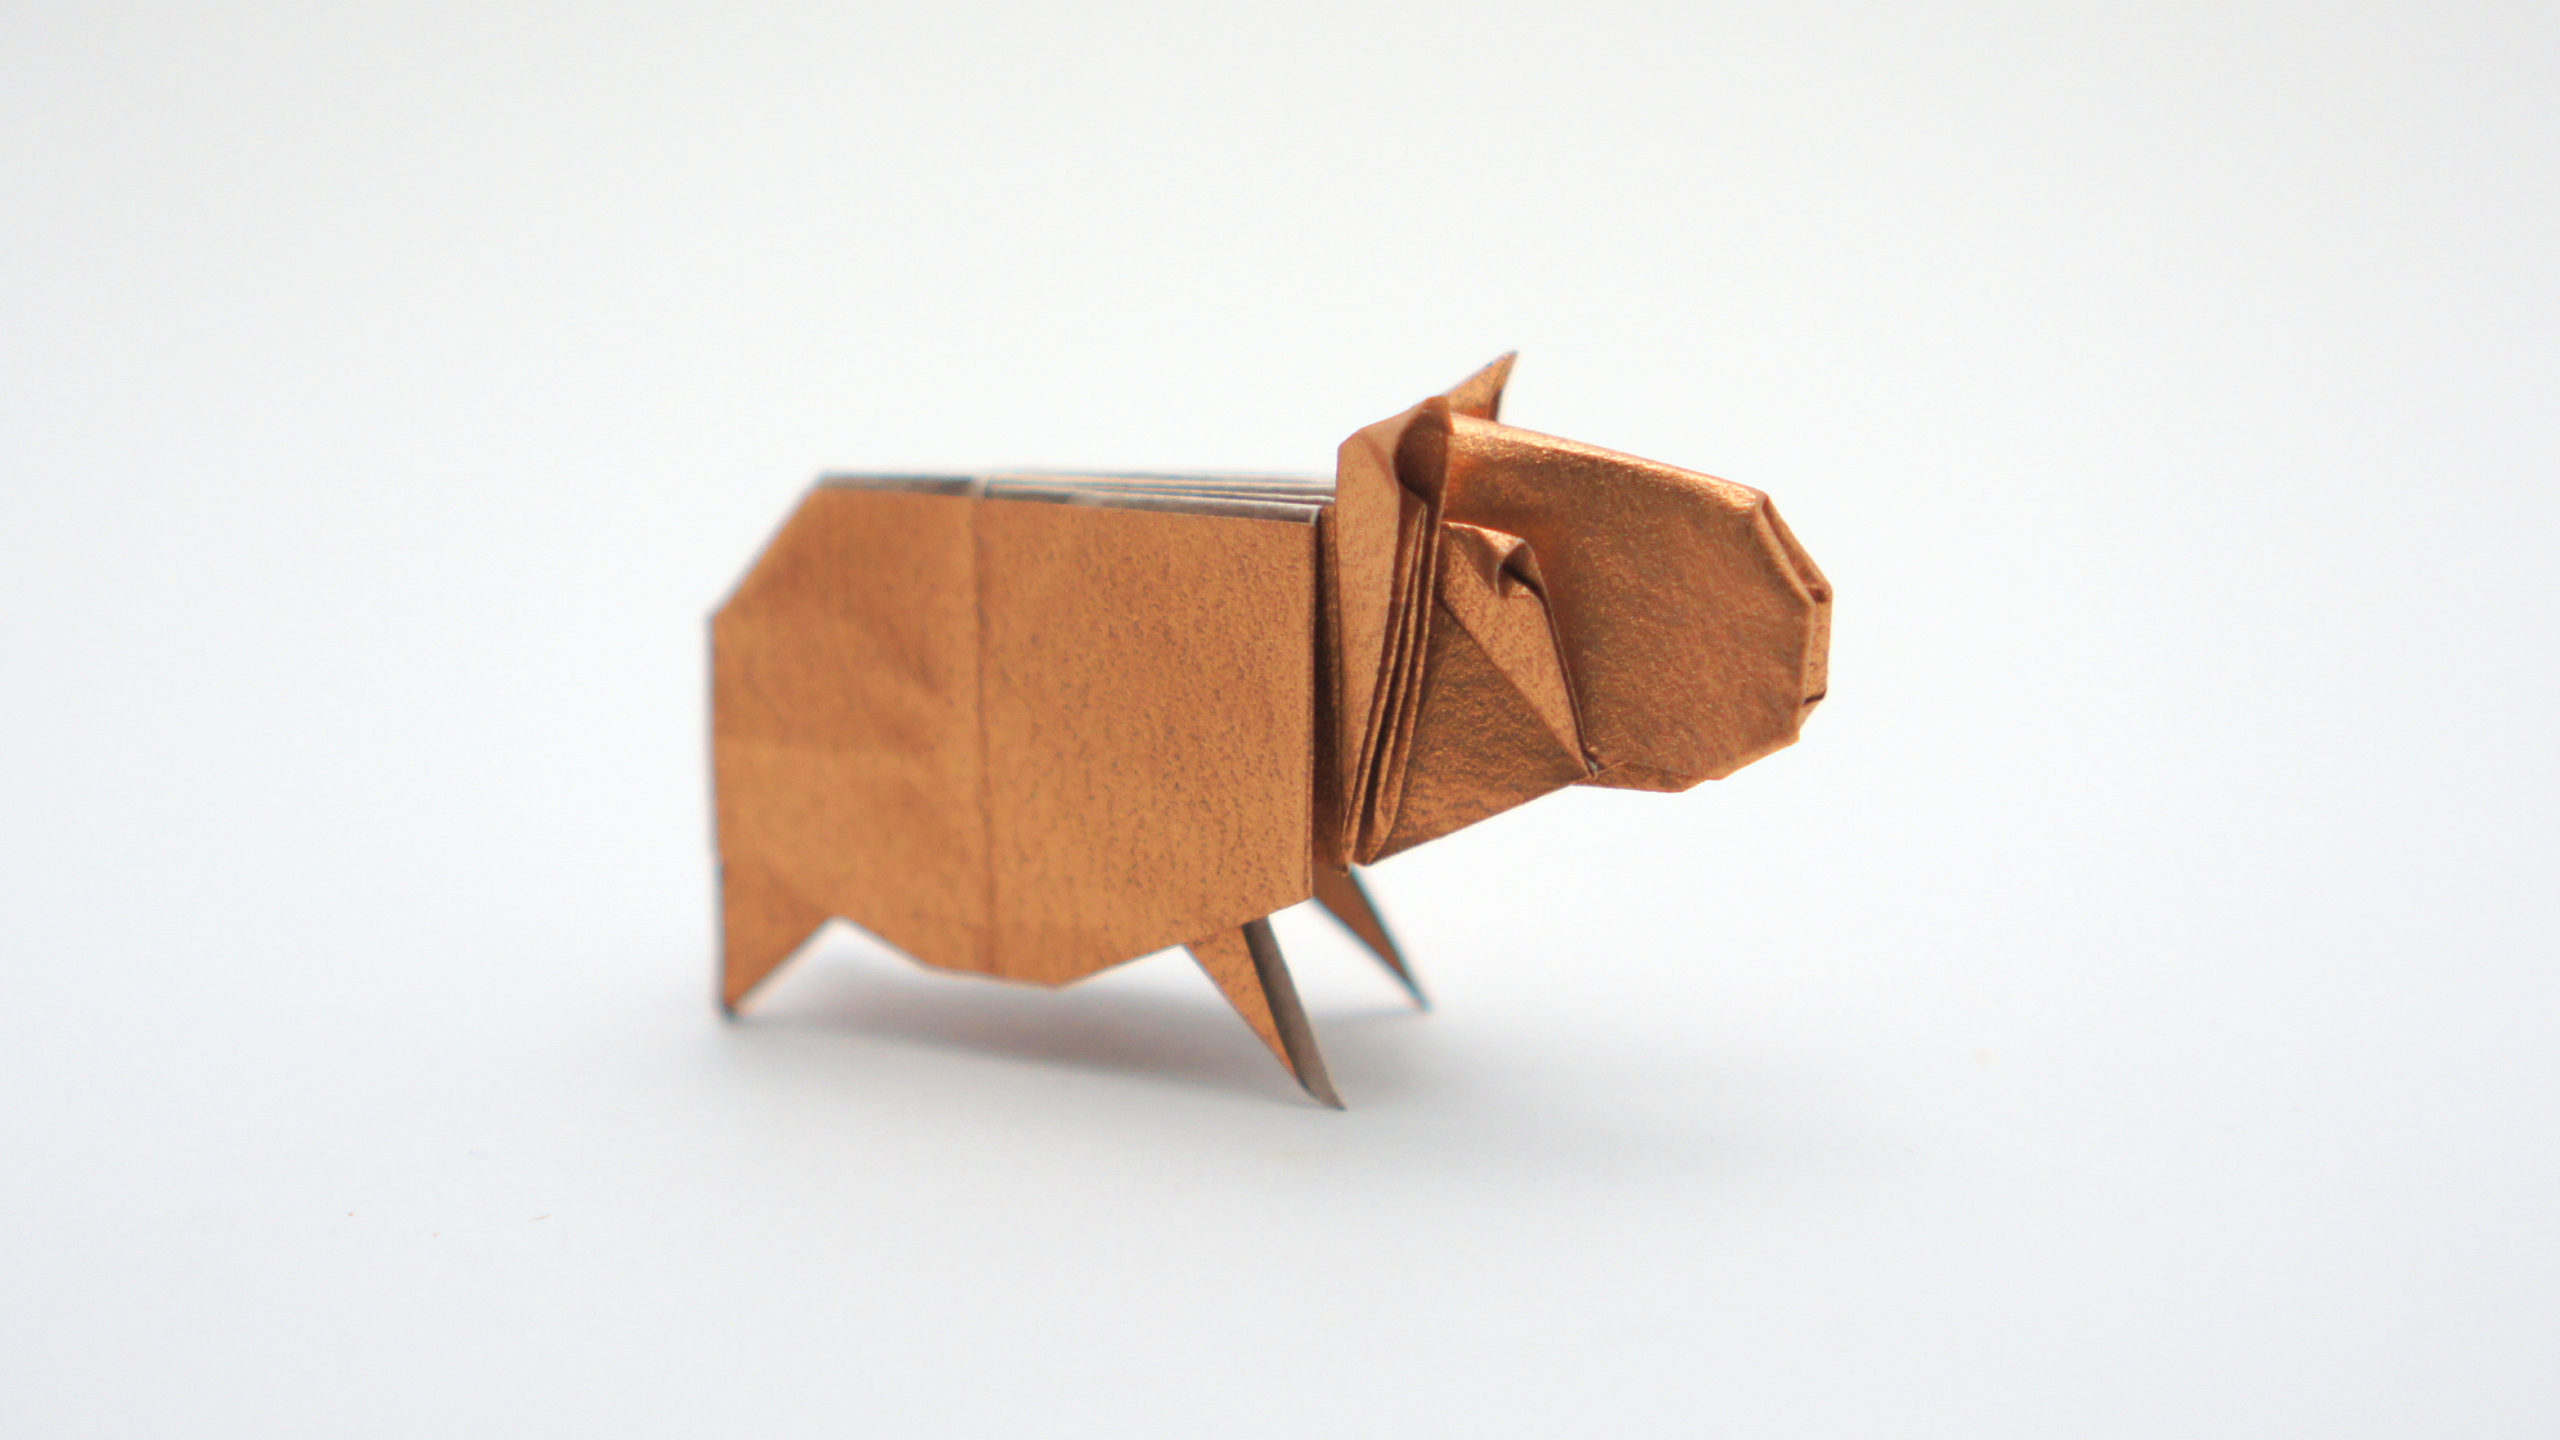
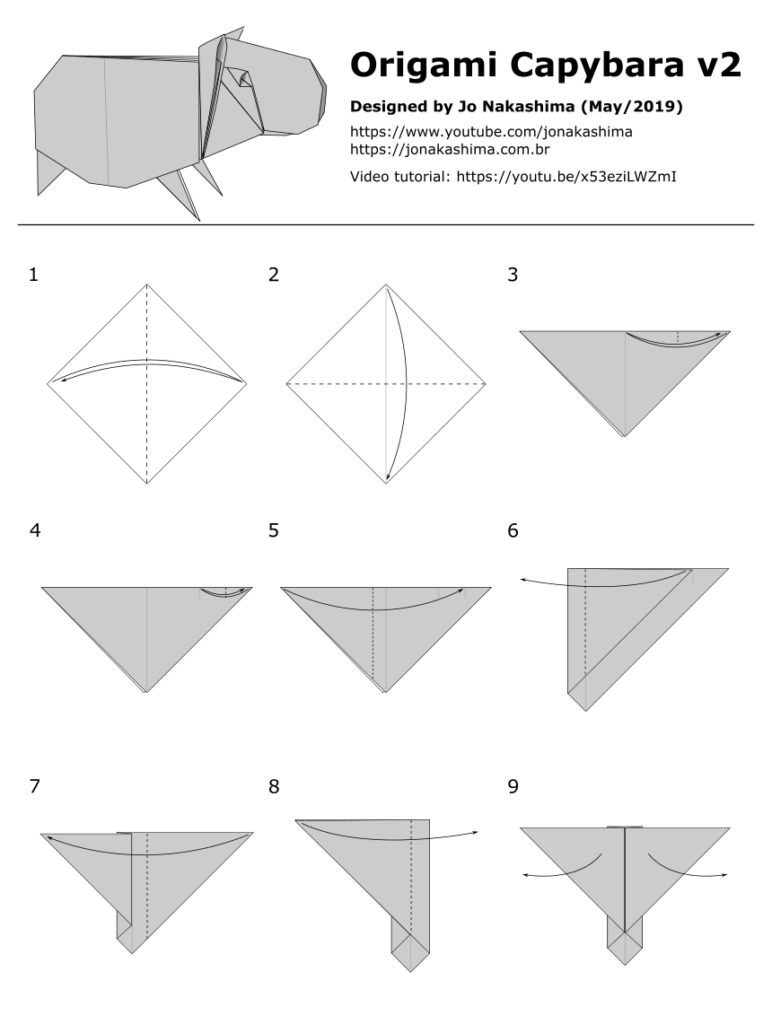
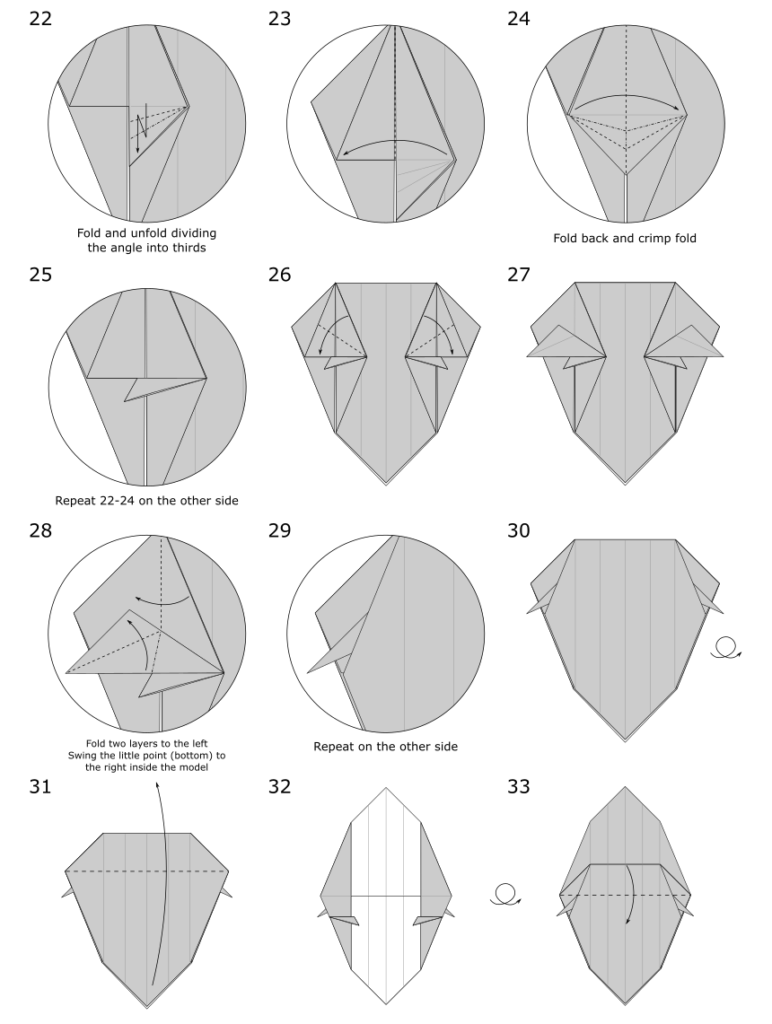
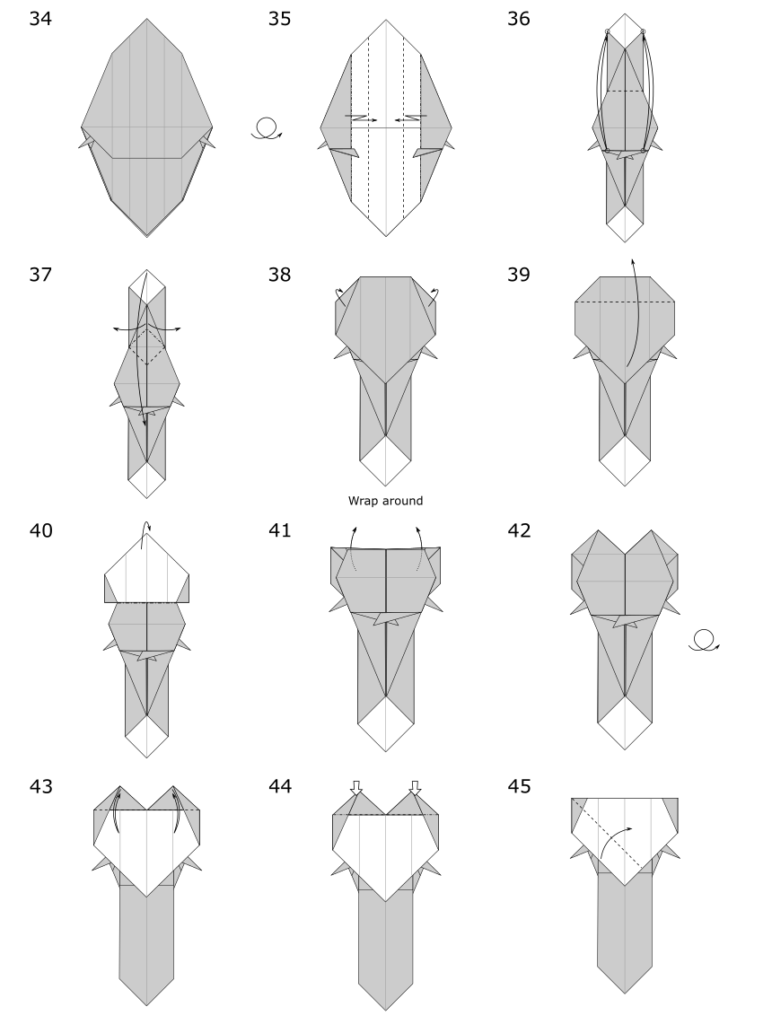
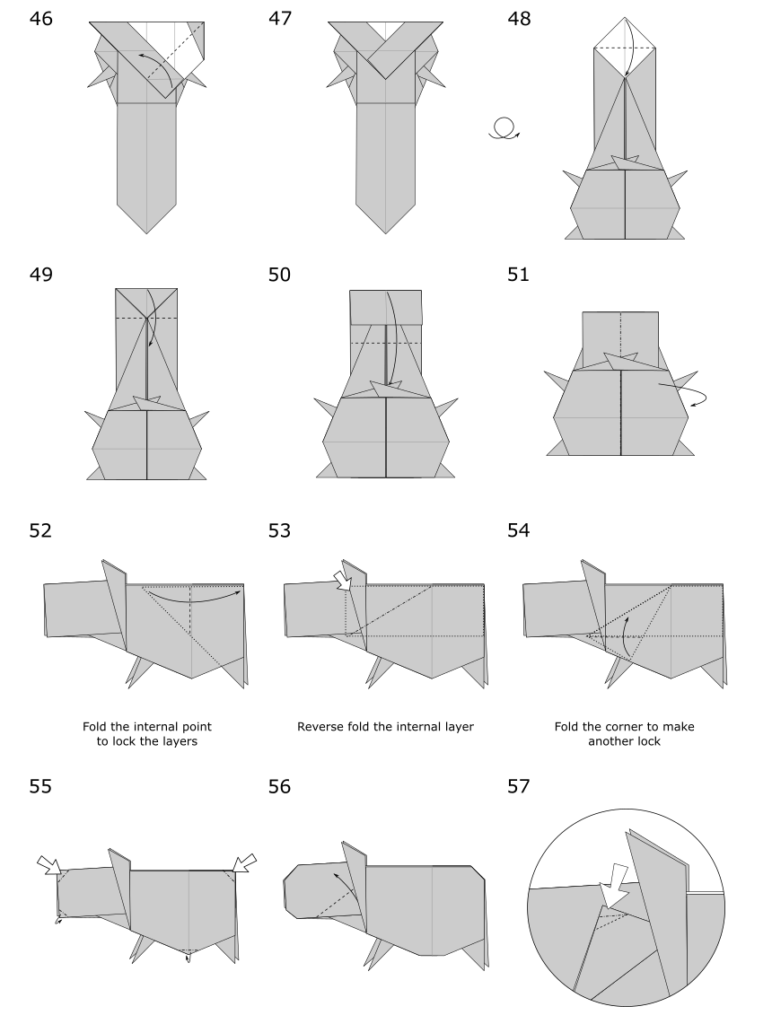
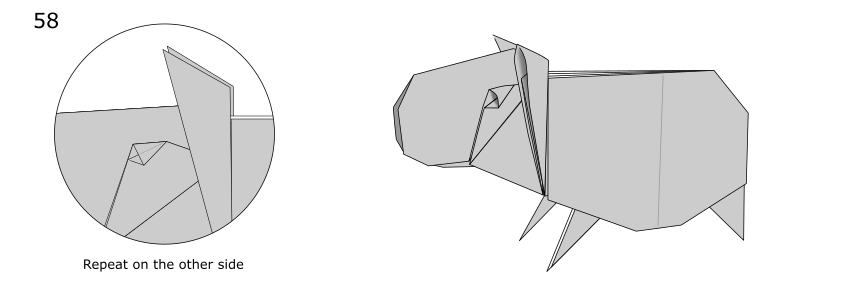
This is an updated version of my origami Capybara originally designed in Jun/2015. The external shape looks the same as the first version, with addition of the eyes. But internally there are more improvements with locks and a better folding sequence.
Designed by Jo Nakashima (Jun/2015 + May/2019) Difficulty level: intermediate Recommended paper size: 20cm x 20cm
Origami Capybara Tutorial
Diagrams
Notice: at first I’ve made these diagrams only for the video, not to be published separately. For this reason, some transitions or steps might not be so clear. If you find some step difficult, you can find more detailed instructions in the video tutorial.
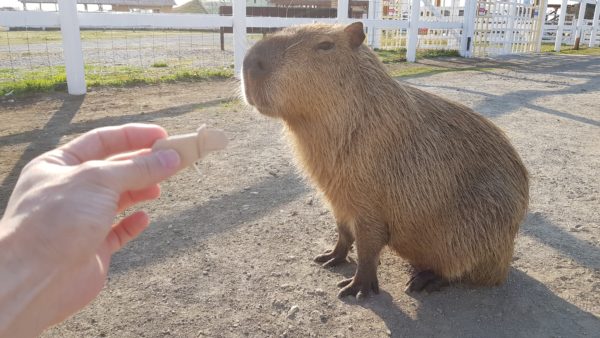
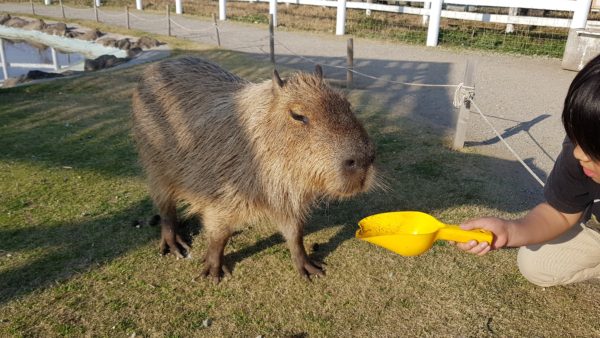
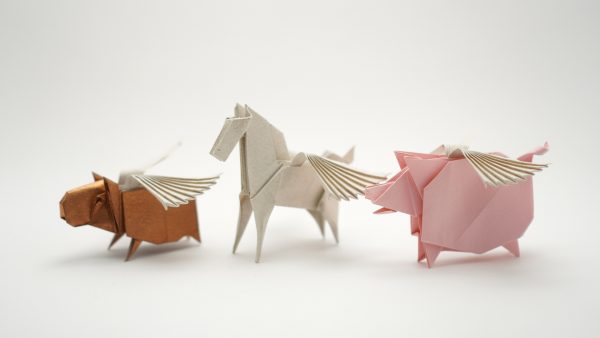
Some pictures
The capybara is the largest living rodent in the world. They are common in South America, but people from other parts of the world might be unfamiliar with them.
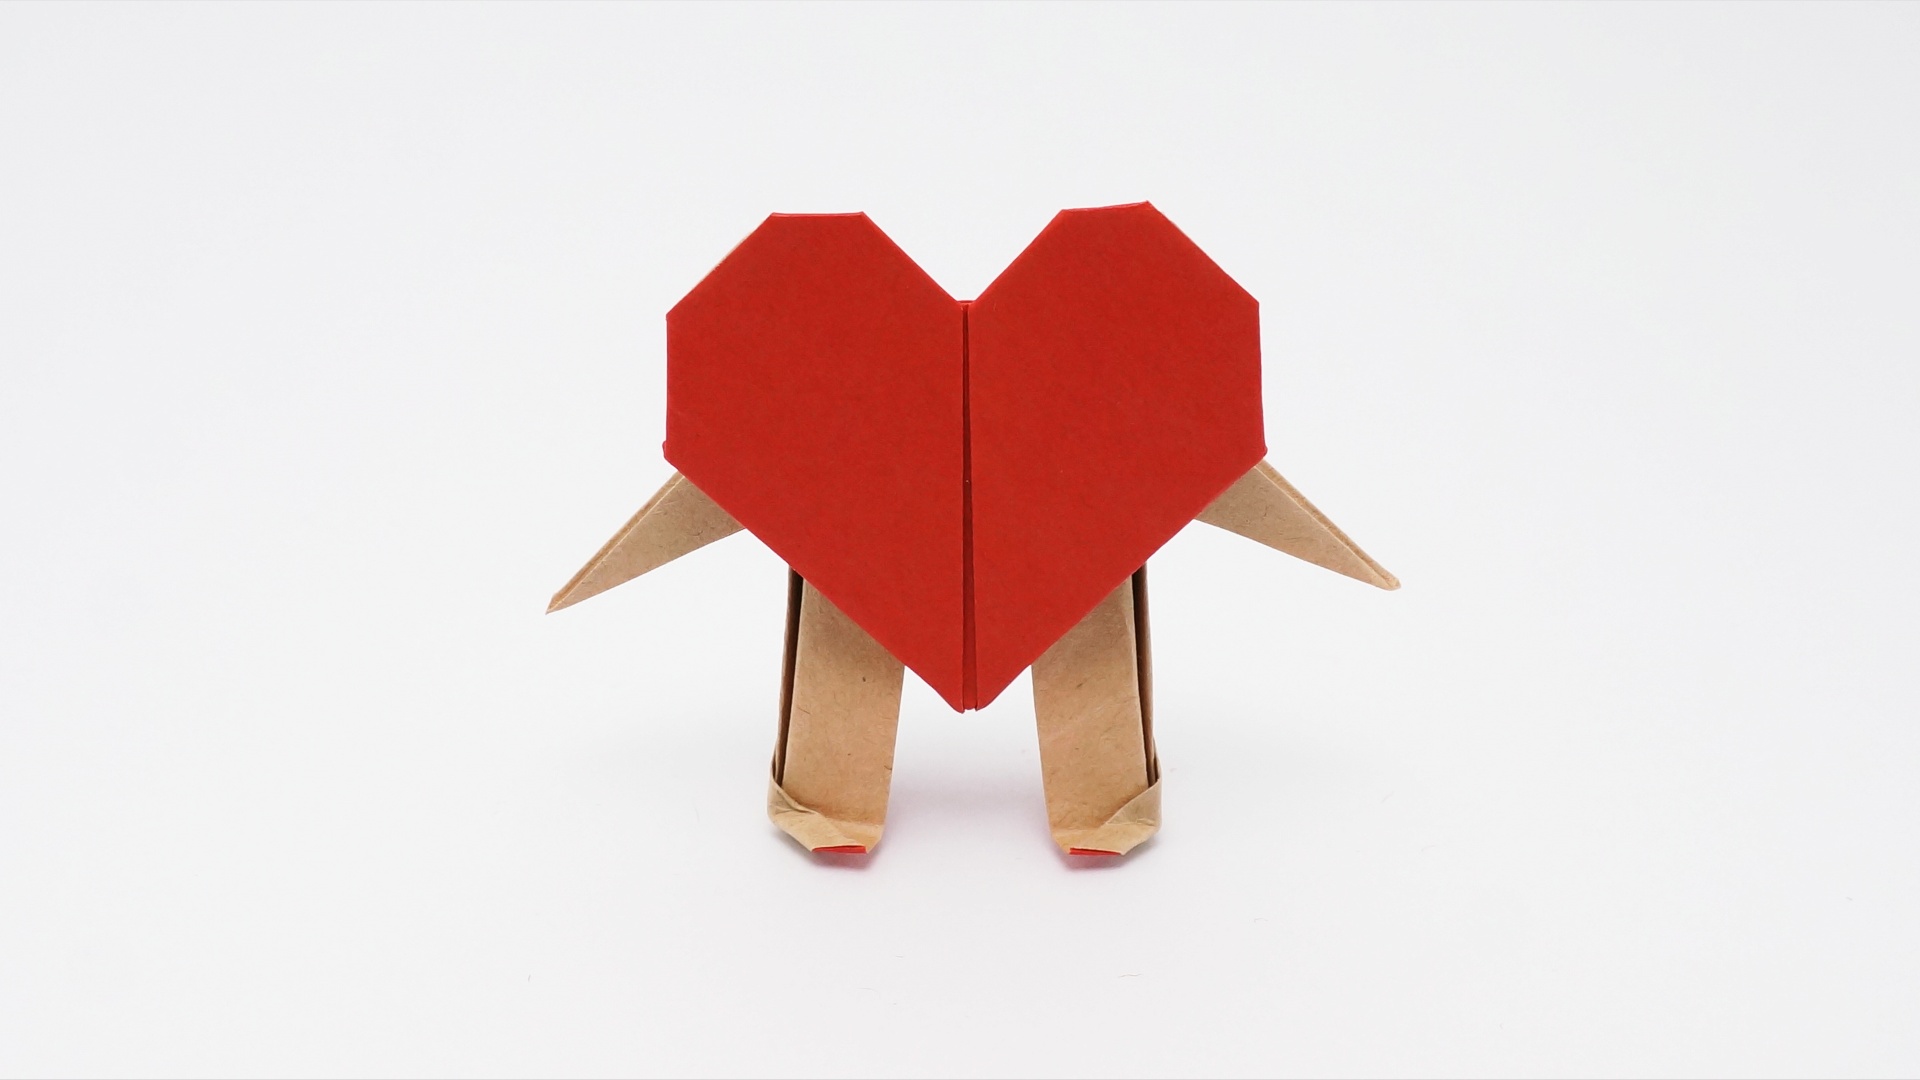
Showing my origami capybara to a non origami capybaraOne more picture because they’re really cuteYou can attach origami Wings
Support my work!
If you like my work, please consider visiting and subscribing to my YouTube channel! You’ll find all my work, including models that are not in this website and also models from other origami artists. The easiest way to support my work is simply watching my videos, clicking the like button, leaving comments and subscribing to my channel!
You can also contribute with small donations on Patreon or YouTube Channel Membership. It’s basically like paying me a tip as a thanks for my work and get some rewards in return, like early access to my tutorials and your name in the video (the “thank you” list). They work with recurring payments, but you can cancel anytime so one-time donations are also possible.
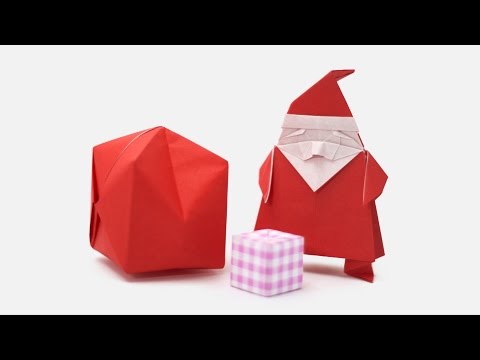
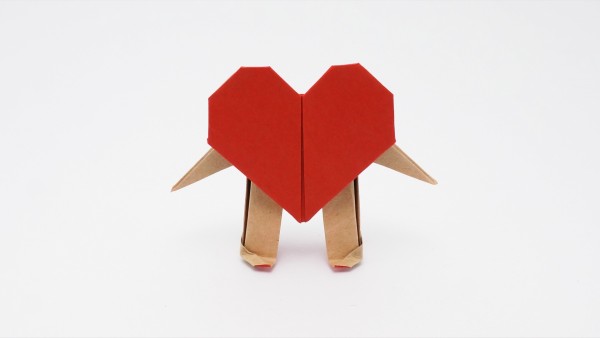
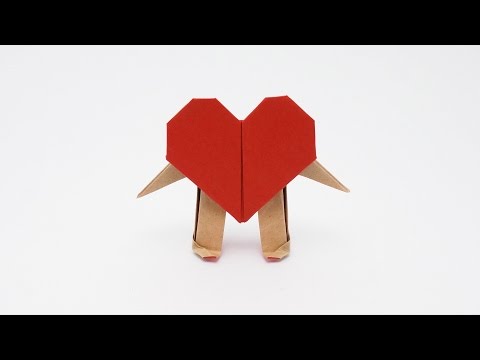
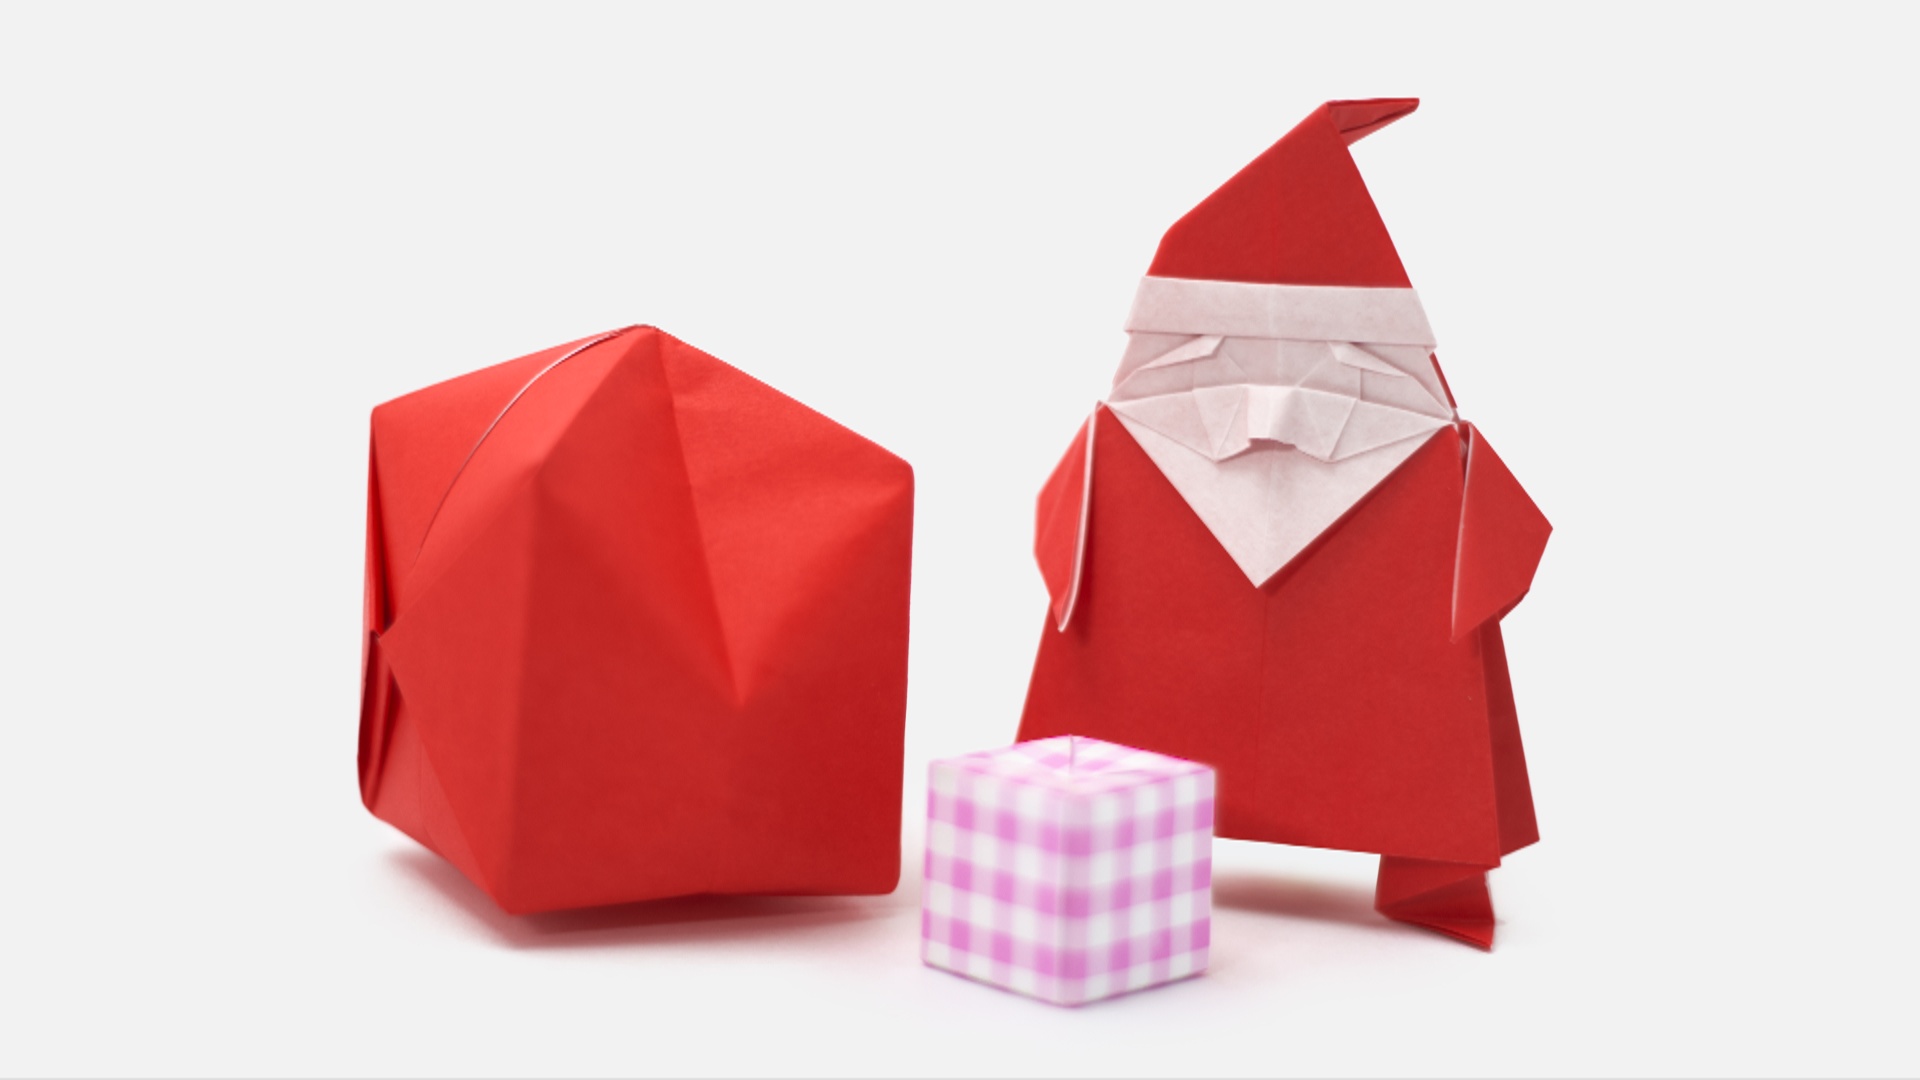
I’ve created a simple origami Santa Claus. You can use a traditional origami Waterbomb as the bag and the Pandora’s Box as a gift box. See also other models for Christmas on my playlist!
Designed by Jo Nakashima & Camila Zeymer (07/Nov/2015) Difficulty level: simple Recommended paper size: 15cm x 15cm Diagrams:download [PDF]
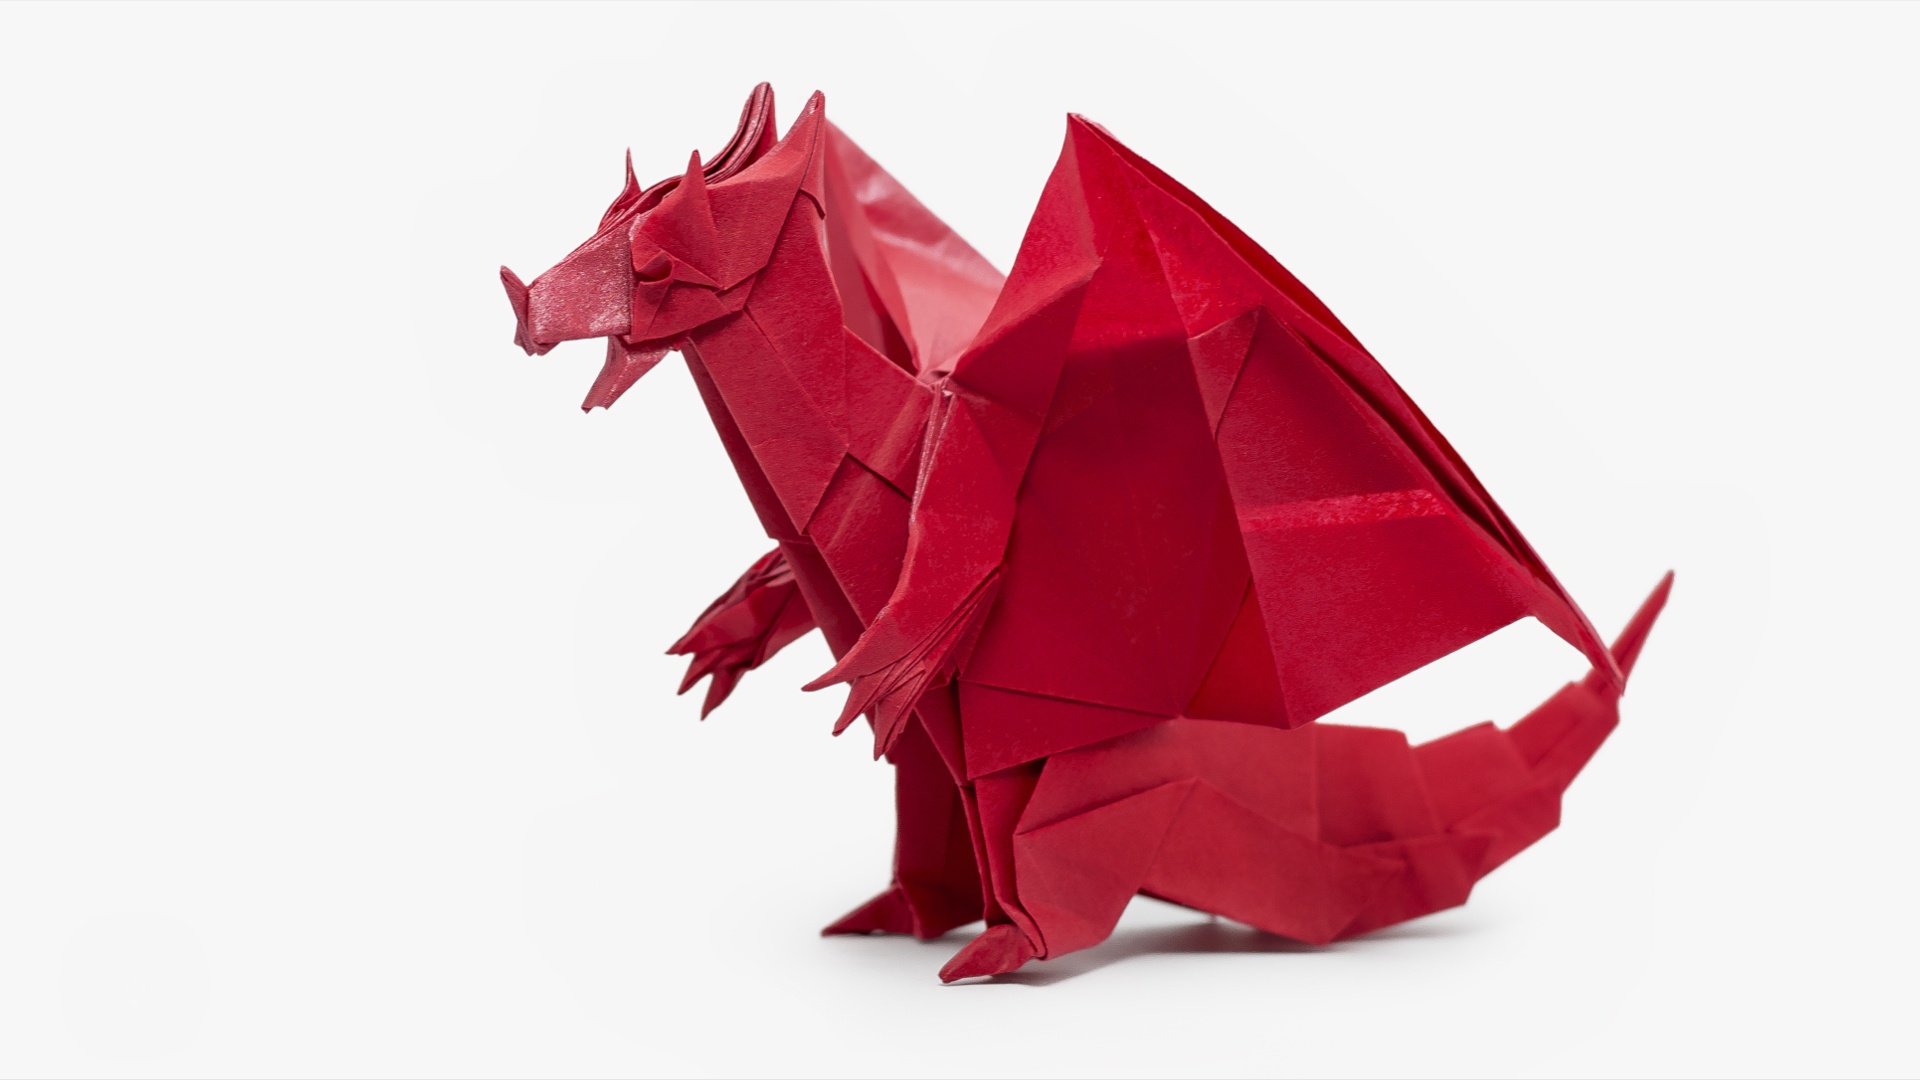
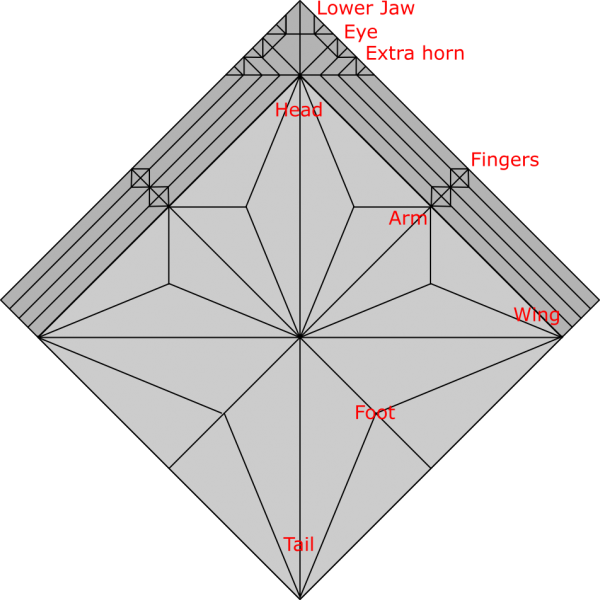
How to make the origami Devil Dragon Designed by Jo Nakashima (2015/09) Difficulty level: complex
The origami Devil Dragon is the evolution of my other origami dragons. I like it a lot specially because of the expression on his face. Now it has fingers, spikes on the tail, extra horns, eyes, improved lower jaw and larger wings.
Paper
In the video tutorial I start with 20cm x 20cm sheet of paper to show only the first steps, then I switch to 40cm x 40cm.
I’m using Red Tissue-foil, but this model doesn’t requires special paper if you use a sheet large enough (I recommend at least 40cm x 40cm). The eyes and the spikes on the tail can be a bit tricky to make if you use a small sheet.
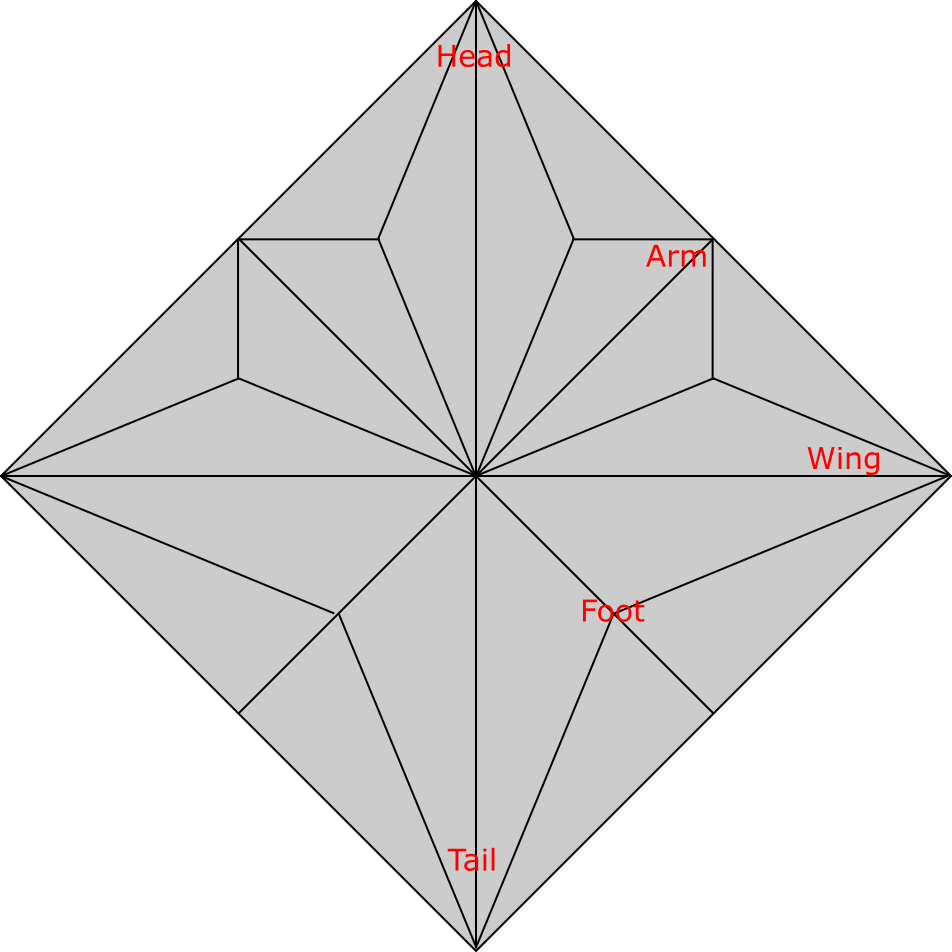
Crease Pattern
You can see how it evolved from my previous Dragon in the crease patterns below.
Dragon CP
Devil Dragon CP
The initial base is very simple, it is basically a mix of the bird base and the frog base. By “adding” some extra paper (the darker area at the top of the crease pattern) I managed to create all the extra features. This technique is called “border grafting” (to learn more about origami design I recommend the book Origami Design Secrets, by Robert J. Lang).
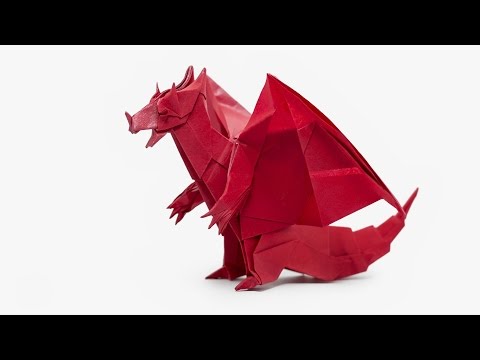
Time-lapse
The tutorial is almost one hour long, but you can have an idea of the process in this time-lapse:
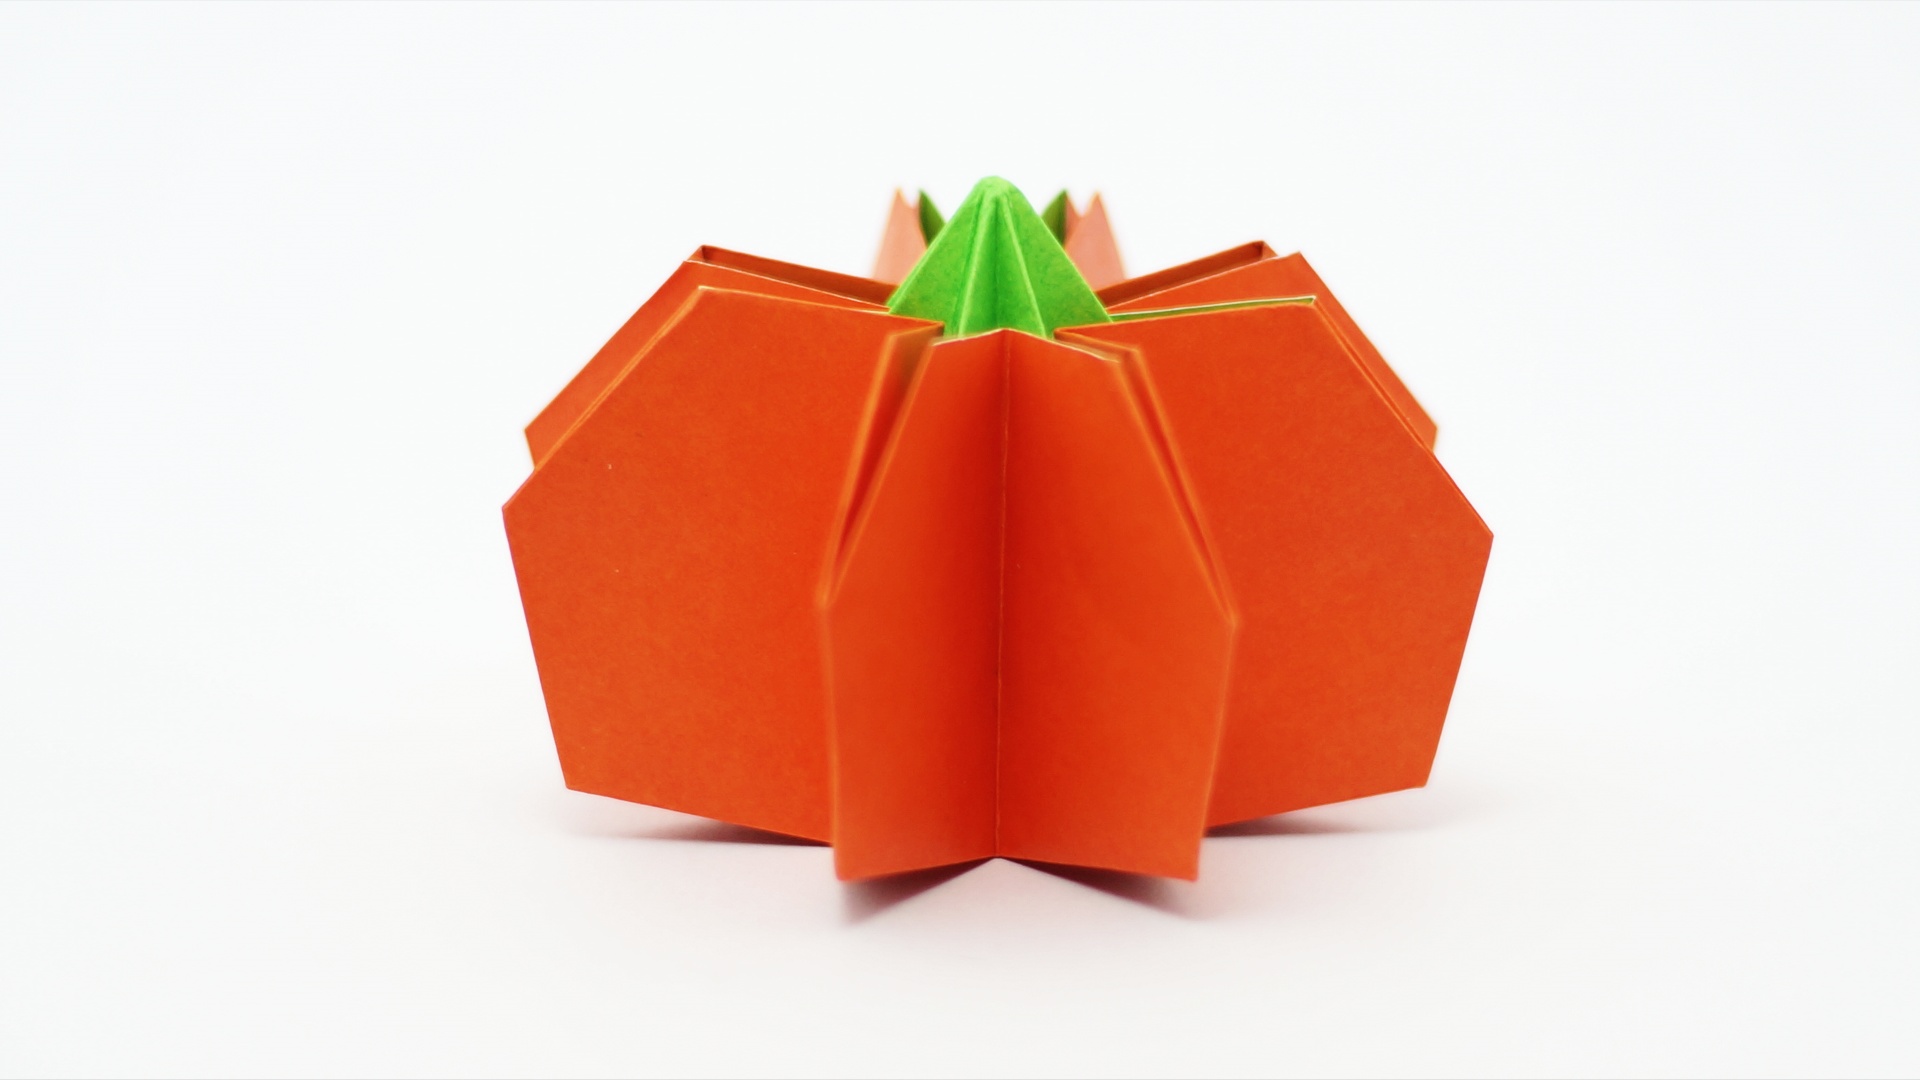
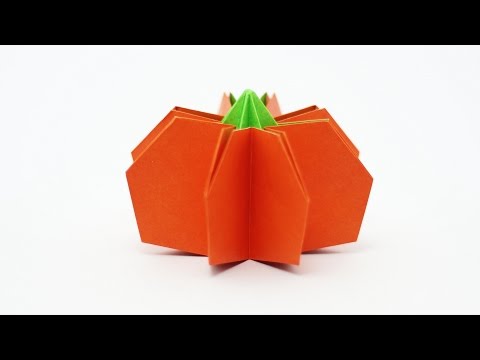
Learn how to make a simple origami pumpkin for Halloween from a square base.
Designed by Jo Nakashima (07/Oct/2015) Difficulty level: simple Recommended paper size: 15cm x 15cm My paper: standard origami paper Diagrams:download [PDF]
Origami Pumpkin color change
This model makes use of both sides of paper, if you don’t have the right colors you can use an additional green sheet of paper just to change the color of the top. The video below shows how to make it in more detail.
Support my work!
If you like my work, please consider visiting and subscribing to my YouTube channel! You’ll find all my work, including models that are not in this website and also models from other origami artists. The easiest way to support my work is simply watching my videos, clicking the like button, leaving comments and subscribing to my channel!
You can also contribute with small donations on Patreon or YouTube Channel Membership. It’s basically like paying me a tip as a thanks for my work and get some rewards in return, like early access to my tutorials and your name in the video (the “thank you” list). They work with recurring payments, but you can cancel anytime so one-time donations are also possible.
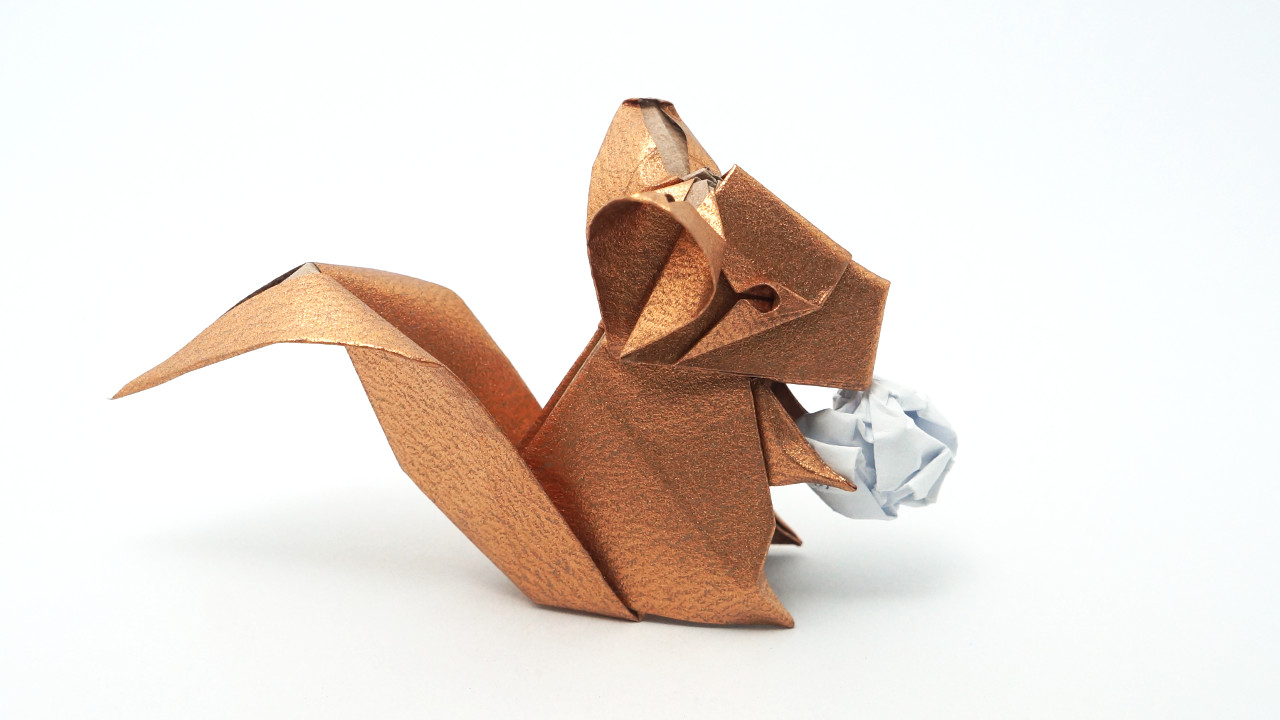
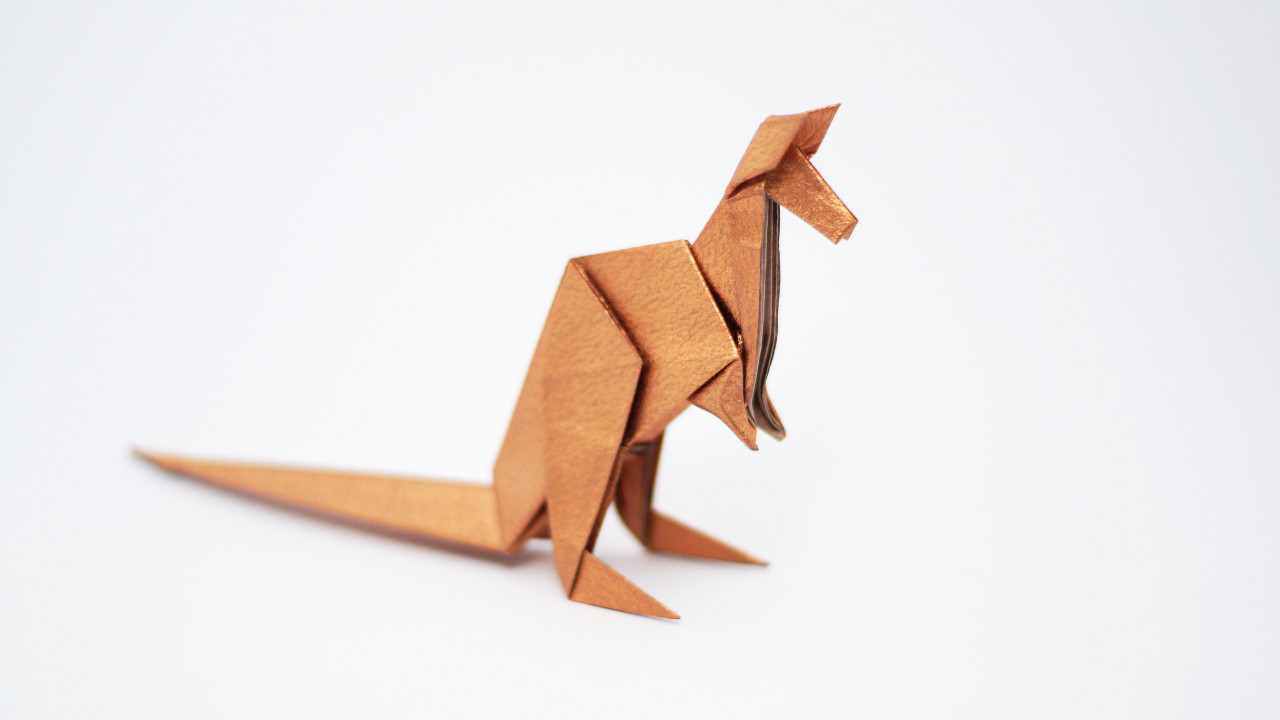
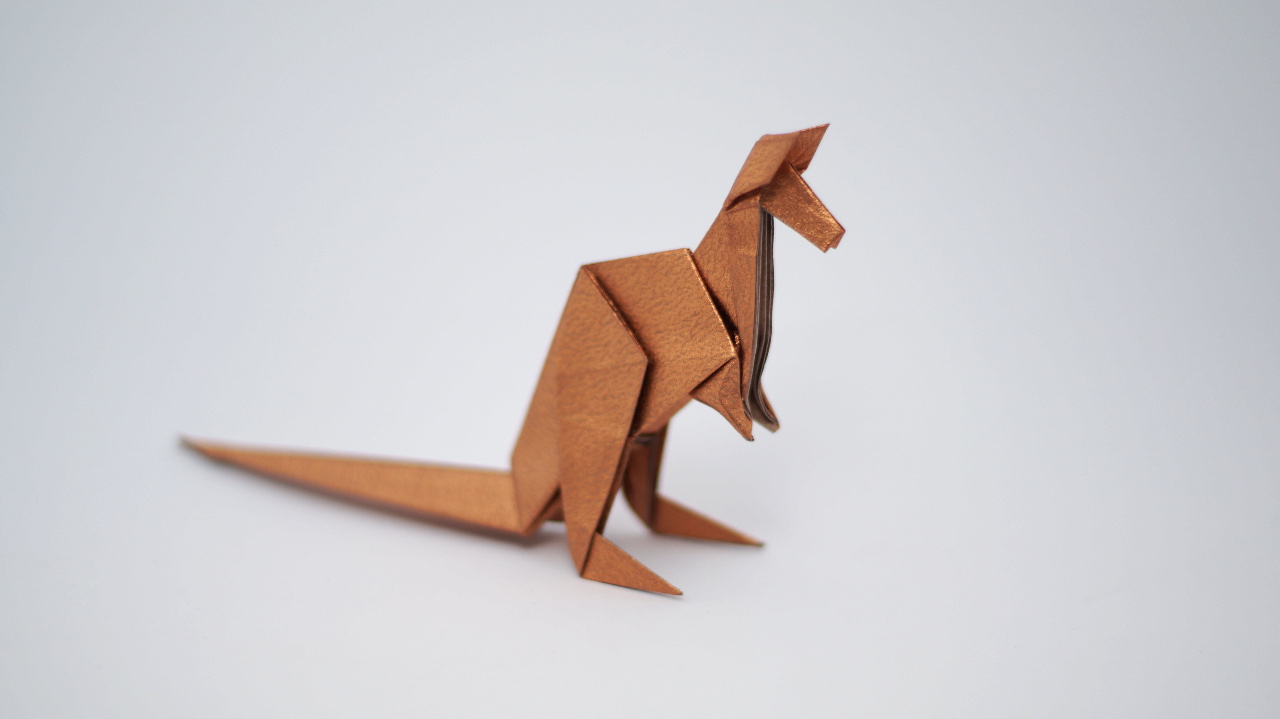
Designed by Jo Nakashima (13/Set/2015) Difficulty level: low intermediate Recommended paper size: 20cm x 20cm My paper:Copper Tissue-foil (special paper is not required) Diagrams:download [PDF]
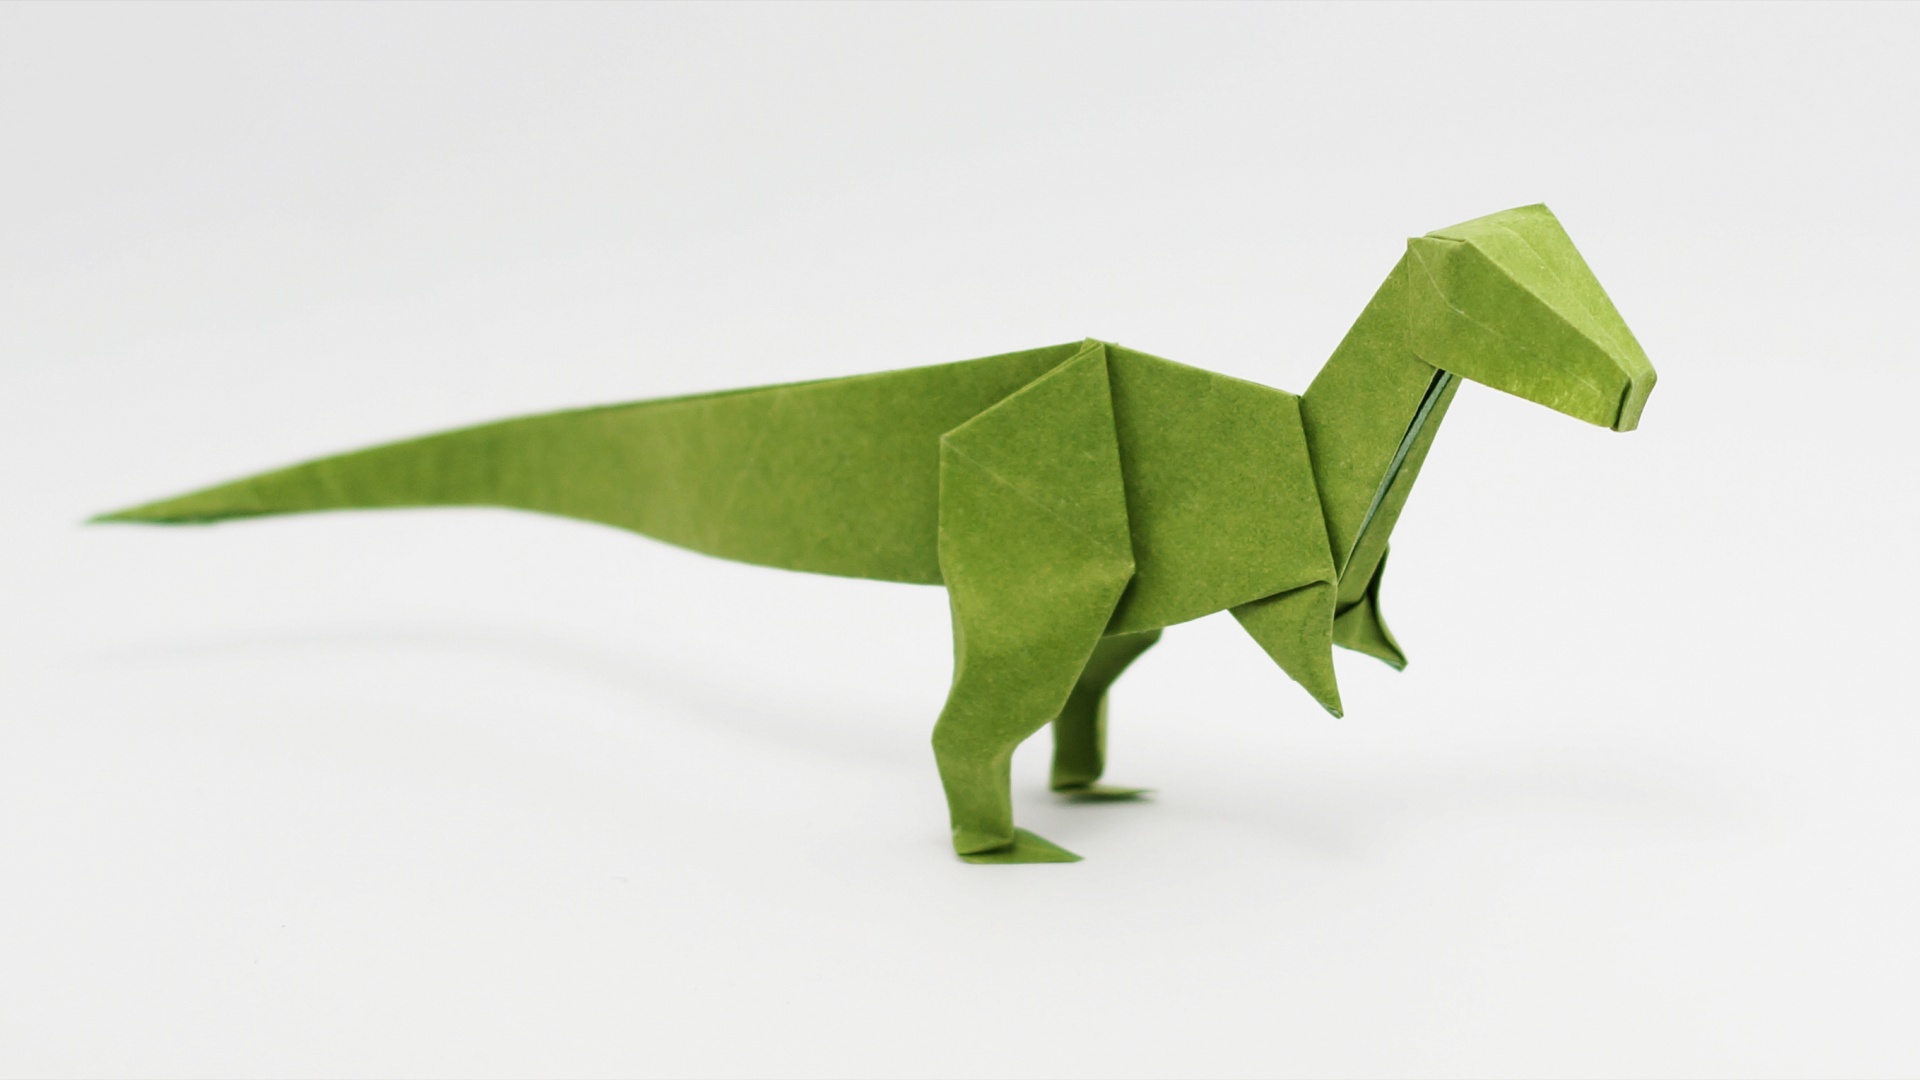
Learn how to make an origami Velociraptor Designed by Jo Nakashima (19/Jul/2015) Difficulty level: intermediate
This model and my origami T-Rex are very similar because I’ve created both dinosaurs from the same base. The velociraptor has longer tail/arms and smaller head.
I’m very satisfied with this model and I think it’s much better than the T-Rex: it holds the shape well and it can even stand on his feet without tail support, if you use a good paper. Another great feature is the head: you can make it flat or with a nice 3D shape!
In the video tutorial I’m using 20cm x 20cmGreen Tissue-foil. This paper has a beautiful texture and holds the creases very well. However, special paper isn’t required and you can use even smaller sheets like 10cm x 10cm origami paper to fold this dinosaur.
Diagrams
Origami Velociraptor diagrams available to download. If you have any trouble, watch the video tutorial!
Help video
There is one step to make the head (9:14) where people sometimes find difficult to make. All you need to do is a reverse fold using the existing creases, but there are so many folds at the same time that it can be confusing for beginners. If you got stuck in this step, watch this video: